
Quotes in customer accounts
Show quotes inside Shopify's new customer accounts, translate the section, and set what signed-in customers may do with their quotes.
Quotes can appear inside the account area customers already use to check their orders, instead of only on a separate storefront page. Everything for this sits under the Customer account item in the app navigation.
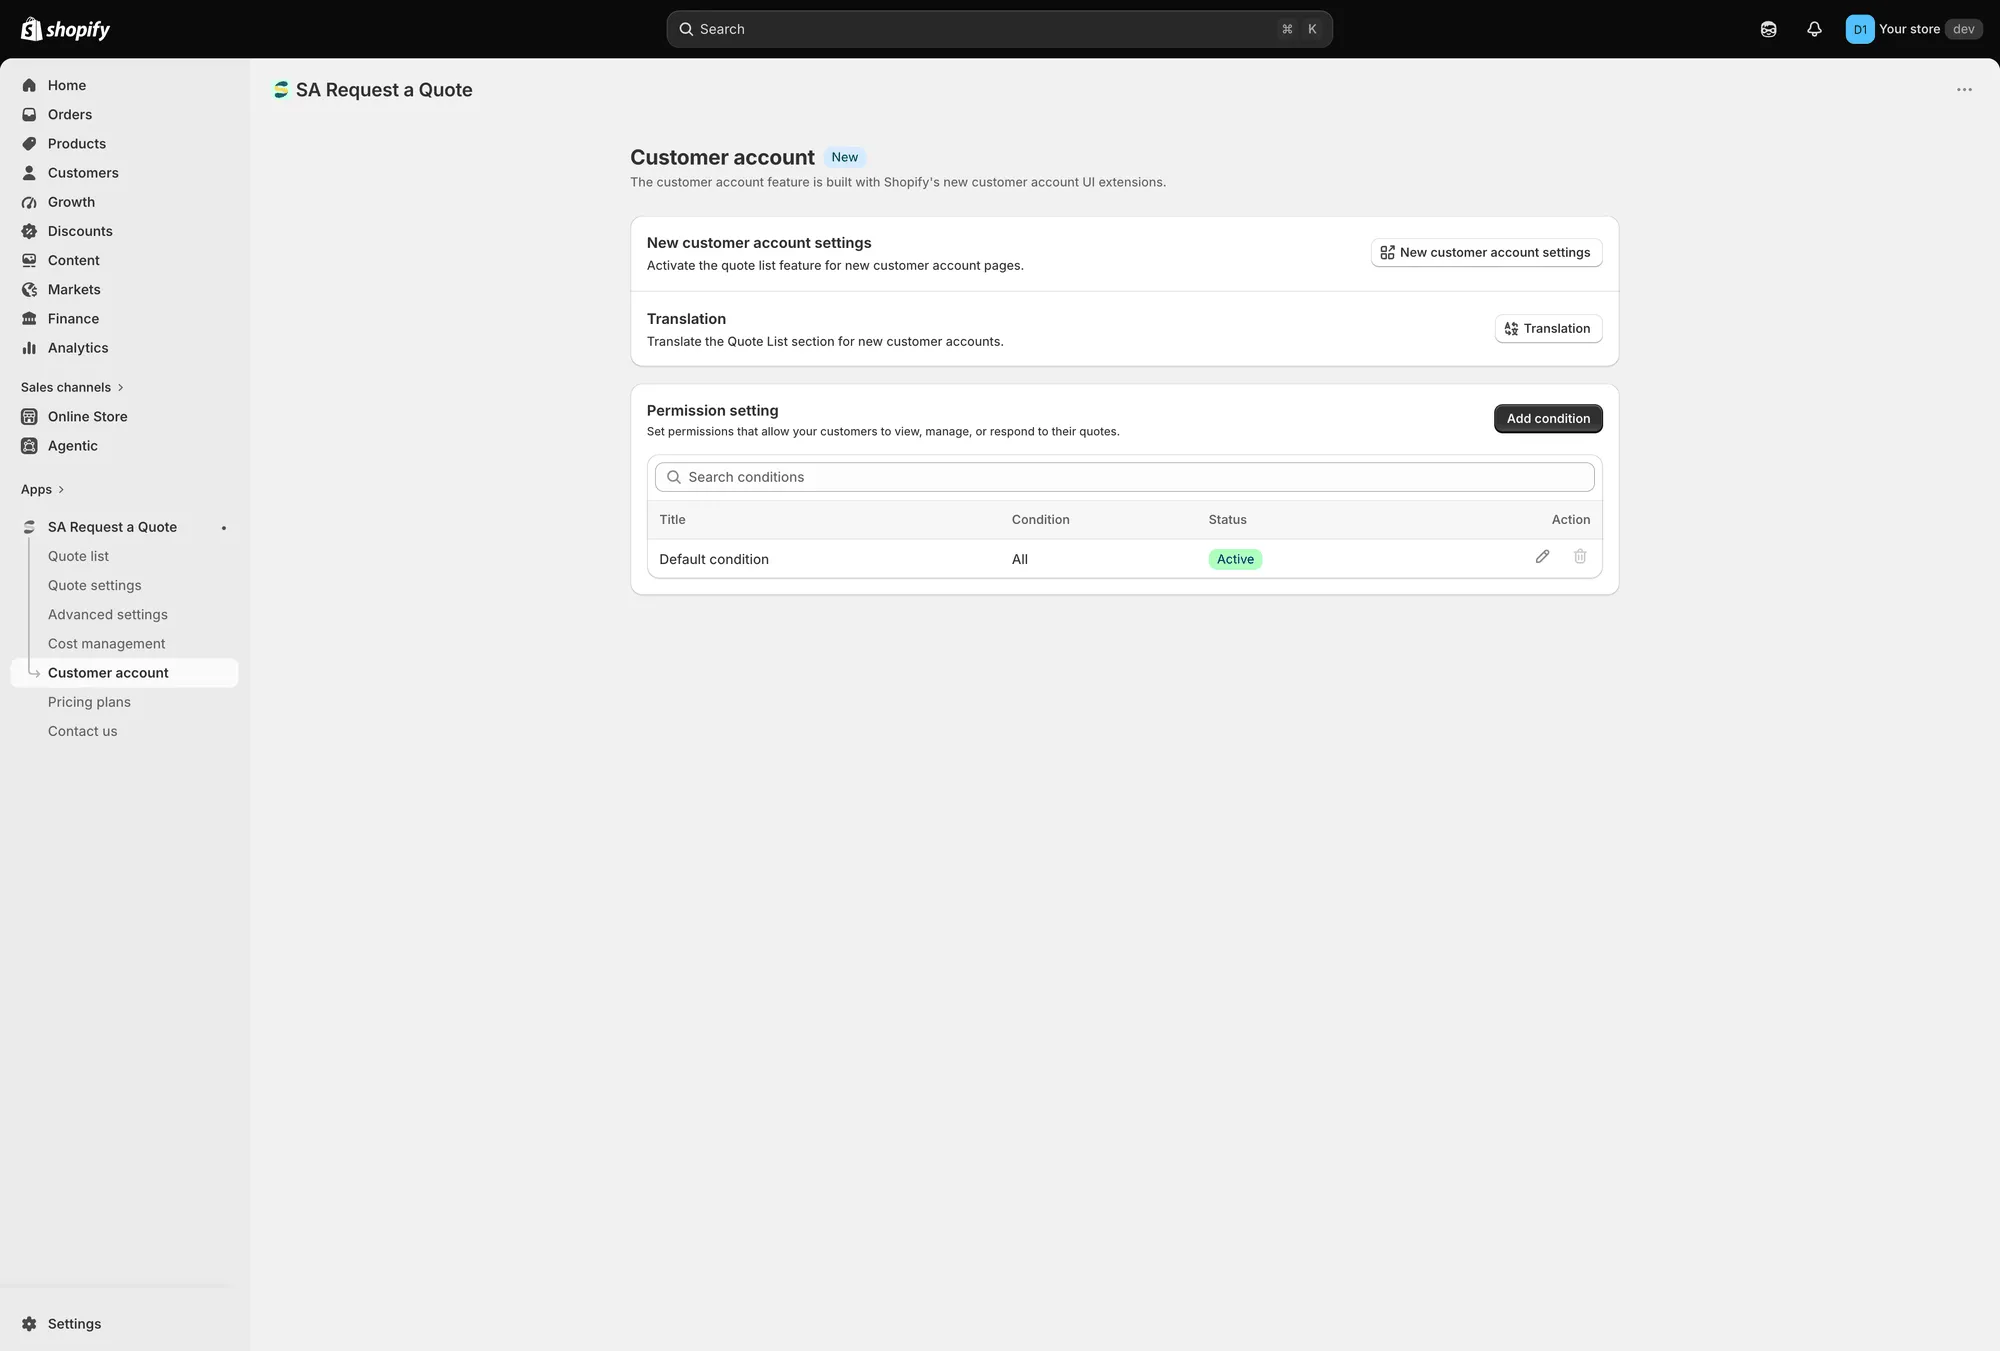
The Customer account page holds all three settings.
What is on the page
Section titled “What is on the page”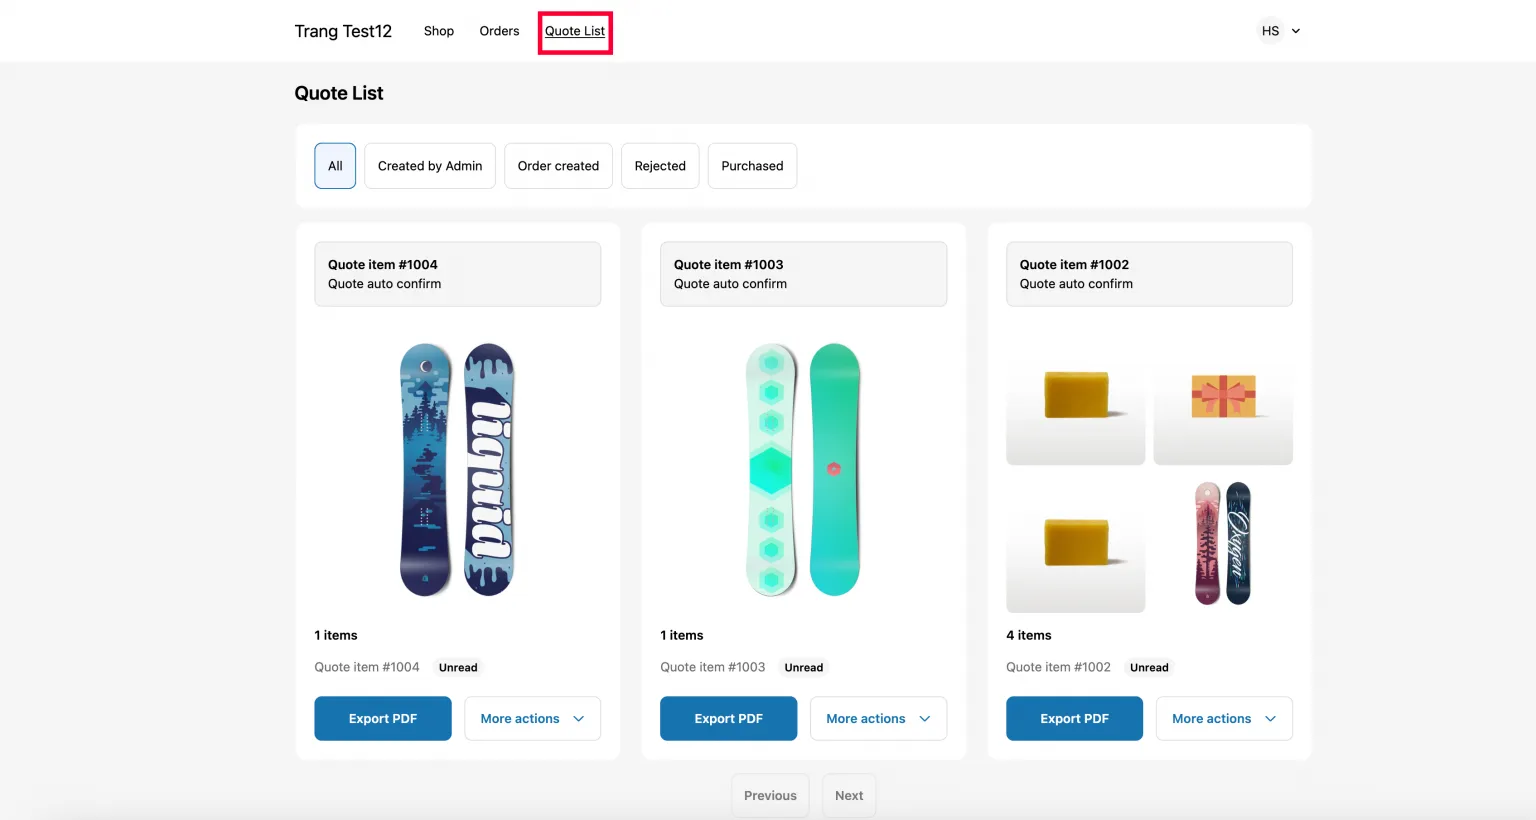
What a signed-in customer finds: their quotes, each with its own actions.
| Setting | What it does |
|---|---|
| New customer account settings | "Activate the quote list feature for new customer account pages." |
| Translation | "Translate the Quote List section for new customer accounts." |
| Permission setting | "Set permissions that allow your customers to view, manage, or respond to their quotes." |
Step 1 — Activate the quote list
Section titled “Step 1 — Activate the quote list”New customer account settings is not a switch you flip inside the app. The button hands you over to Shopify: it opens your store’s Checkout and customer accounts editor in a new browser tab, on the customer profile page, with the app blocks available. The app stays open in the tab behind it, so you can come back without losing your place.
The app adds two blocks in that editor, and they do different jobs. Add one, the other, or both.
| Block | Where it appears | What the customer does with it |
|---|---|---|
| View Quote Profile | On the profile page, as a block | Shows a banner reading "View and manage your quote list" with a View quote button that opens the quote list page. You can style it from the profile page. |
| Quote List | In the account header menu, as a menu item | Gives them a permanent link at the top of the account, so quotes are one click away from anywhere in the account. |
-
Open Customer account
Section titled “Open Customer account”In the app navigation, click Customer account.
-
Click New customer account settings
Section titled “Click New customer account settings”On the first card, click the New customer account settings button. Shopify’s Checkout and customer accounts editor opens in a new tab.
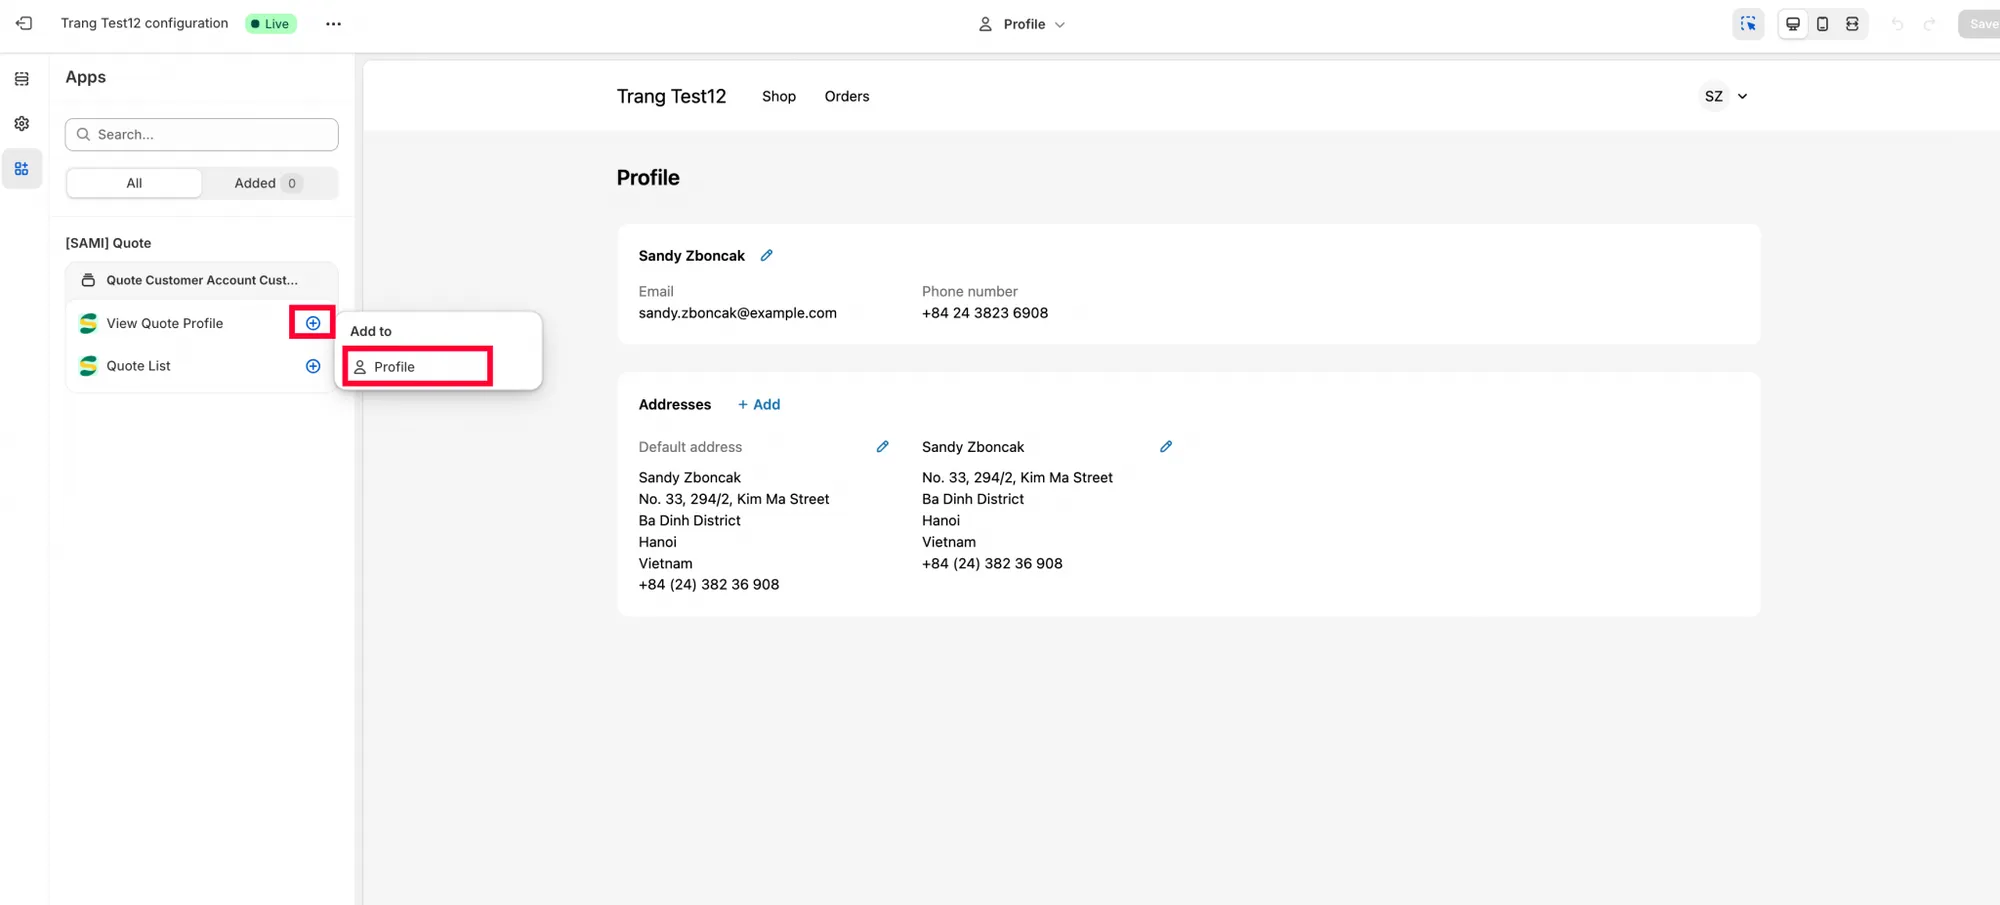
The app’s blocks appear in the editor’s picker once the hand-off lands.
-
Add View Quote Profile to the profile page
Section titled “Add View Quote Profile to the profile page”In the editor, add the View Quote Profile block to the profile page and set it up the way you want it to look. This is the block that gives customers a View quote button.
-
Save before you add the Quote List block
Section titled “Save before you add the Quote List block”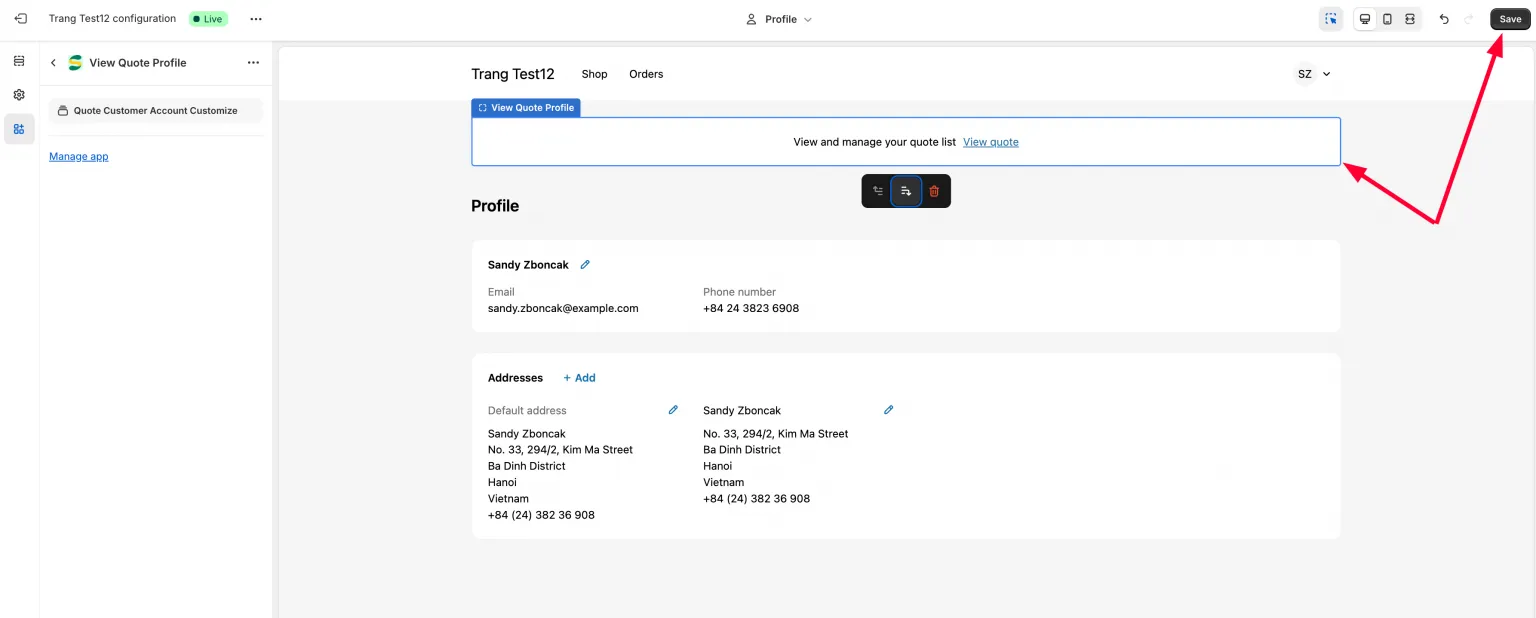
Save the profile page before moving to the menu.
On the Quote List section page, click Save first, then click the Quote list block to start adding it to the header menu.
-
Place Quote list in the header menu, and save again
Section titled “Place Quote list in the header menu, and save again”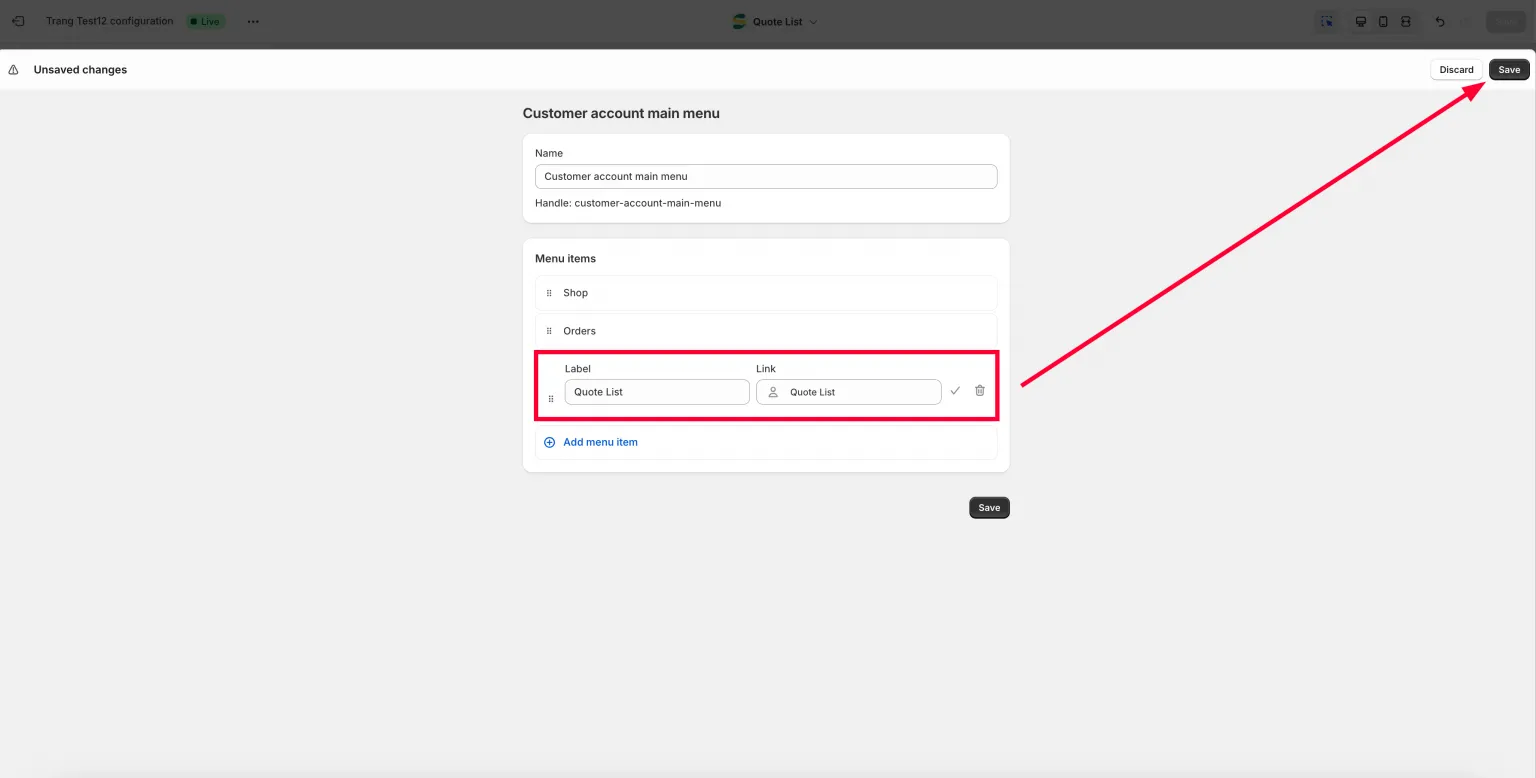
The menu is its own save — the profile page’s Save does not cover it.
Set up the Quote list section in the header menu and click Save a second time. Two saves, not one — the first one makes the block available, the second one keeps where you put it.
-
Check it as a customer
Section titled “Check it as a customer”Go back to your storefront, sign in as a customer and open the account area.
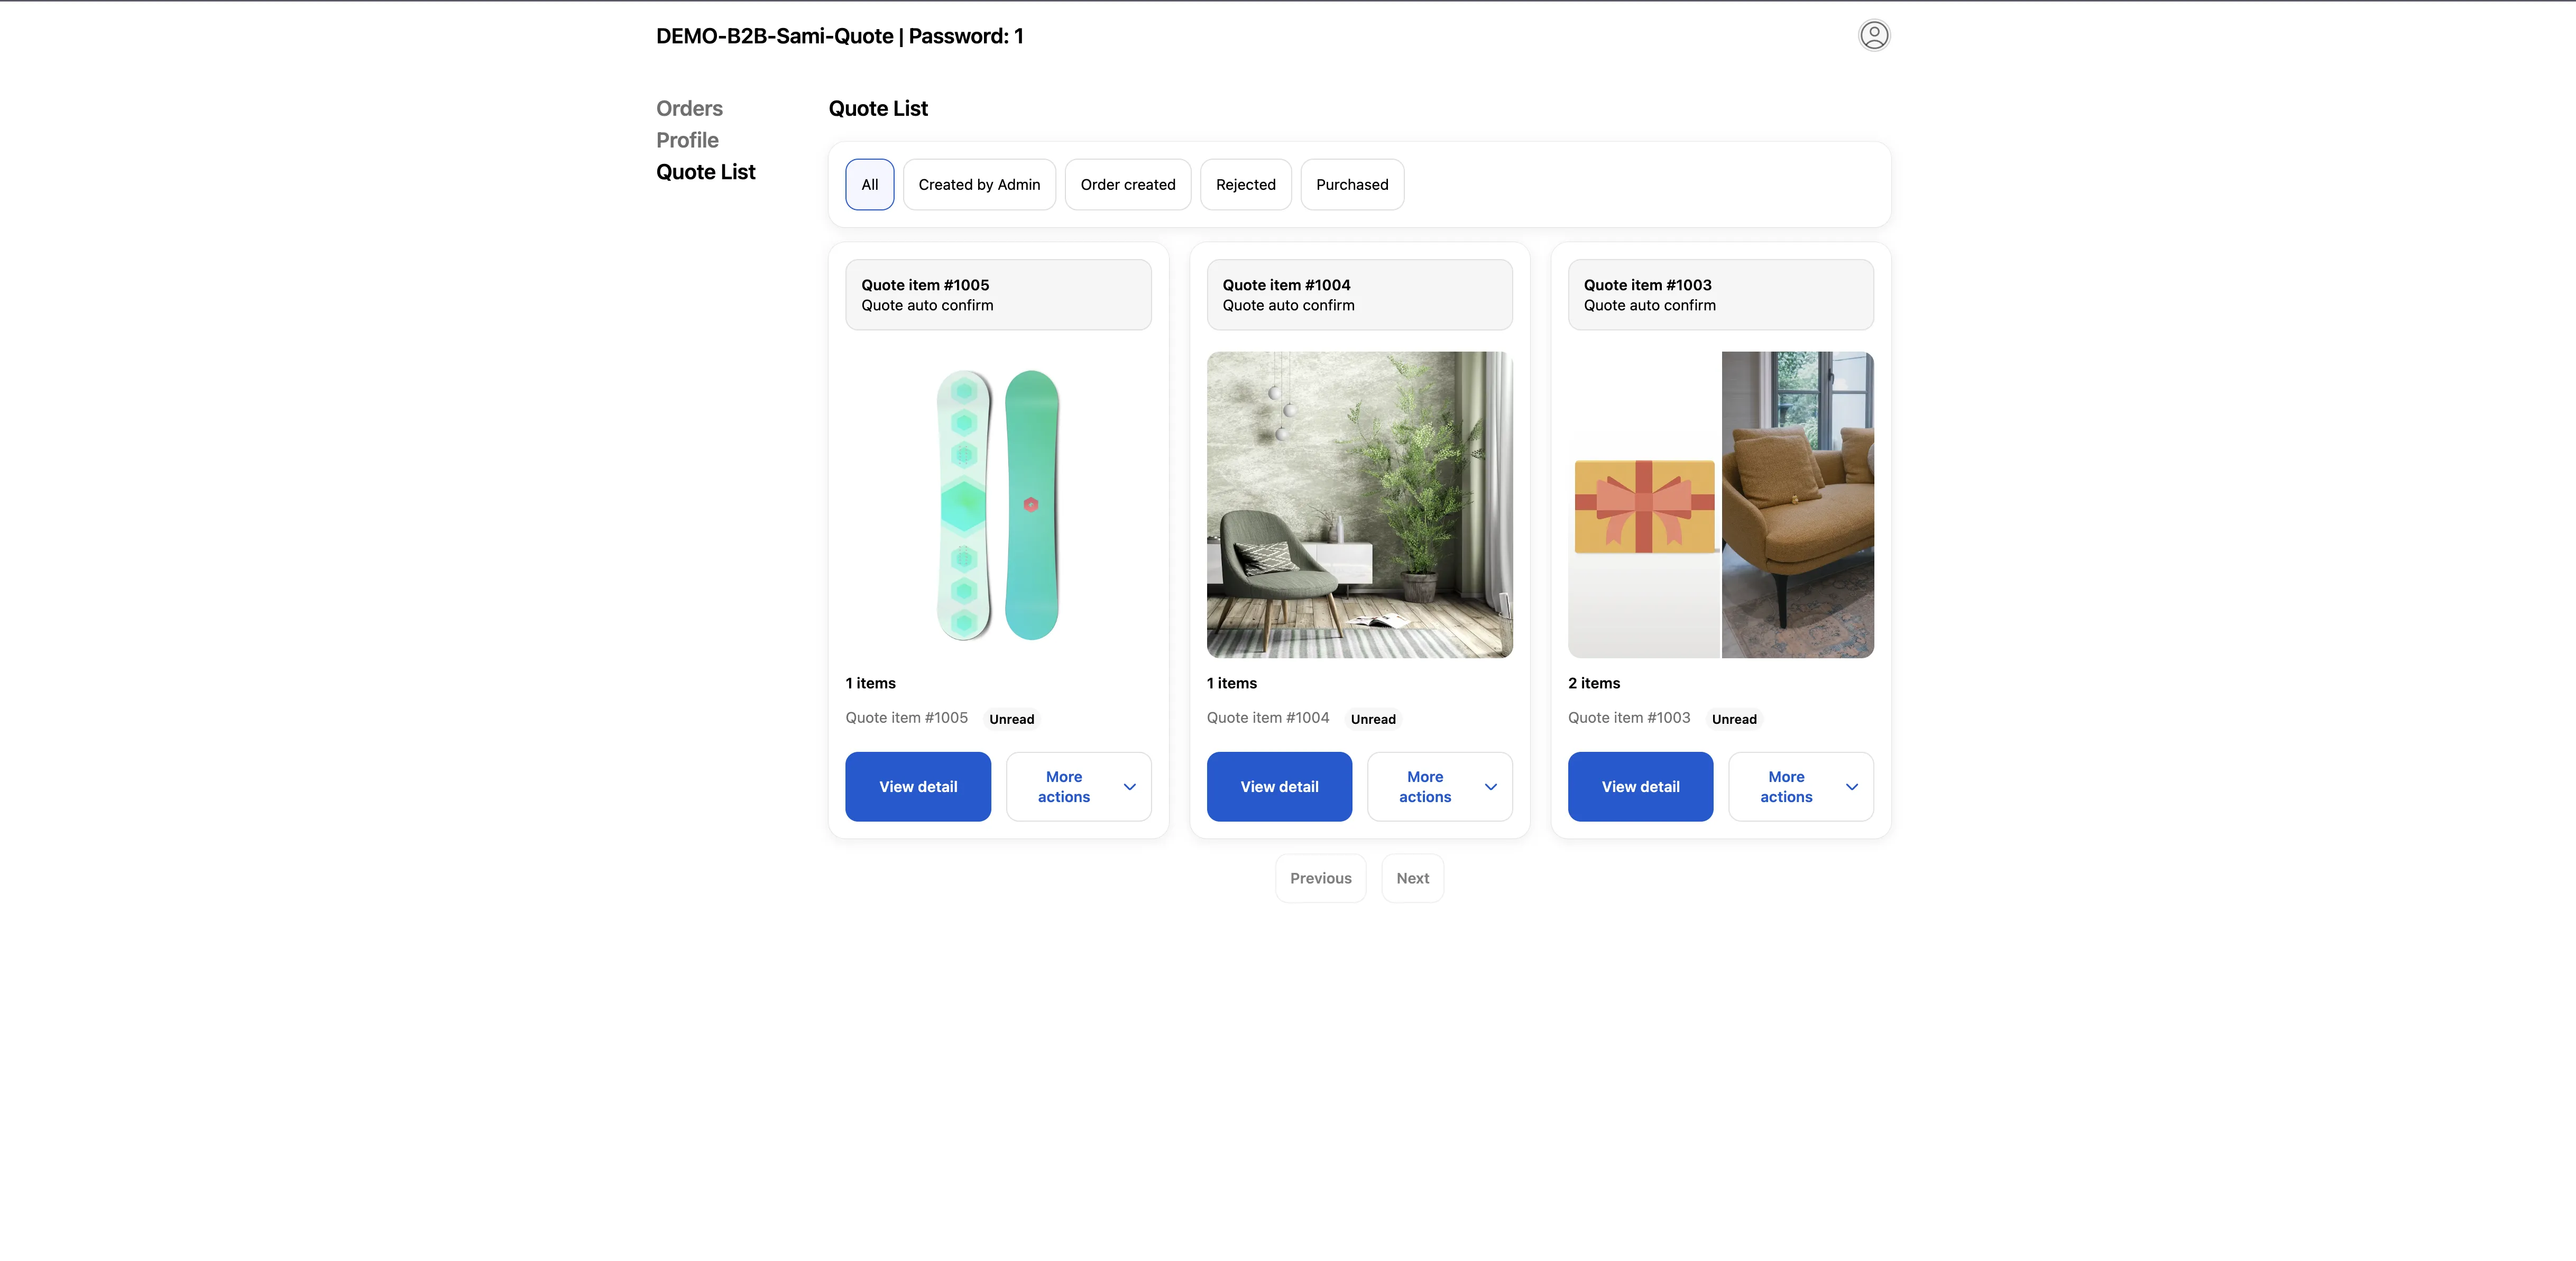
Signed-in customers find their quotes in their own account.
Step 2 — Decide what customers may do
Section titled “Step 2 — Decide what customers may do”Permission setting is where you “Set permissions that allow your customers to view, manage, or respond to their quotes.” So this is not only about whether quotes are visible — it is also where you decide whether a customer can act on one.
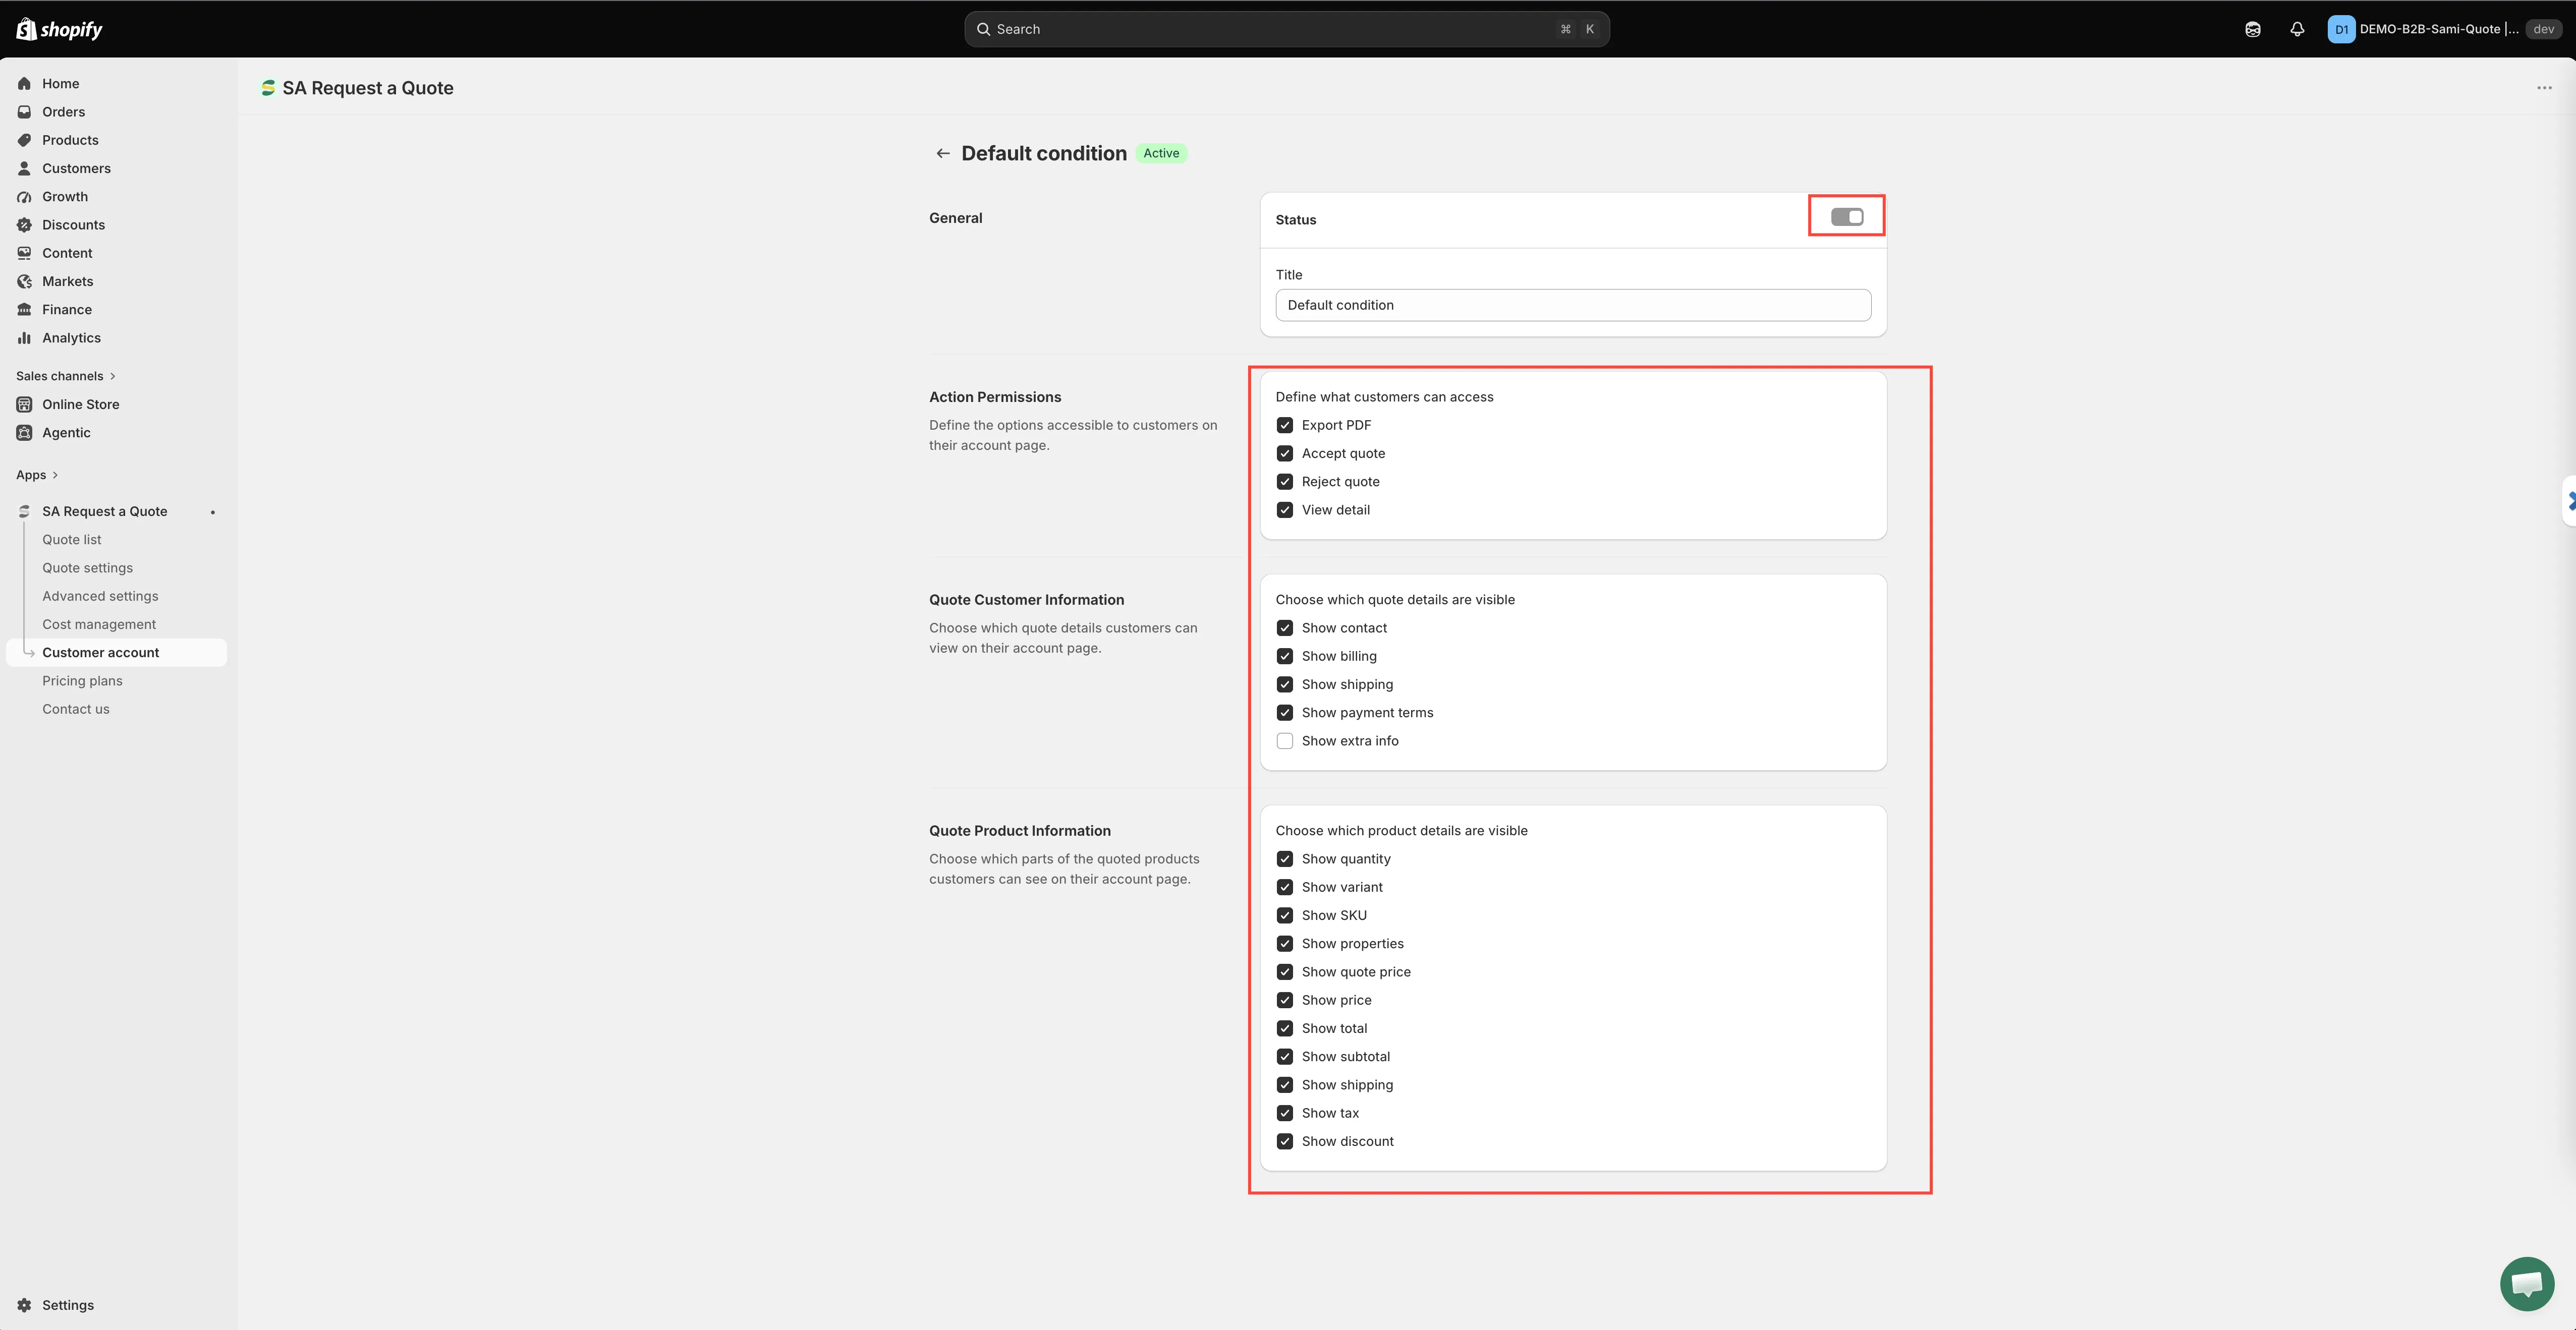
The card holds an Add condition button, a Search conditions box, and a table with the columns Title, Condition, Status and Action. Each row has an edit and a delete control under Action. The table starts with a Default condition row.
The Default condition, and when it stops applying
Section titled “The Default condition, and when it stops applying”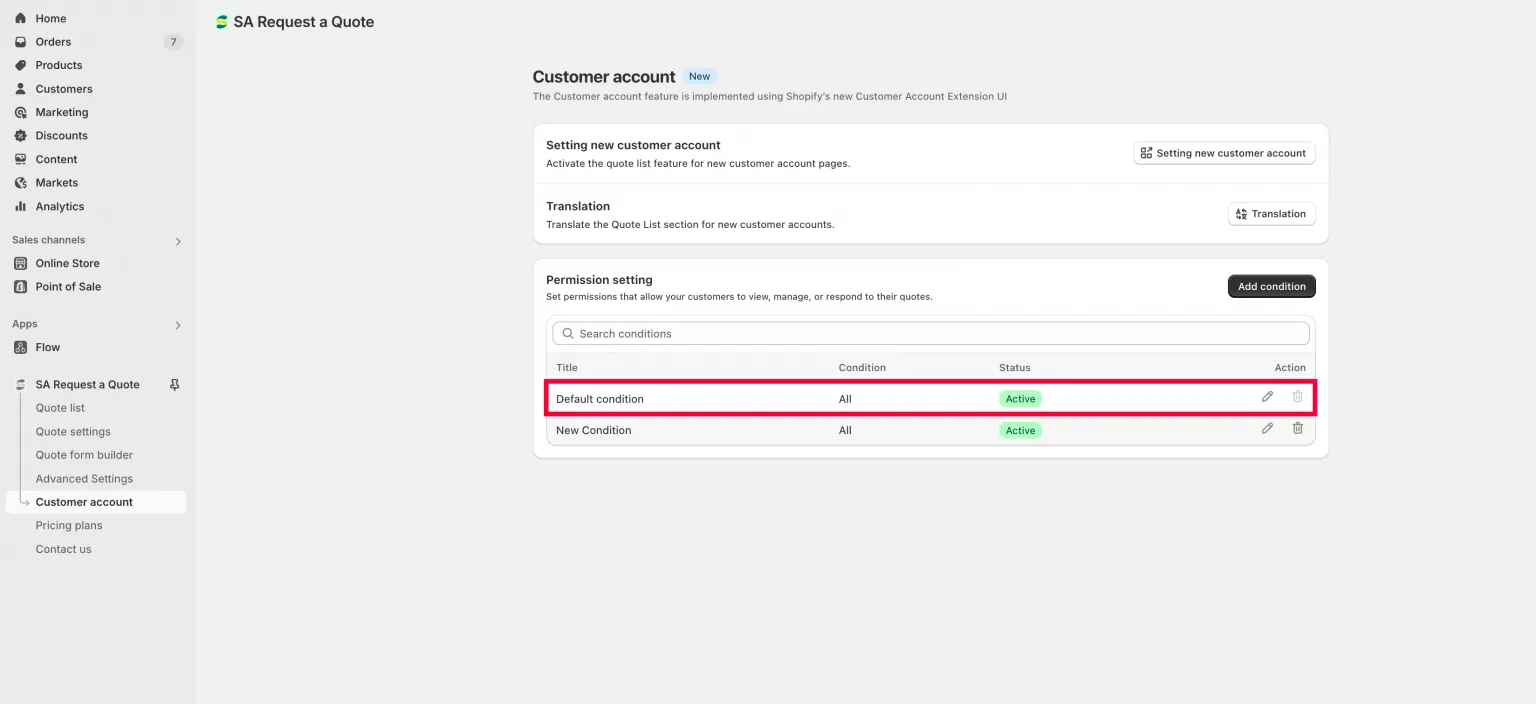
Default condition is what applies until you add your own.
If you never create a condition of your own, the app applies the Default condition on the first row, and that row carries all permissions. That is why quotes look fully open before you have configured anything.
The Default row is deliberately fenced off: it has no Condition section (it targets everybody), its Status switch is locked, and its delete control is disabled. You can still open it with the edit control and change which permissions and which fields it grants.
Add a condition
Section titled “Add a condition”On the Customer account page, scroll to Permission setting and click Add condition.
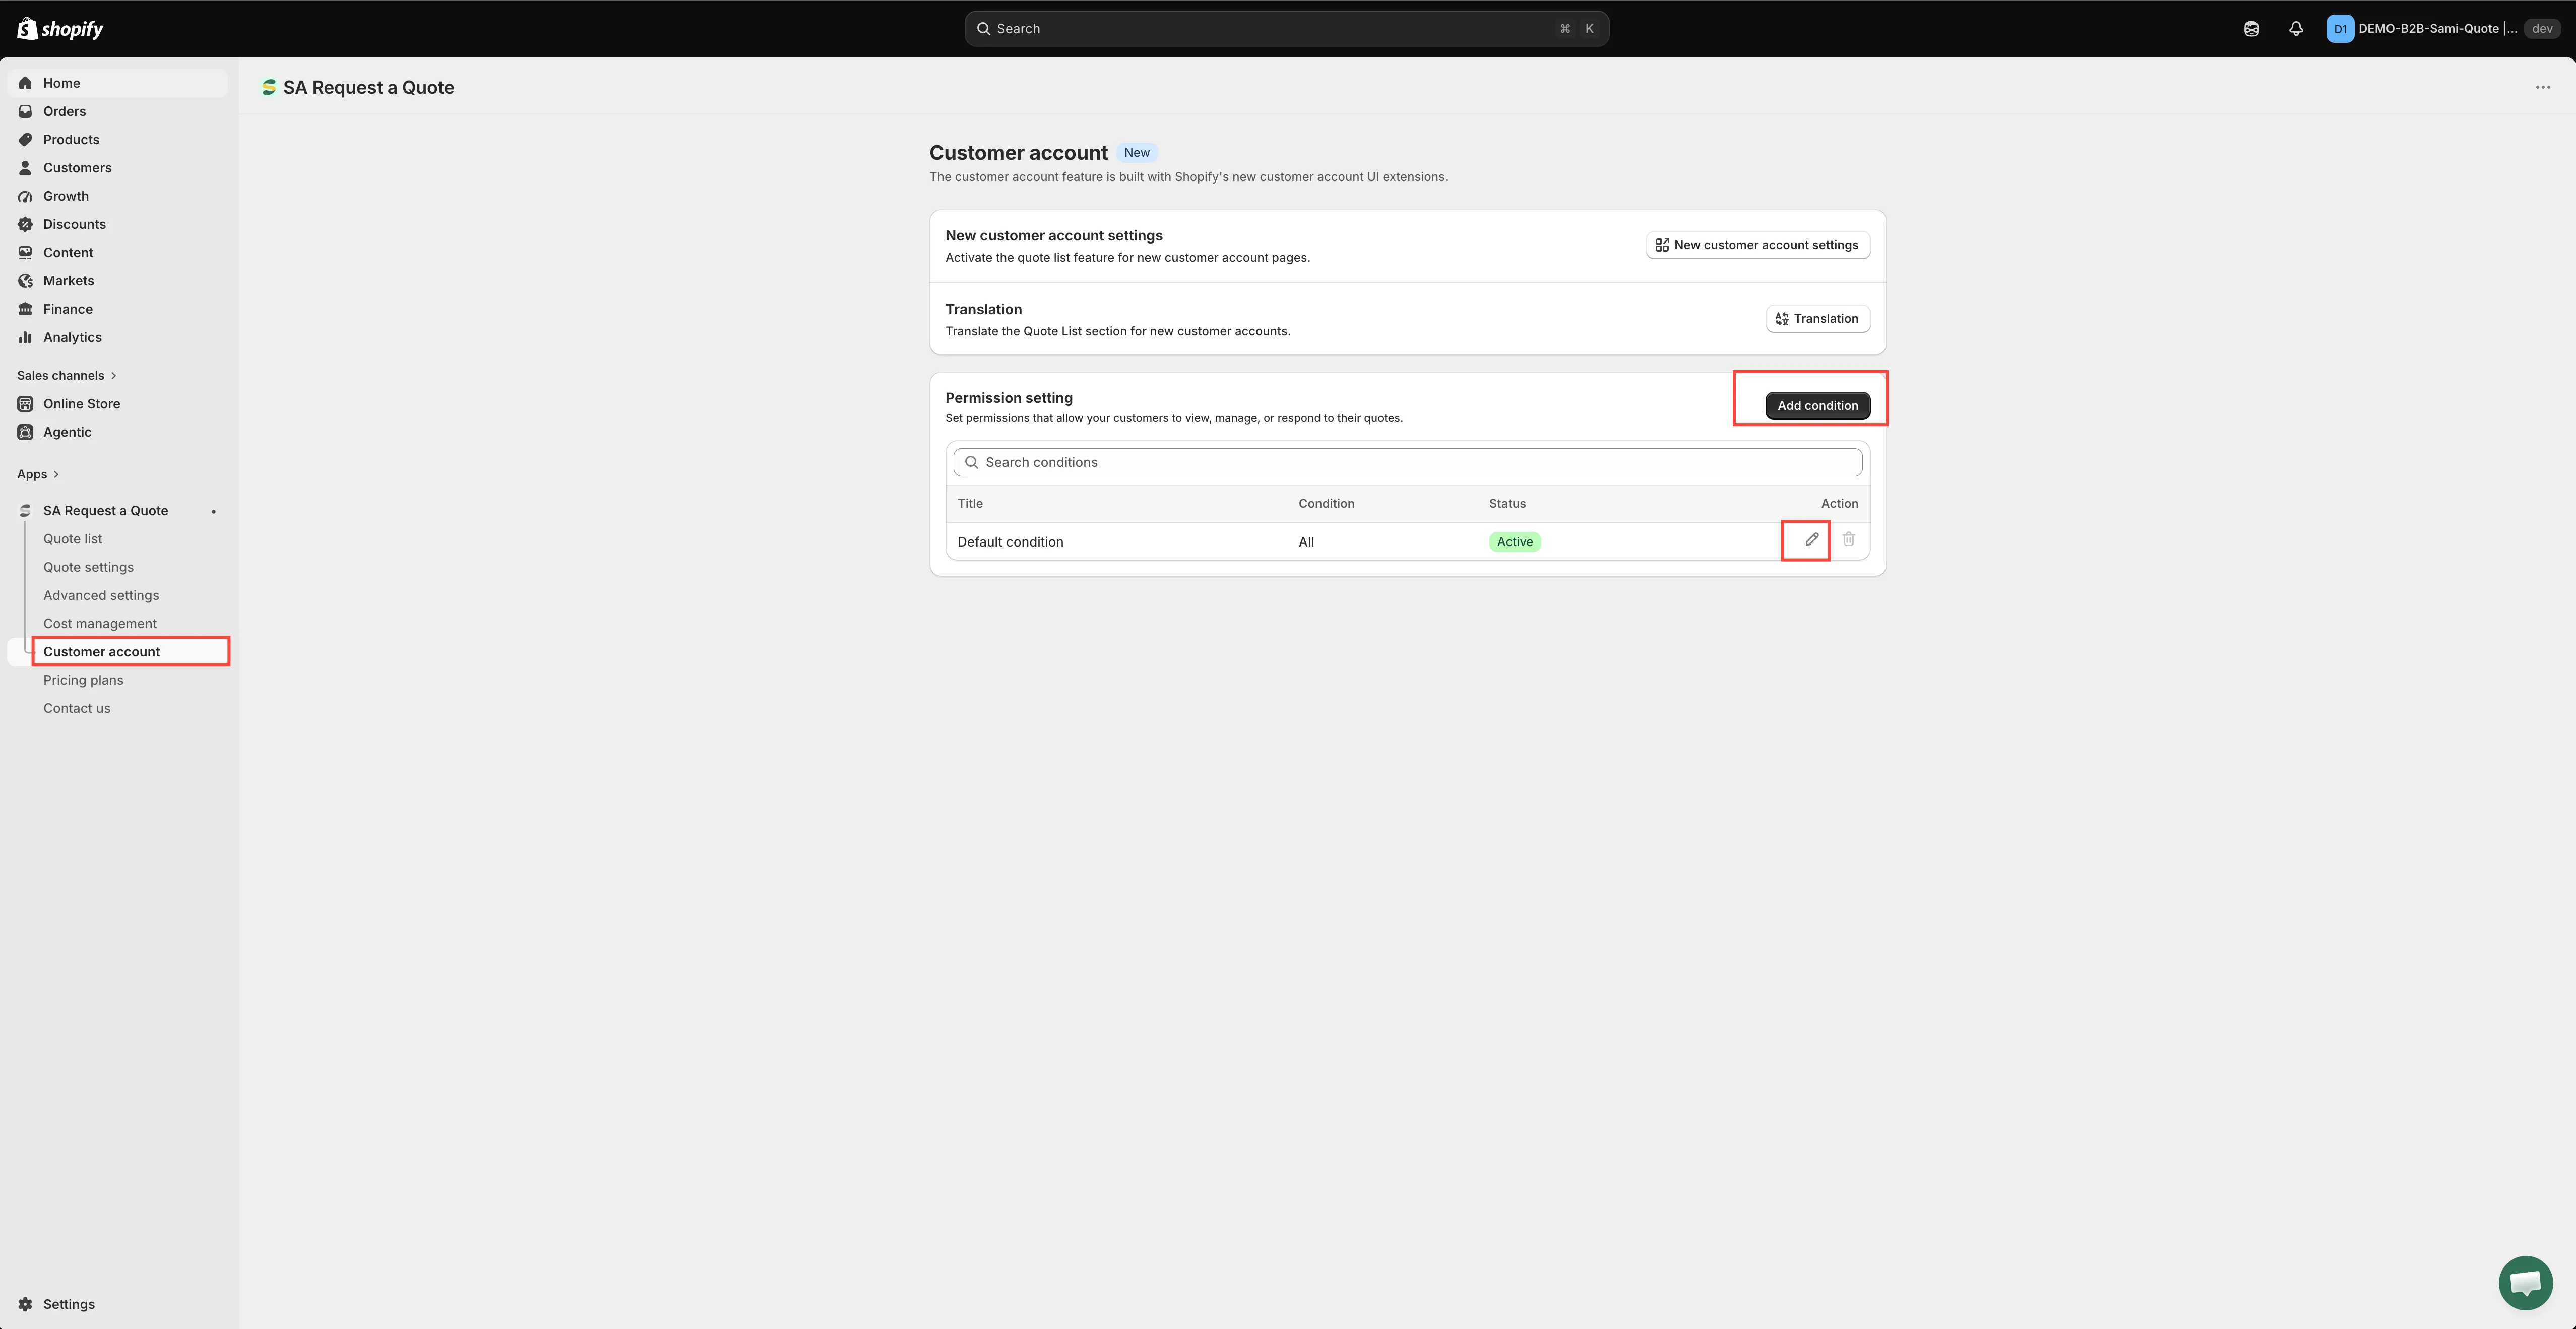
Conditions decide what each kind of customer may do with a quote.
The screen that opens has five sections. Work down them in order.
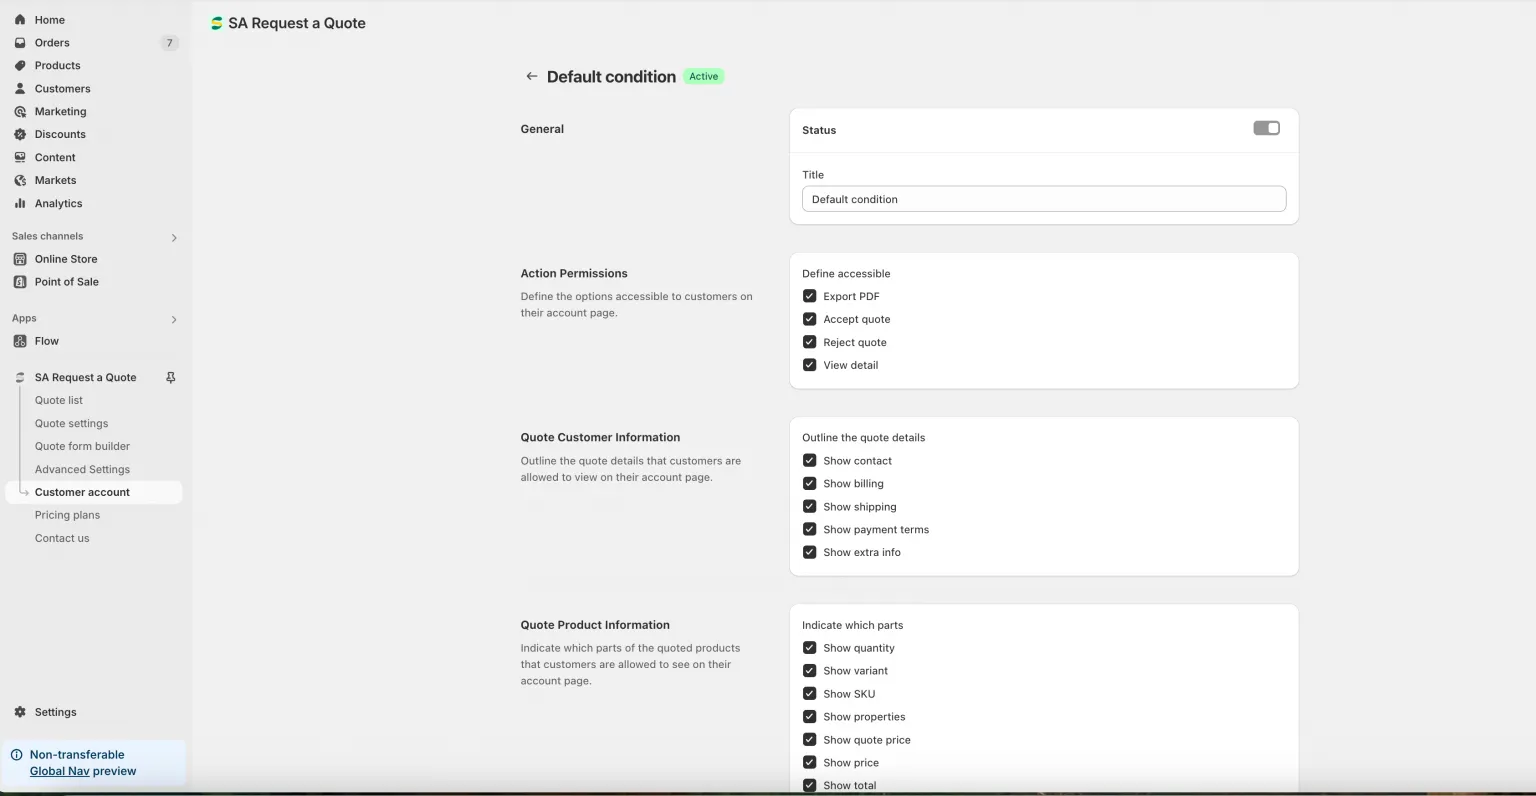
One condition, top to bottom: what it is called, who it matches, and what it allows.
-
General
Section titled “General”Two controls: a Status switch and a Title field.
Turn Status on to make the condition live on your storefront; turn it off later to retire it without deleting it. A new condition is created off, and the badge beside the title reads Draft until you switch it on — a condition sitting at Draft is the usual reason a permission “did not apply”.
Type a Title you will recognise in the list a year from now, such as
Wholesale customers — full access. The field starts with the placeholder textCondition, and the app refuses to save with it empty (“Title can’t be blank”). -
Condition
Section titled “Condition”“Apply the rule only if the customer matches the specified conditions.” This is who the rule applies to. Pick one of four:
Choice What you then set All Nothing — it reads "All logged-in customers". Customer Tag Customer tag contains or Customer tag doesn't contain, then the tags themselves. Separate several tags with commas. Customer Country Customer country is in or Customer country is not in, then search for and pick countries. Each one you pick is added as a tag you can remove. Customer Type Customer type is or Customer type is not, then DTC or B2B. 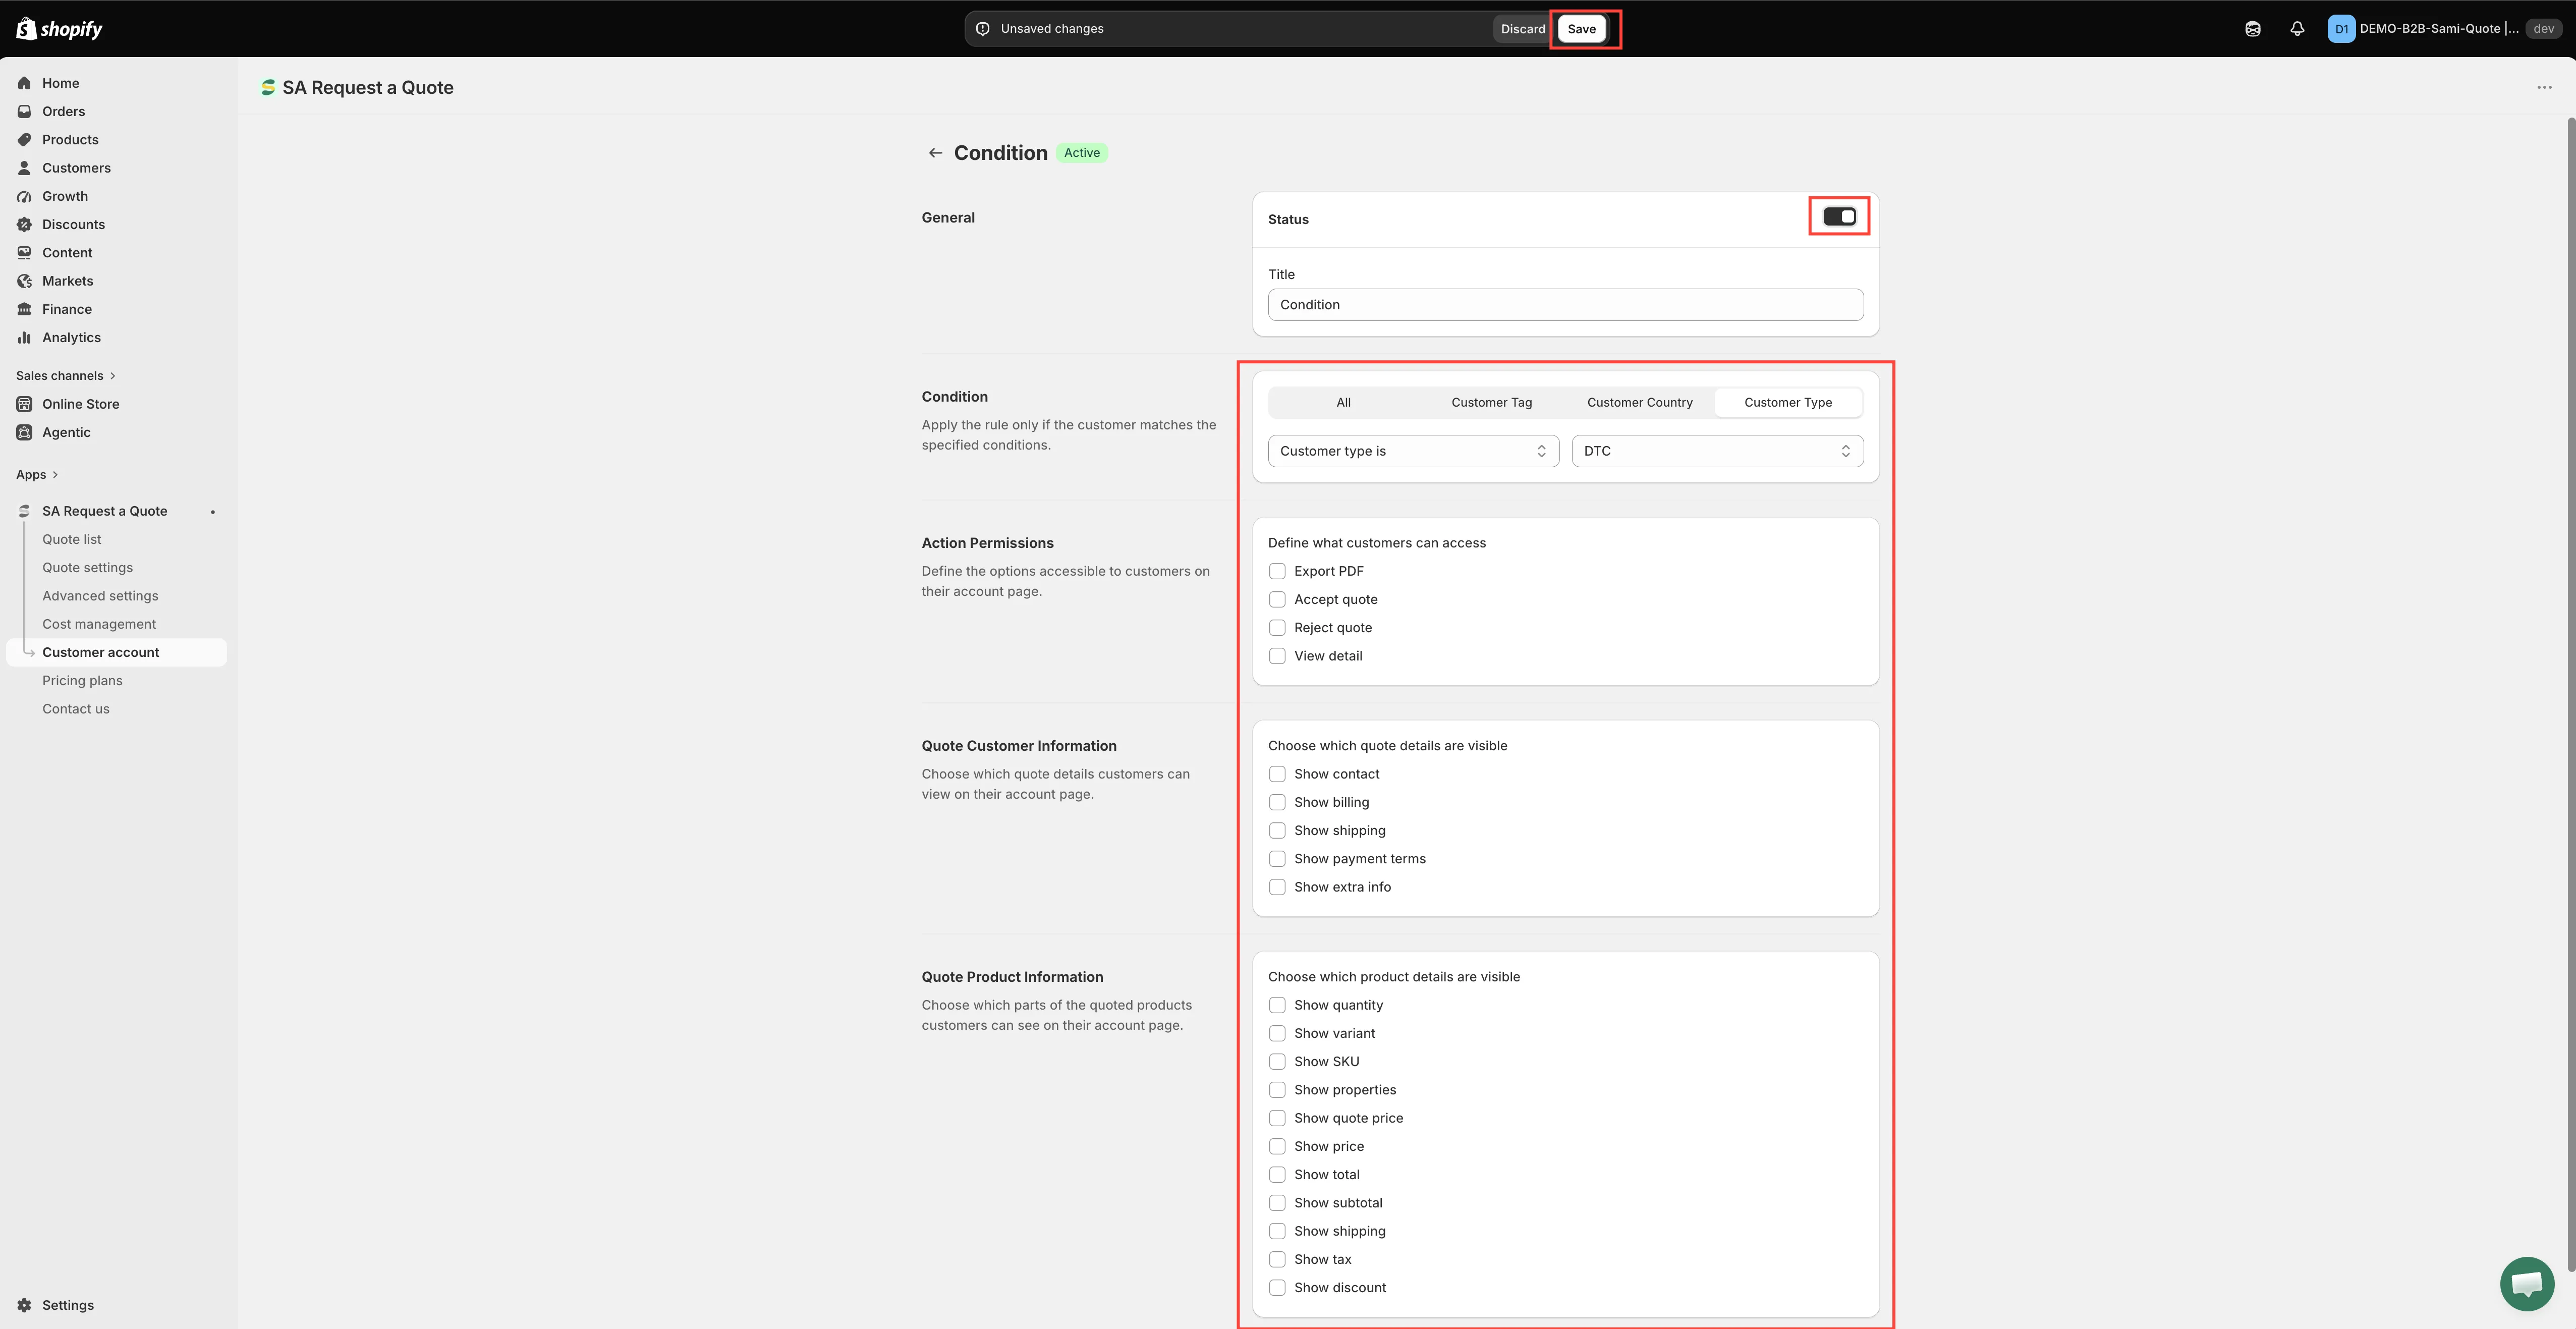
-
Action Permissions
Section titled “Action Permissions”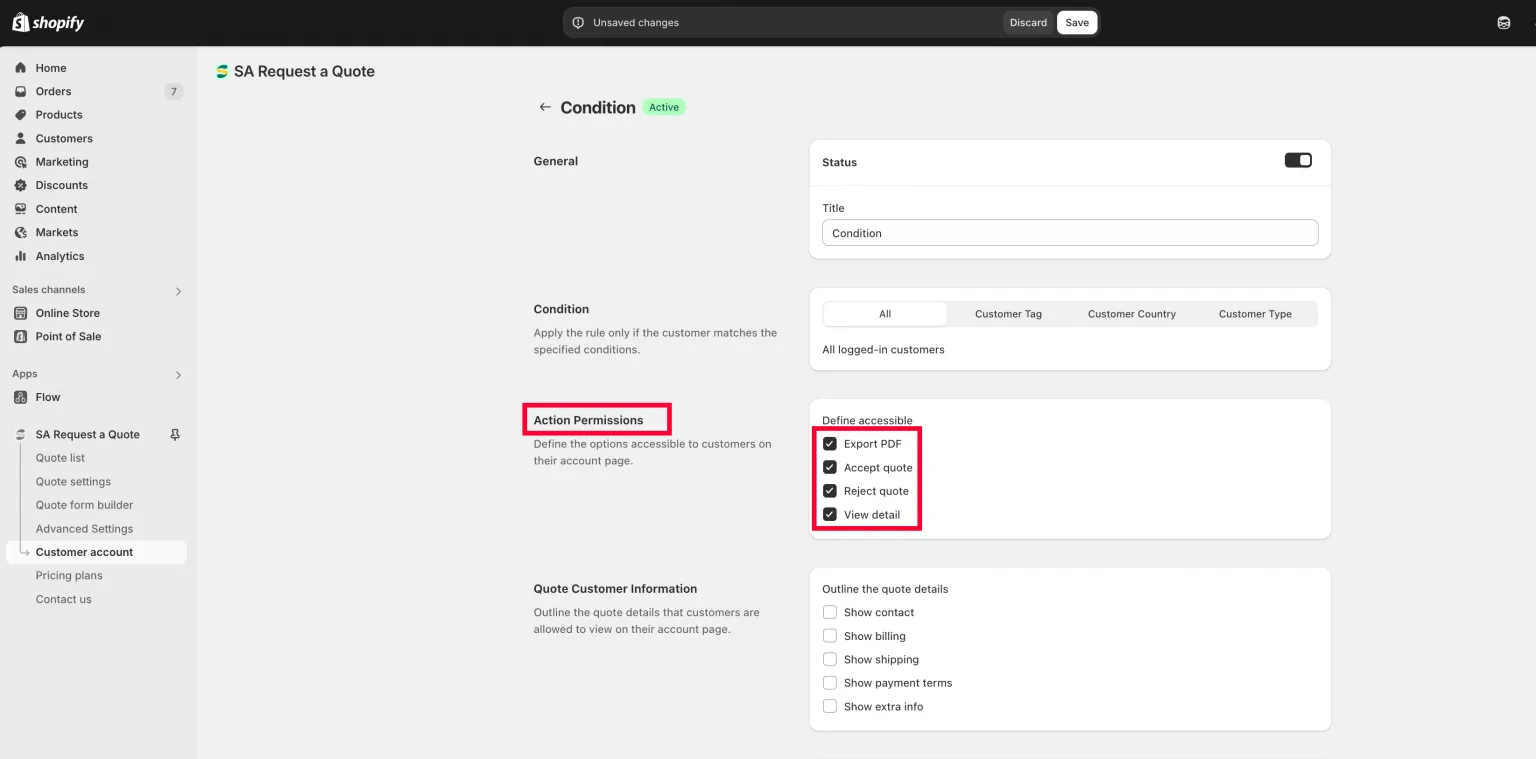
Four switches decide what a matching customer can do to a quote.
“Define the options accessible to customers on their account page.” Tick what a matching customer is allowed to do with a quote:
- Export PDF
- Accept quote
- Reject quote
- View detail
Leave them all unticked and the customer can see that a quote exists but cannot open or answer it.
-
Quote Customer Information
Section titled “Quote Customer Information”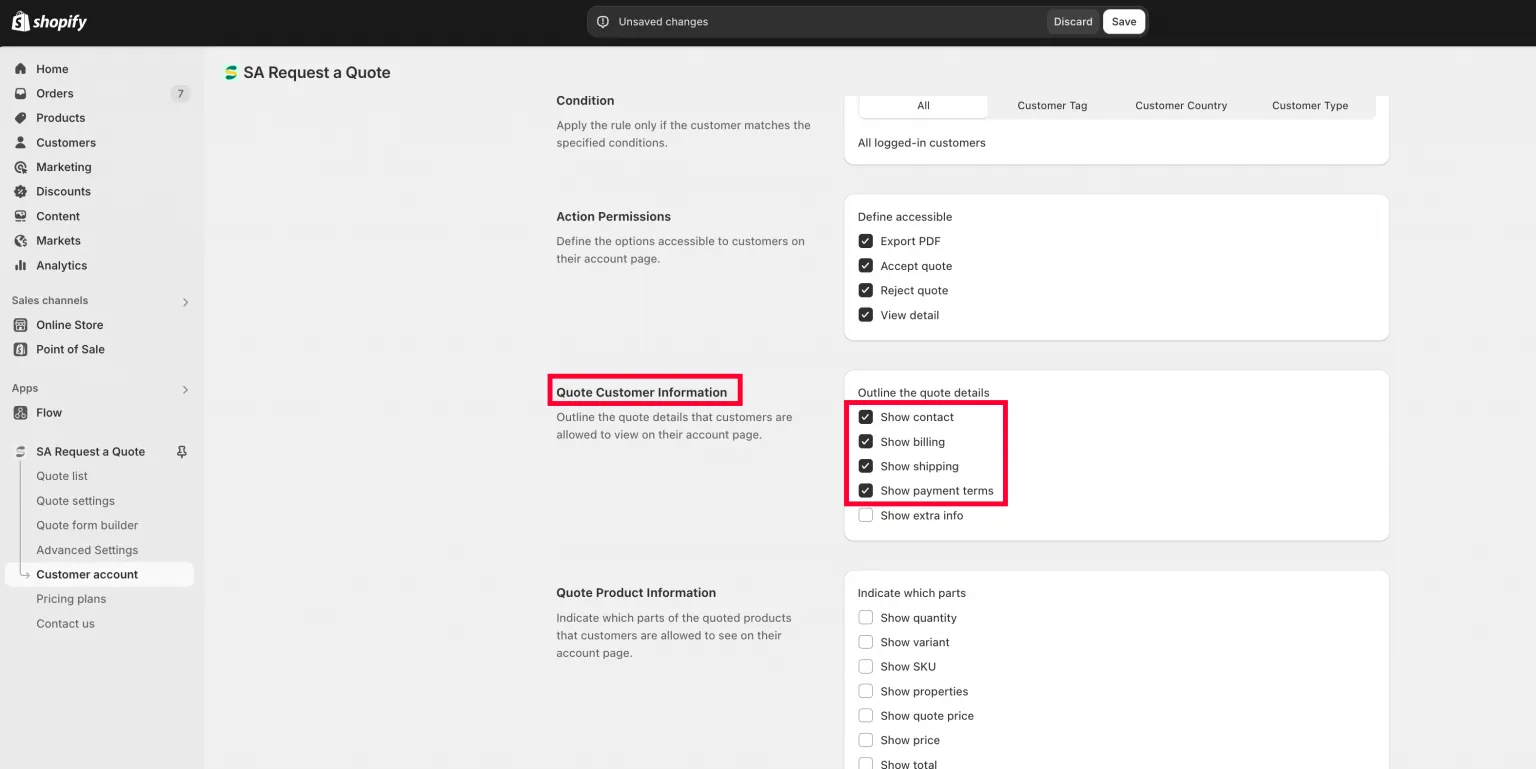
Choose which of their own details a customer sees on the quote.
“Choose which quote details customers can view on their account page.” Tick which of their own details are shown back to them:
Show contact · Show billing · Show shipping · Show payment terms · Show extra info
-
Quote Product Information
Section titled “Quote Product Information”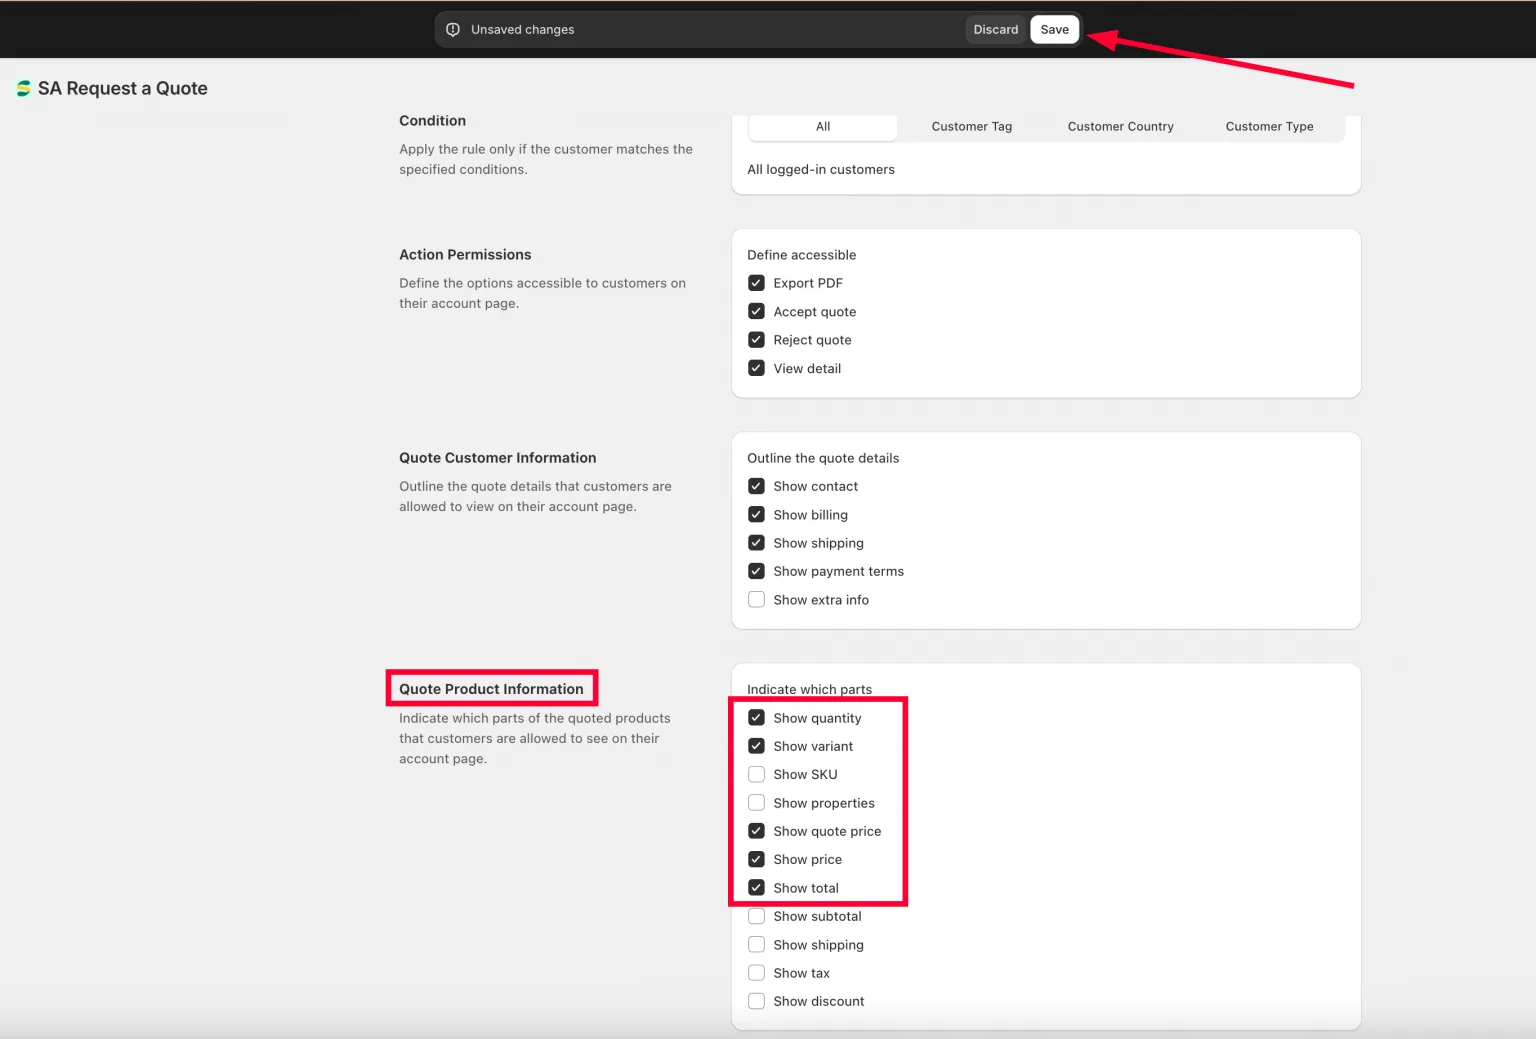
And which parts of the quoted products they see, price included.
“Choose which parts of the quoted products customers can see on their account page.” Tick what the product lines show:
Show quantity · Show variant · Show SKU · Show properties · Show quote price · Show price · Show total · Show subtotal · Show shipping · Show tax · Show discount
-
Save, then check it in the storefront
Section titled “Save, then check it in the storefront”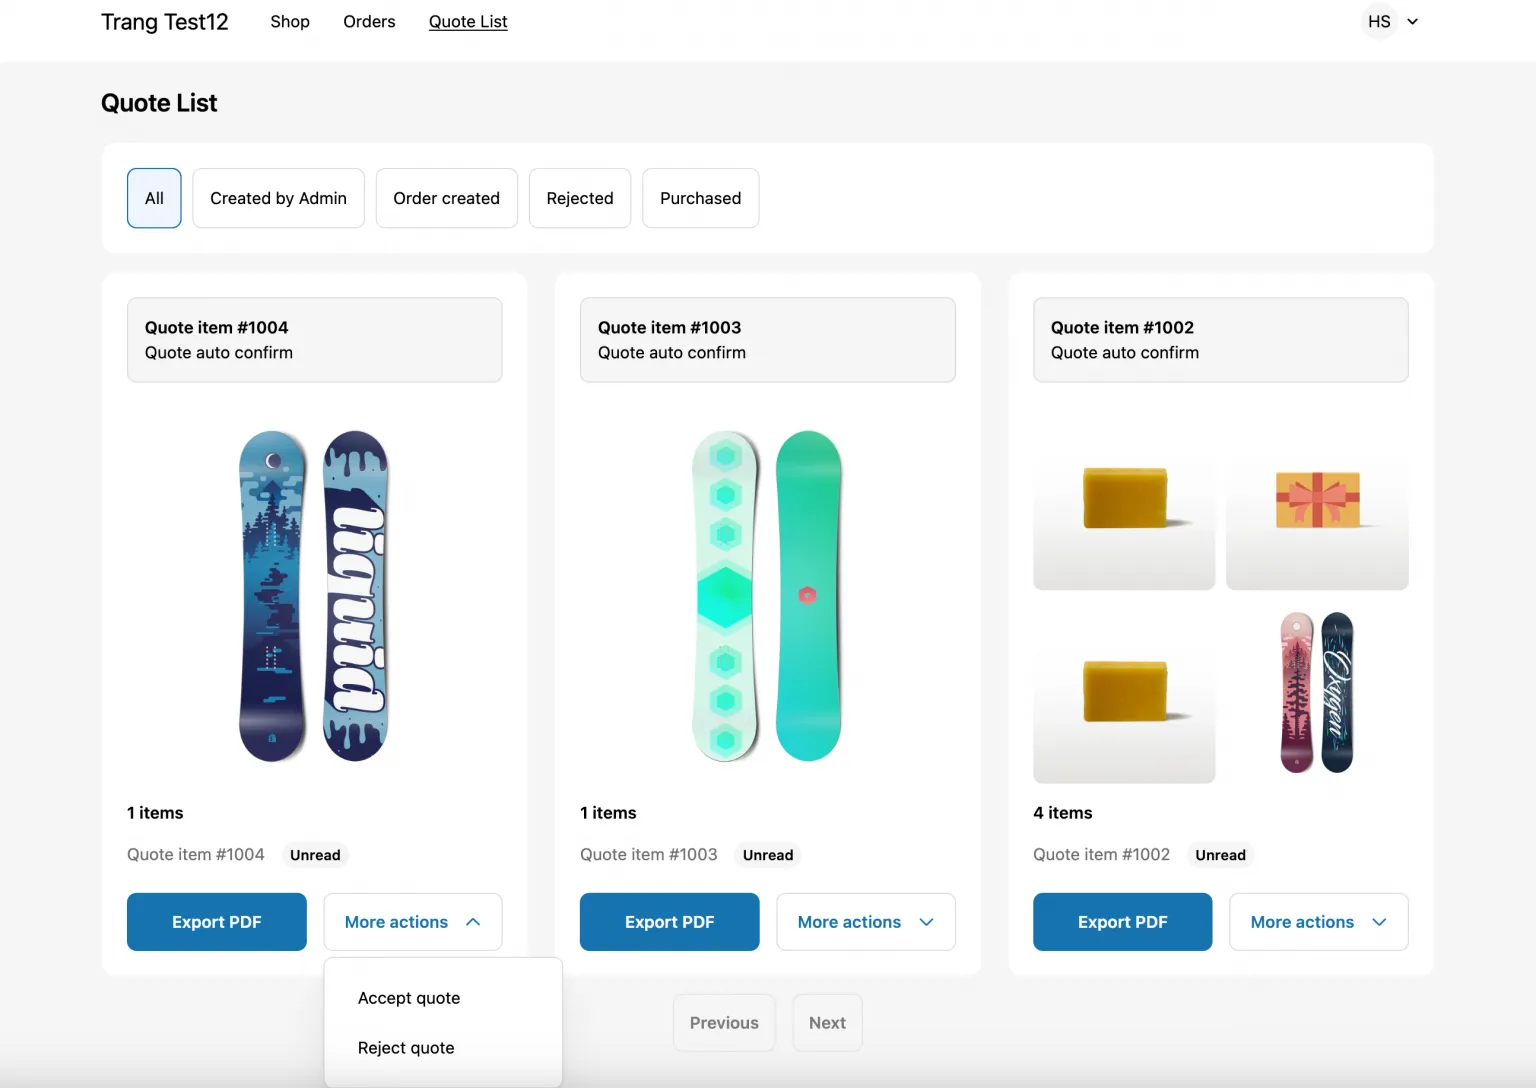
The permissions you granted, as the customer meets them.
Click Save on the save bar at the top. Discard changes beside it throws the edits away.
Then sign in to your own storefront as a test customer who matches the condition and confirm you see exactly what you granted — and that a customer who does not match sees what you expect too.
Step 3 — Translate the section
Section titled “Step 3 — Translate the section”Translation on the same page lets you “Translate the Quote List section for new customer accounts.” It covers that section of the account page and nothing else.
-
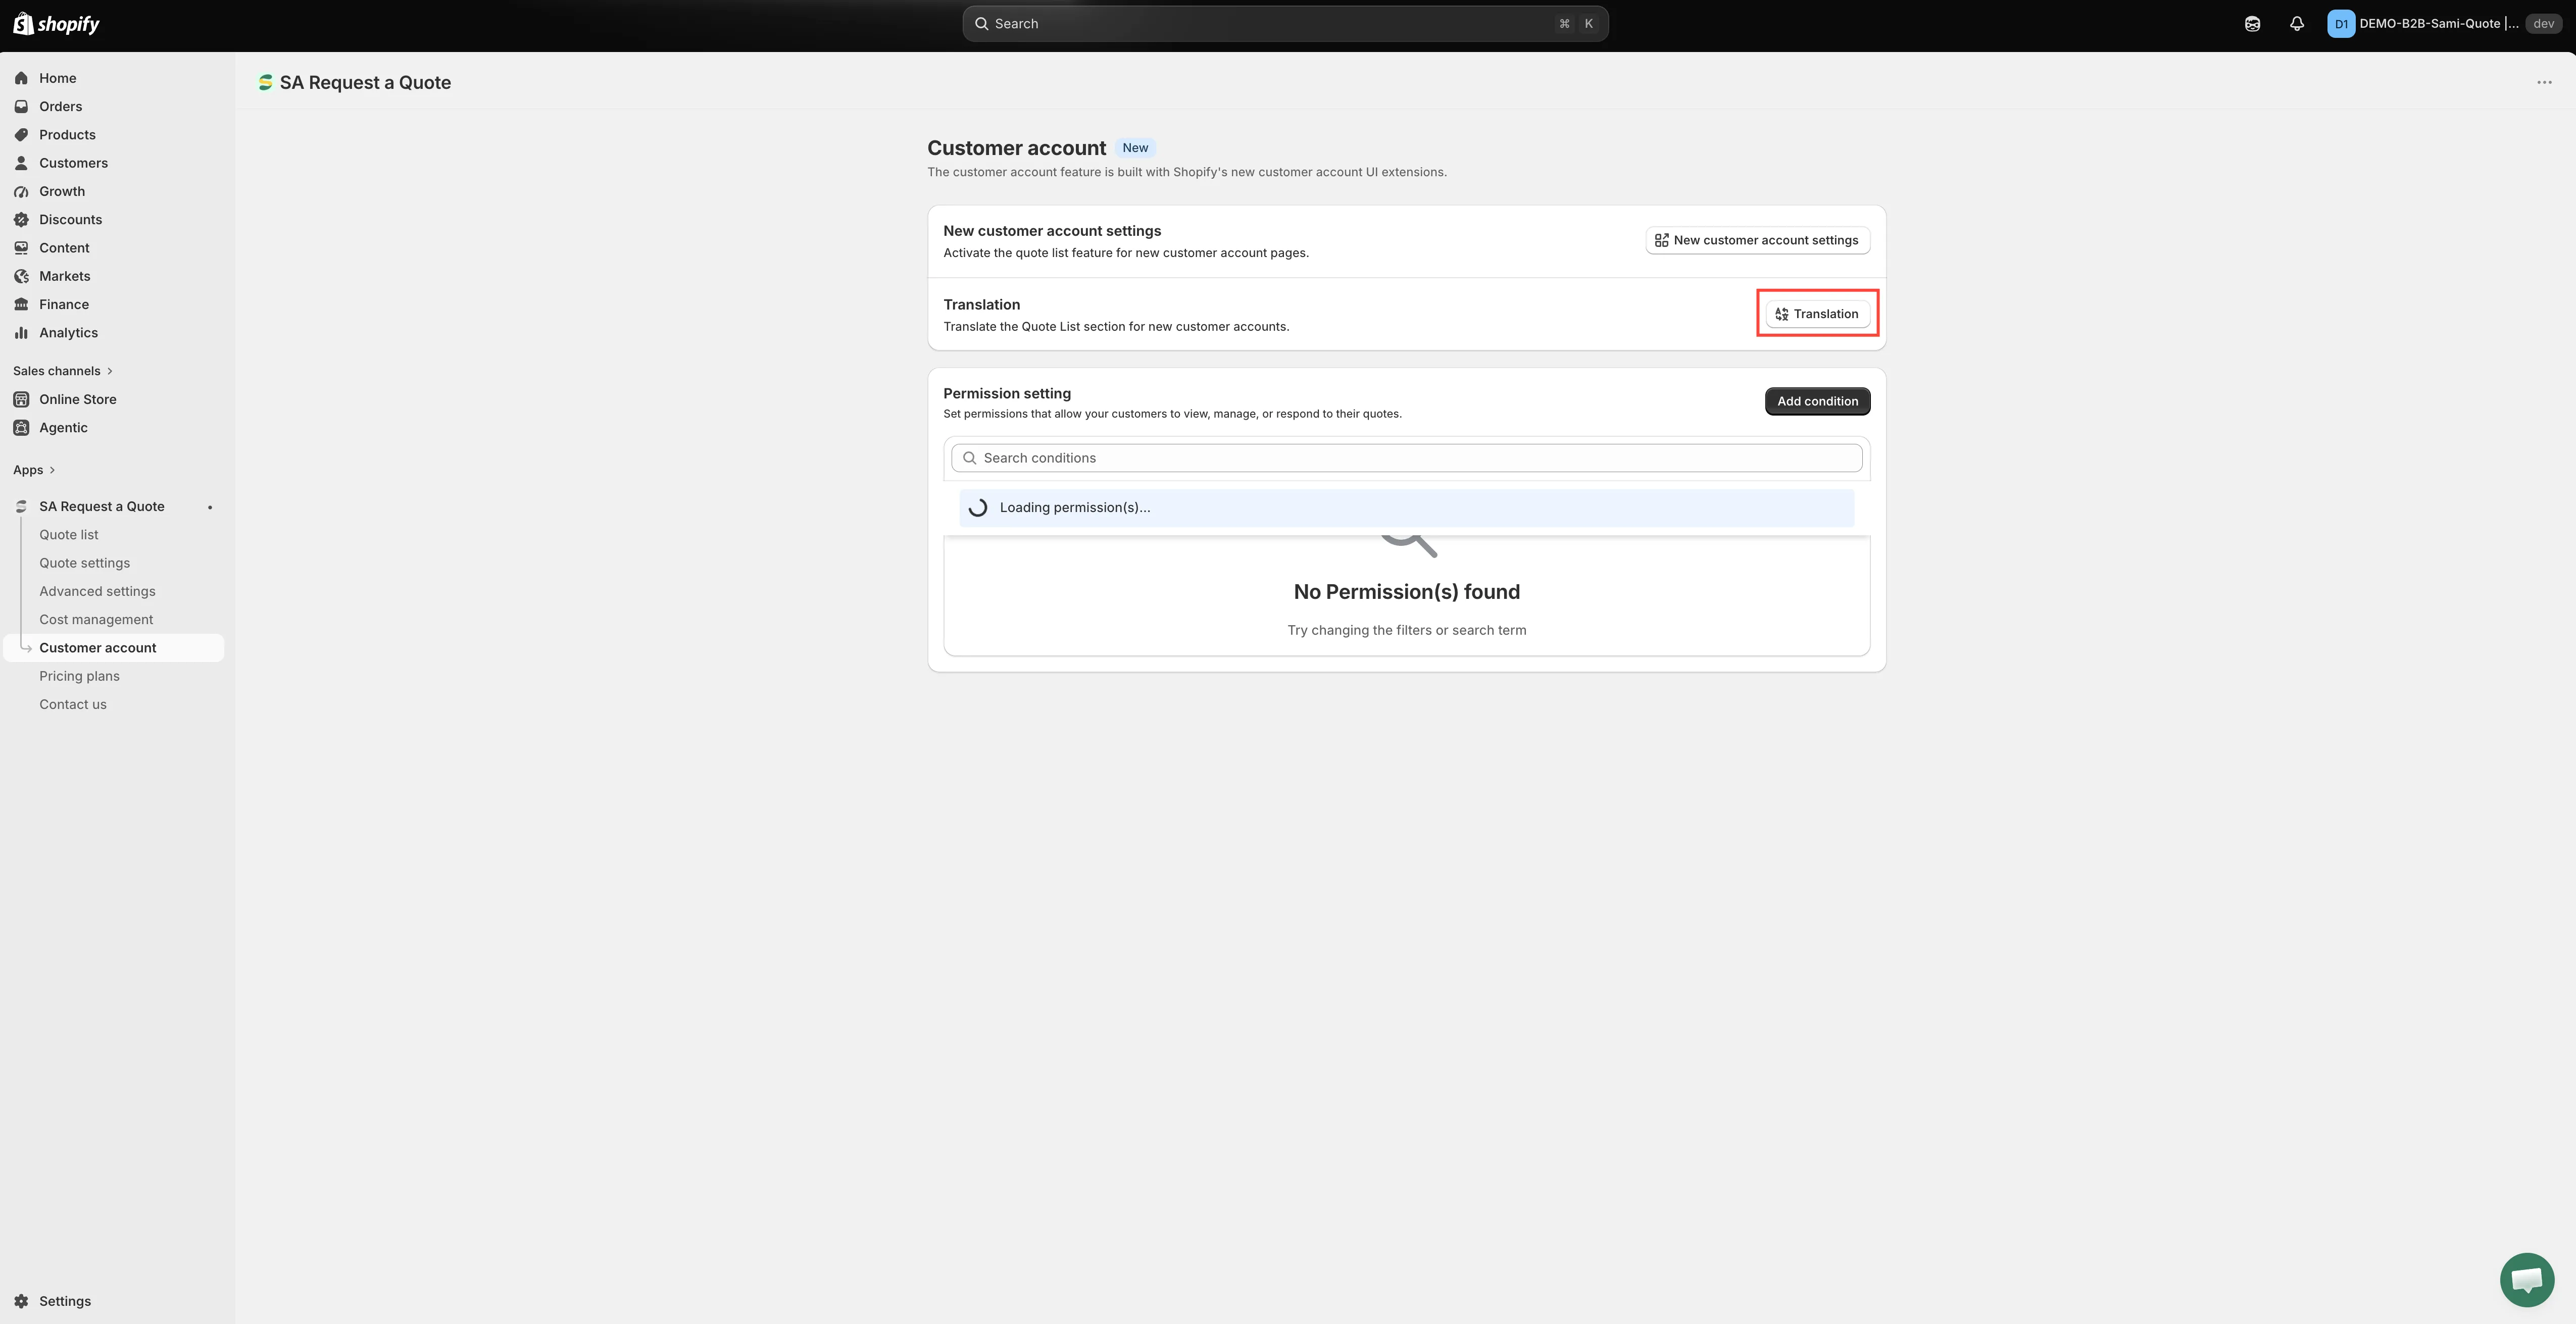
Open the Translation button
Section titled “Open the Translation button”On the Customer account page, go to the Translation card and click the Translation button.
-
Fill in the wording, group by group
Section titled “Fill in the wording, group by group”The Translate the quote list for new customer accounts page lists every string in the section, grouped under headings such as Quote profile banner action, Quote page, Quote status, Quote action, Quote item, Customer information, Payment information, Quote product, Export modal and Empty Page.
Each string is a pair of fields: the left one shows the original English and cannot be edited, the right one is yours to fill in. Click into the right-hand field and type the wording you want customers to read.
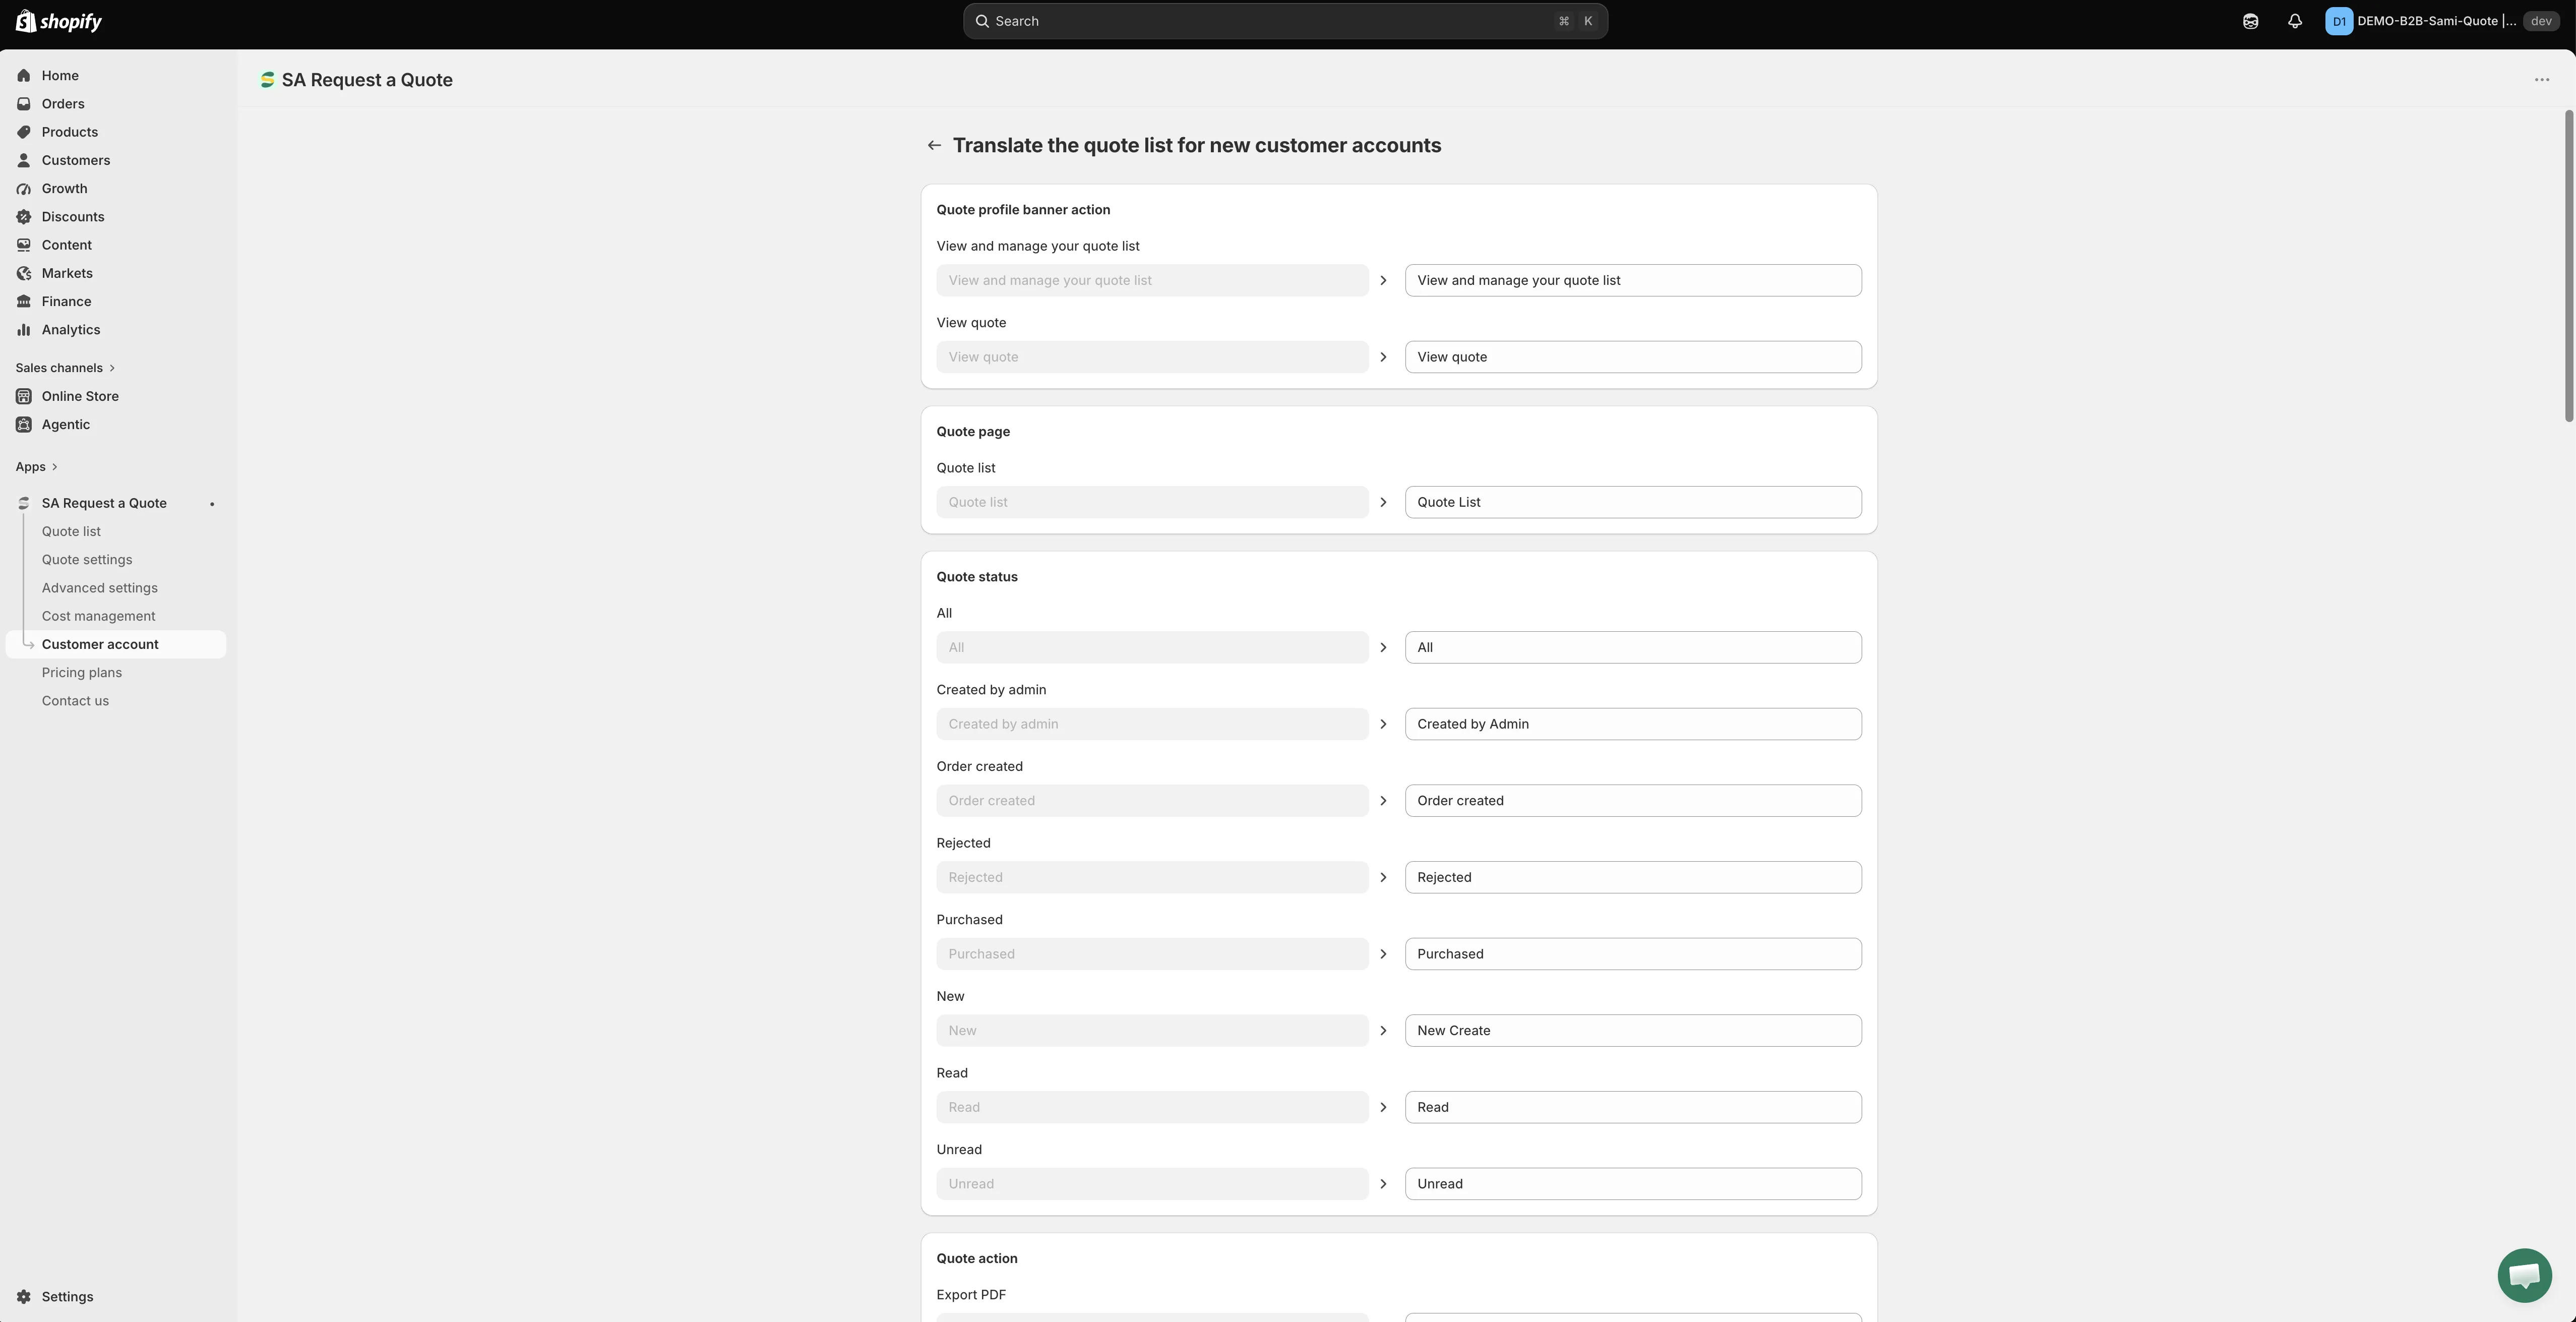
-
Save and check the storefront
Section titled “Save and check the storefront”Click Save, then sign in to your storefront and open the account area to see the new wording in place.
Everything else your customers read — the quote form, your storefront text and both quote emails — is translated somewhere else, on the Translations tab of Advanced settings. See Translate storefront text.
Two ways to show past quotes
Section titled “Two ways to show past quotes”| Approach | Use when |
|---|---|
| Quote history page | You want a page you can link from your menu, at /pages/quotes-history. |
| Customer account | Your store uses Shopify's new customer accounts and you want quotes to sit alongside orders, where customers expect them. |
Both need the customer to be signed in, so neither replaces the emails you send. See Quote history page.
If the settings look greyed out
Section titled “If the settings look greyed out”Customer Account UI is listed under the PRO plan. If the controls on this page are disabled and the app shows a padlock line reading “🔐 This feature is available on …”, that is your plan rather than a fault — nothing is broken in your store or your theme. The link in that line goes to the plan that includes the feature, and Pricing plans in the app sidebar shows what each plan covers. See Plan comparison.
If something is missing in the account
Section titled “If something is missing in the account”| What you see | What to check |
|---|---|
| Nothing at all in the account area | You are signed out, or the store is not on Shopify's new customer accounts. |
| The header menu link is missing | The Quote list block was added without saving the section first, or the second Save in the header menu was never made. |
| A customer sees the list but cannot accept or reject | Accept quote and Reject quote are not ticked in Action Permissions for the condition that matches them. |
| A customer who used to see quotes no longer does | You created a custom condition, so the Default condition stopped applying and that customer matches none of your conditions. |
| A condition has no effect | Its badge reads Draft. Open it and turn Status on in General. |
| The section is in English on a translated store | Use the Translation button on this page — Advanced settings > Translations does not cover it. |
Next steps
Section titled “Next steps”- Quote history page — the standalone page alternative
- Translate storefront text — translate the rest of the wording customers see
- Pricing plans — check what your plan includes