
Set the after-click behavior
Choose what happens the moment a customer clicks your quote button, and what the confirmation message says.
Click action decides what your quote button does. It is the single most important setting on the Button & widget tab, because it determines whether customers finish a request straight away or keep collecting products first.
Choose the click action
Section titled “Choose the click action”-
Open the button settings
Section titled “Open the button settings”In the app, go to Quote settings and click Customize, then open the Button & widget tab.
-
Find Click action
Section titled “Find Click action”Click action sits just under Button text, near the top of the Quote Button Settings section.
-
Pick one of the three actions
Section titled “Pick one of the three actions”Select Open quote form popup, Add product to quote cart, or Redirect to quote page. The table and the walkthroughs below explain each one; Add product to quote cart is the choice for stores where a request usually covers several products. Watch the Preview panel as you switch between them.
-
Save and try it
Section titled “Save and try it”As soon as you change the radio, Discard and Save appear at the top right of the Customize editor. Click Save, then click the quote button on your own storefront to see the action for yourself.
What each action does
Section titled “What each action does”| Option | What the customer sees | Best for |
|---|---|---|
| Open quote form popup | The quote form opens over the page they were looking at. | Single-product requests you want finished on the spot. |
| Add product to quote cart | The product is added to their quote cart and they carry on browsing. | Customers who request several products at once. |
| Redirect to quote page | They are taken straight to your quote cart page. | Stores where a request is nearly always one product and nothing else needs adding. |
What the customer experiences
Section titled “What the customer experiences”The three actions feel completely different on the storefront. This is what each one puts in front of a shopper.
Open quote form popup
Section titled “Open quote form popup”The quote form opens over the page the customer is already on, so they never leave the product. The fields are the ones you built on the Quote form tab, and the form carries the prompt “Already have an account? Log in to auto-fill your contact and company information.”
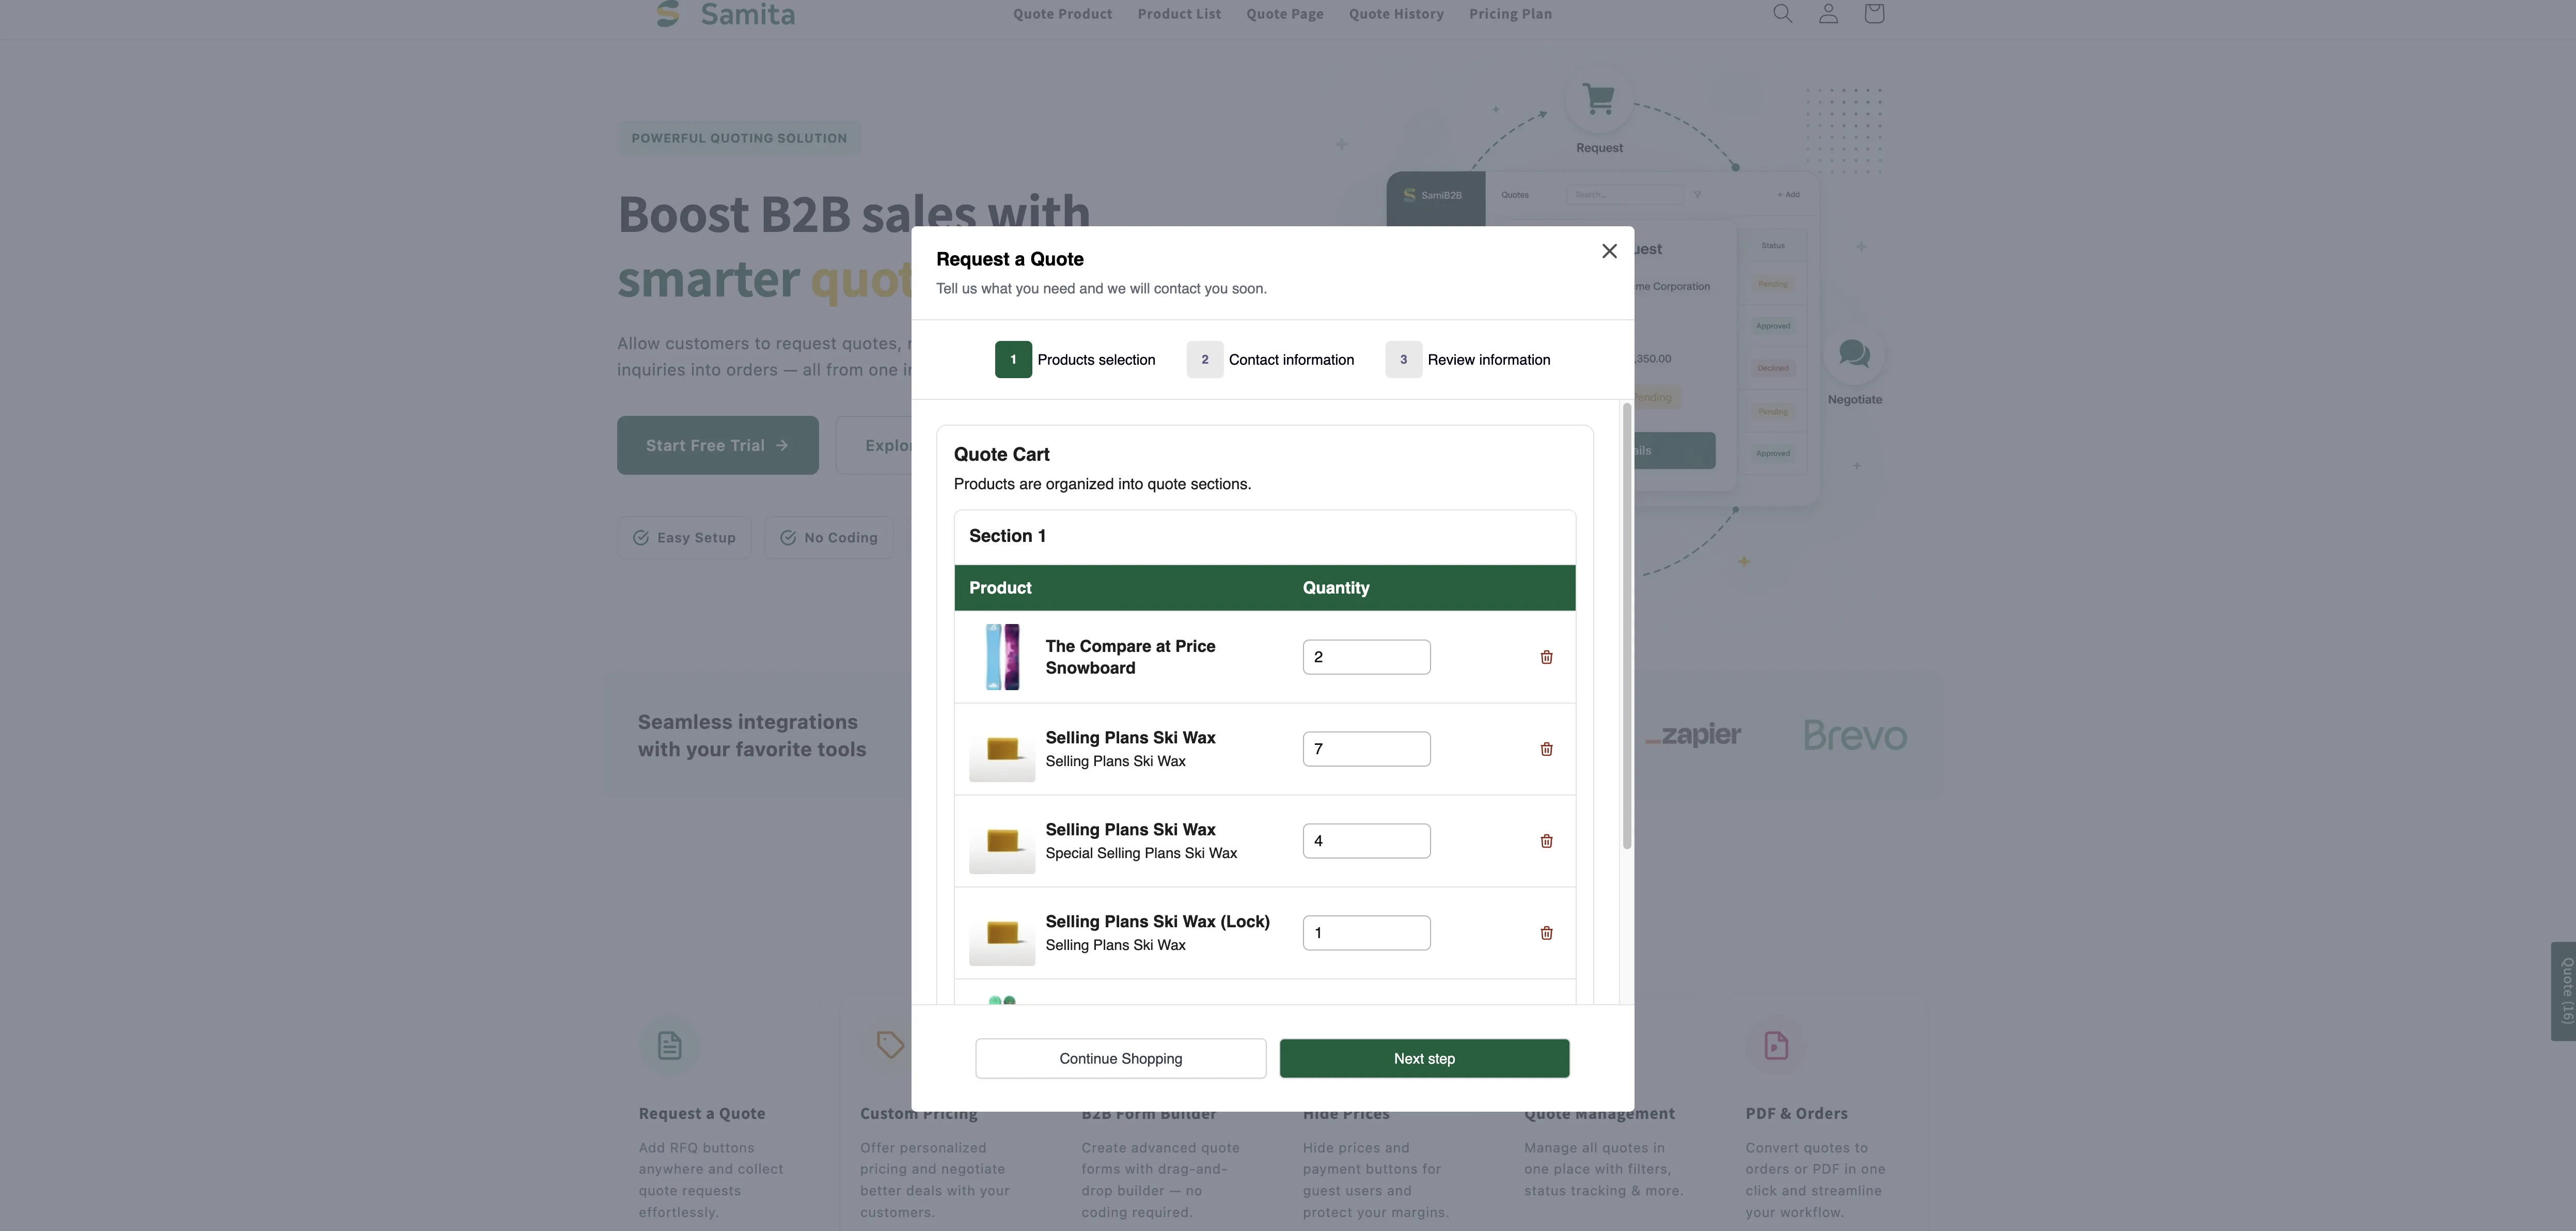
The popup keeps the customer on the page they were reading.
Add product to quote cart
Section titled “Add product to quote cart”The product goes into the customer’s quote cart and they stay exactly where they were. Nothing reaches you yet: a request is only sent once they open the quote cart page and submit the form.
Two things tell them it worked: the confirmation popup described below, and the floating widget at the edge of the screen, labelled Quote (n), whose number goes up with every product added.
Redirect to quote page
Section titled “Redirect to quote page”The customer is taken straight to your quote cart page at /pages/request-for-quote, headed Request a Quote with the line “Tell us what you need and we will contact you soon.”, and the product already listed in their Quote Cart.
With Quote form appearance set to Multiple step they arrive at step 1 Products selection and move on with Next step, while Continue Shopping is there for anyone who meant to keep browsing. With Single page the whole form sits on that one screen. Either way the request is sent from that page — see Request a Quote page.
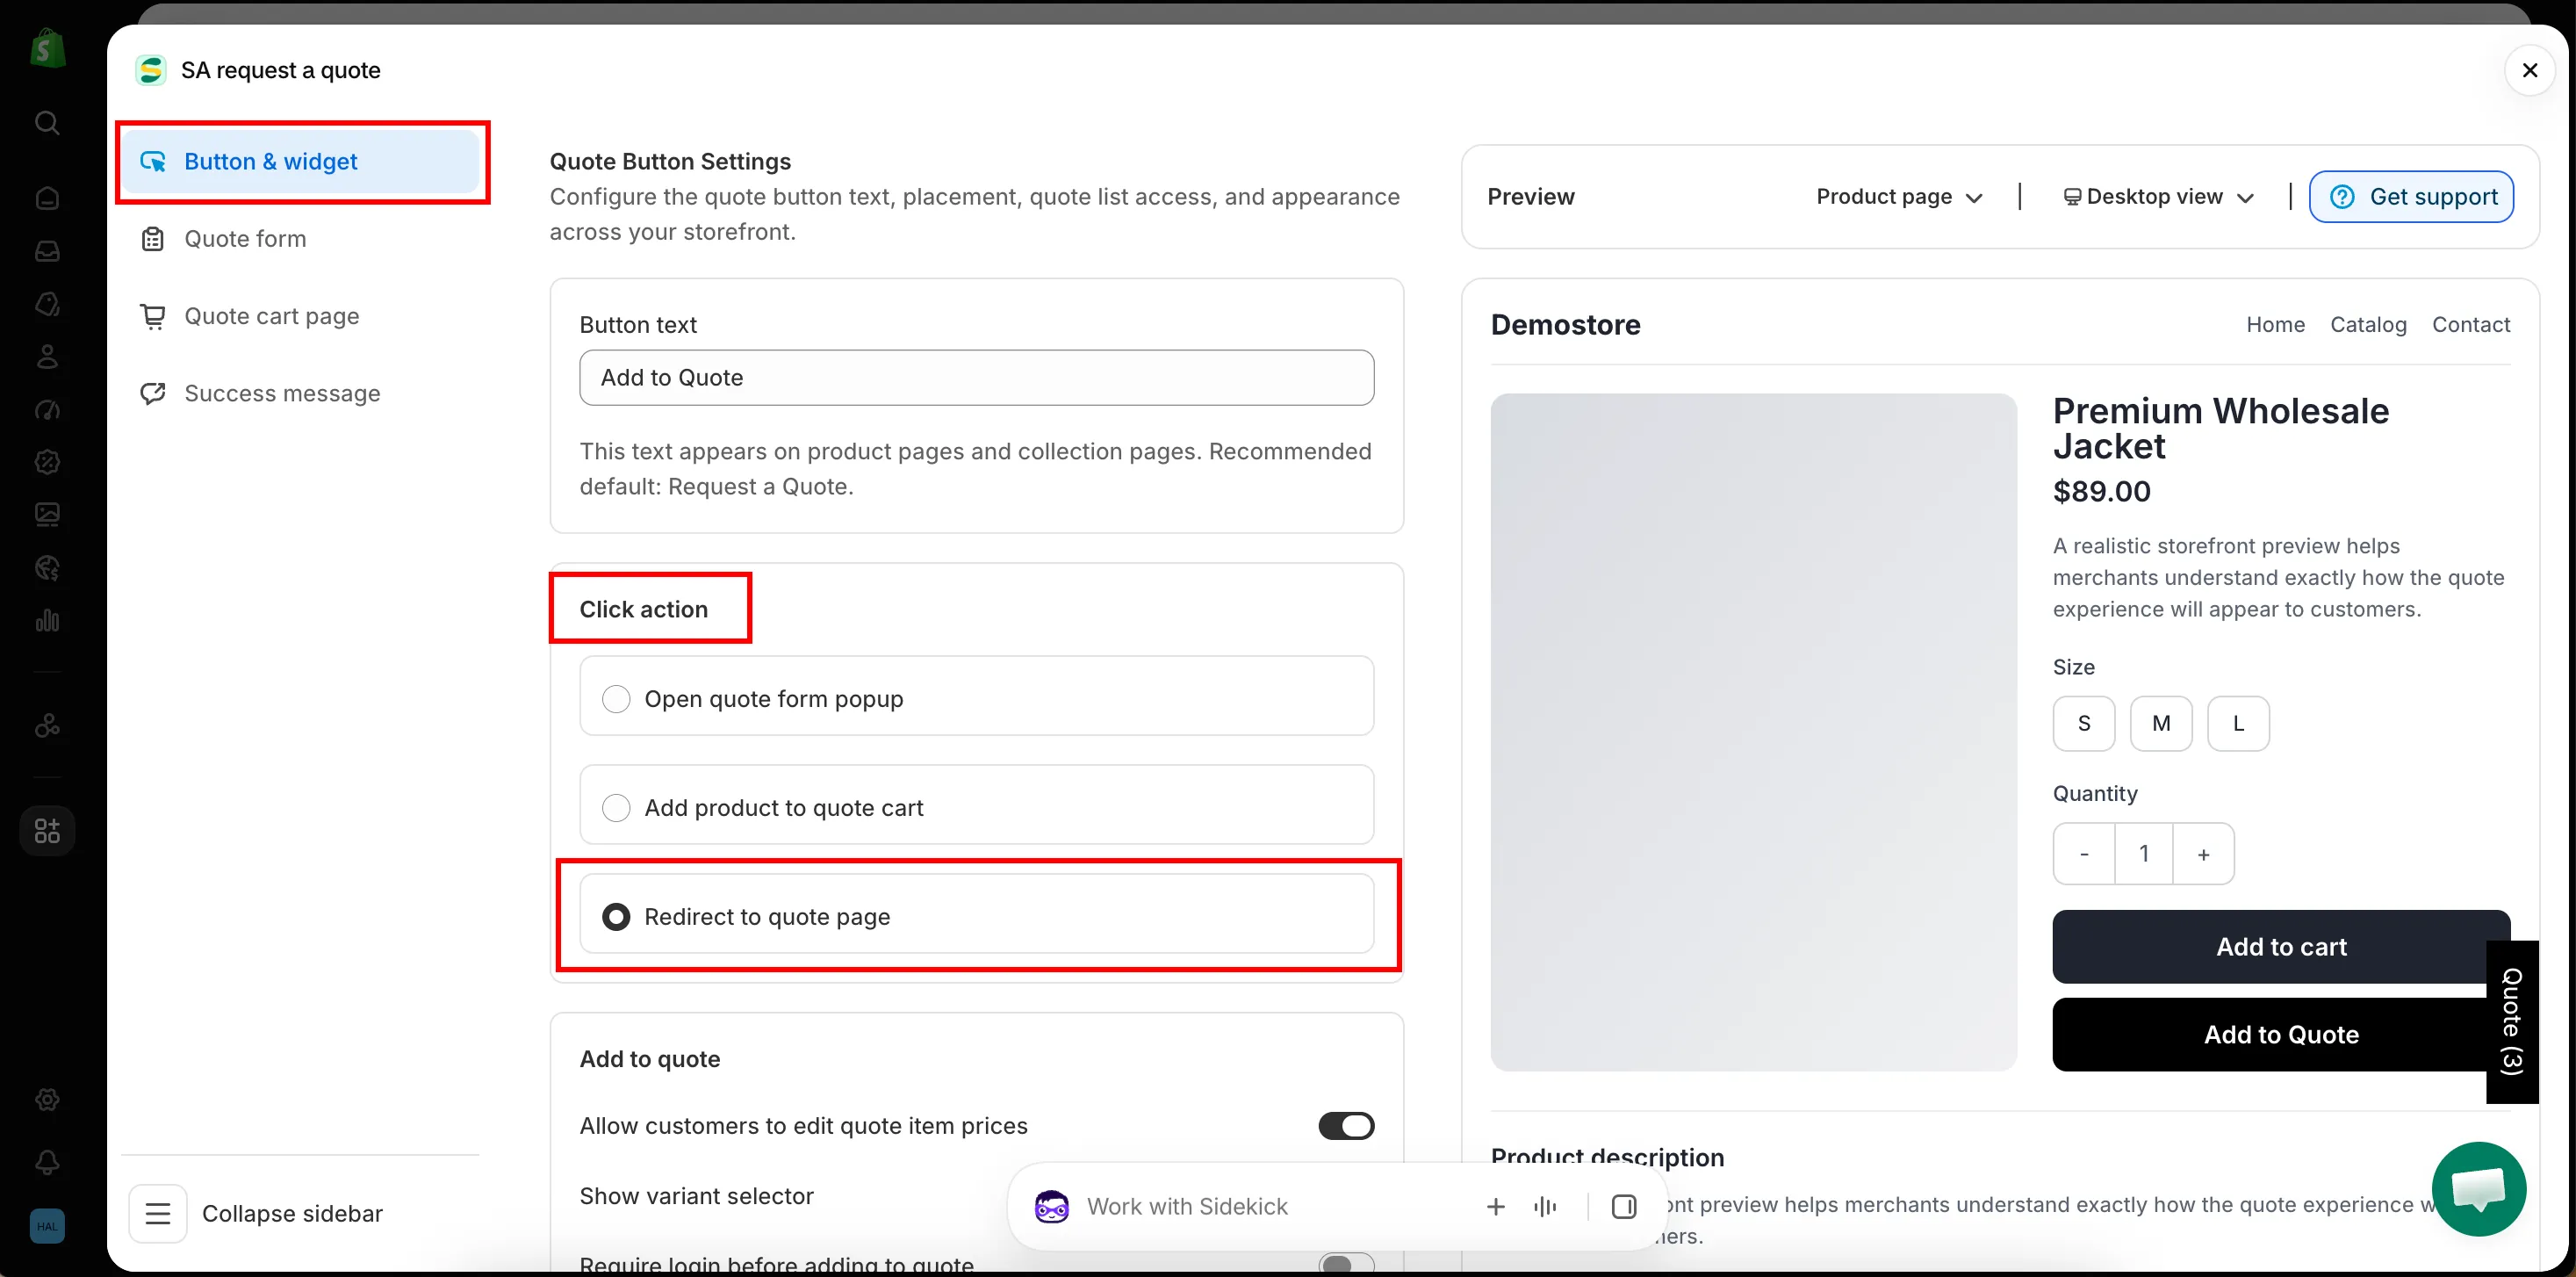
There is no confirmation popup with this action — the quote page itself is the confirmation.
The confirmation message
Section titled “The confirmation message”When a product is added, you can show a short confirmation so the customer knows it worked.
The panel is headed Show popup message after adding product, with a Preview link on the right that shows you the popup without leaving the editor. Fill in these fields:
| Field | What it does |
|---|---|
| Message | The confirmation wording. The default is The product {{ product_title }} is added to your quote. |
| Primary button | The main button in the popup. The default is View Quote. |
| Secondary button | The button that sends the customer back to shopping. The default is Continue Shopping. |
| URL link | "Where the secondary button sends customers. Defaults to your all-products collection." |
Under Message the app lists Available variables: {{ product_title }}. Click it to copy it, then paste it into your wording wherever the product’s name should appear — We have added {{ product_title }} to your quote request. It is the only variable the message accepts.
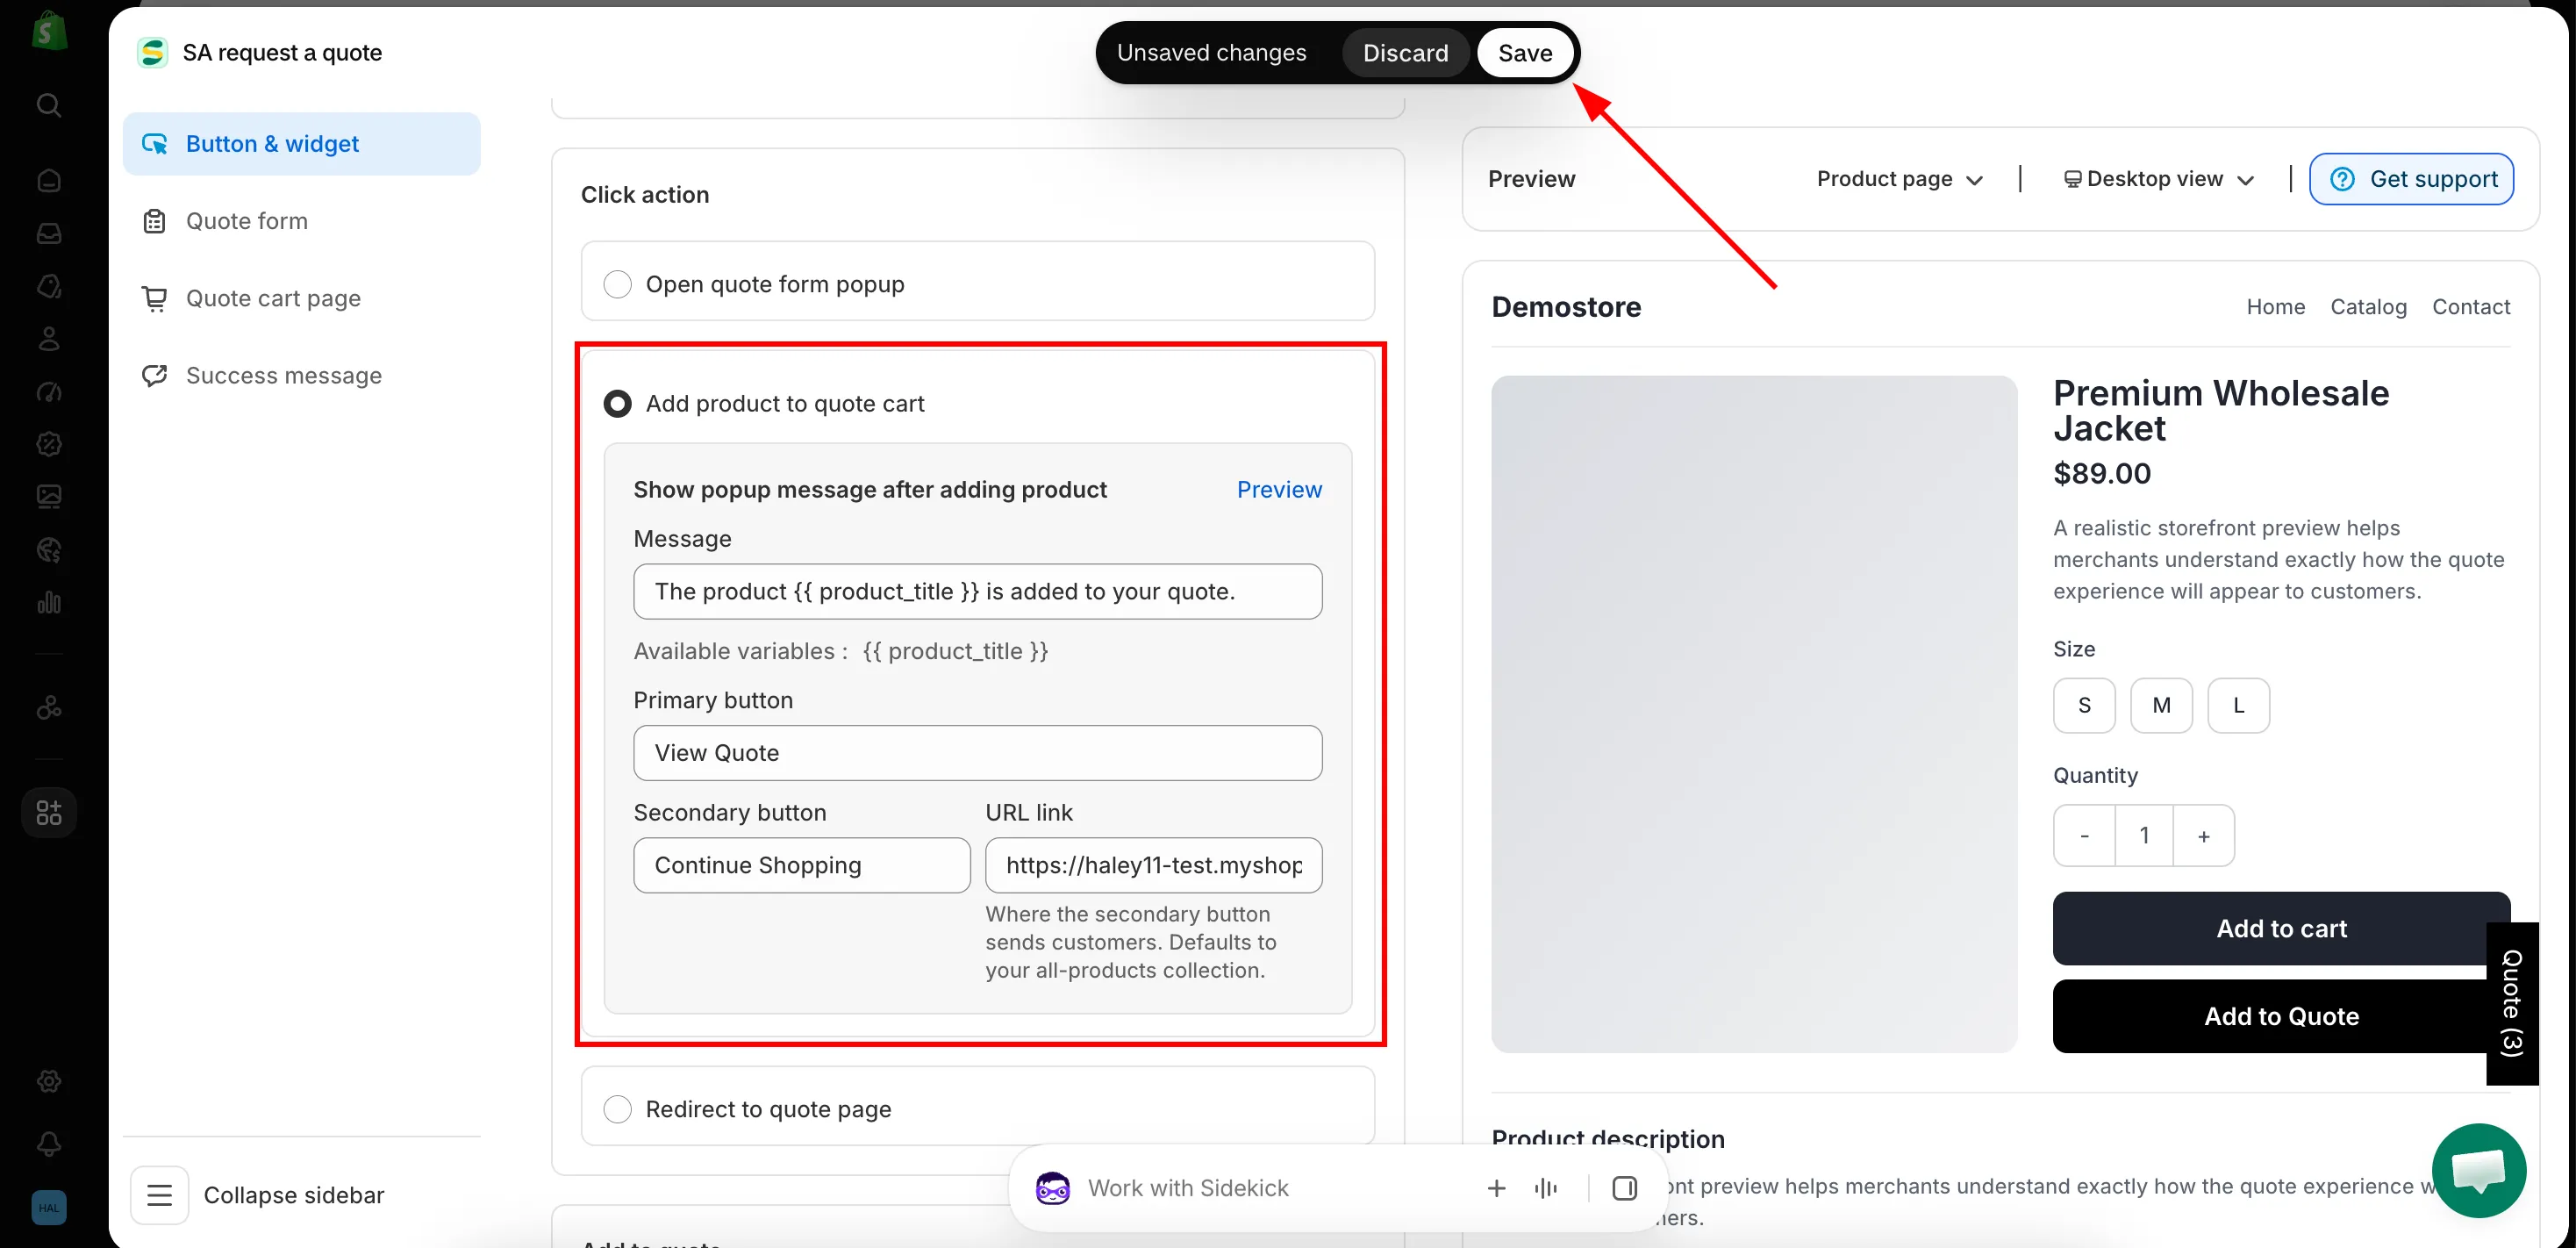
What the popup looks like
Section titled “What the popup looks like”On the storefront it comes out as a small popup over the page the customer was on: your Message, with the product named in it, and two buttons — View Quote to go straight to their quote, and Continue Shopping to carry on browsing.
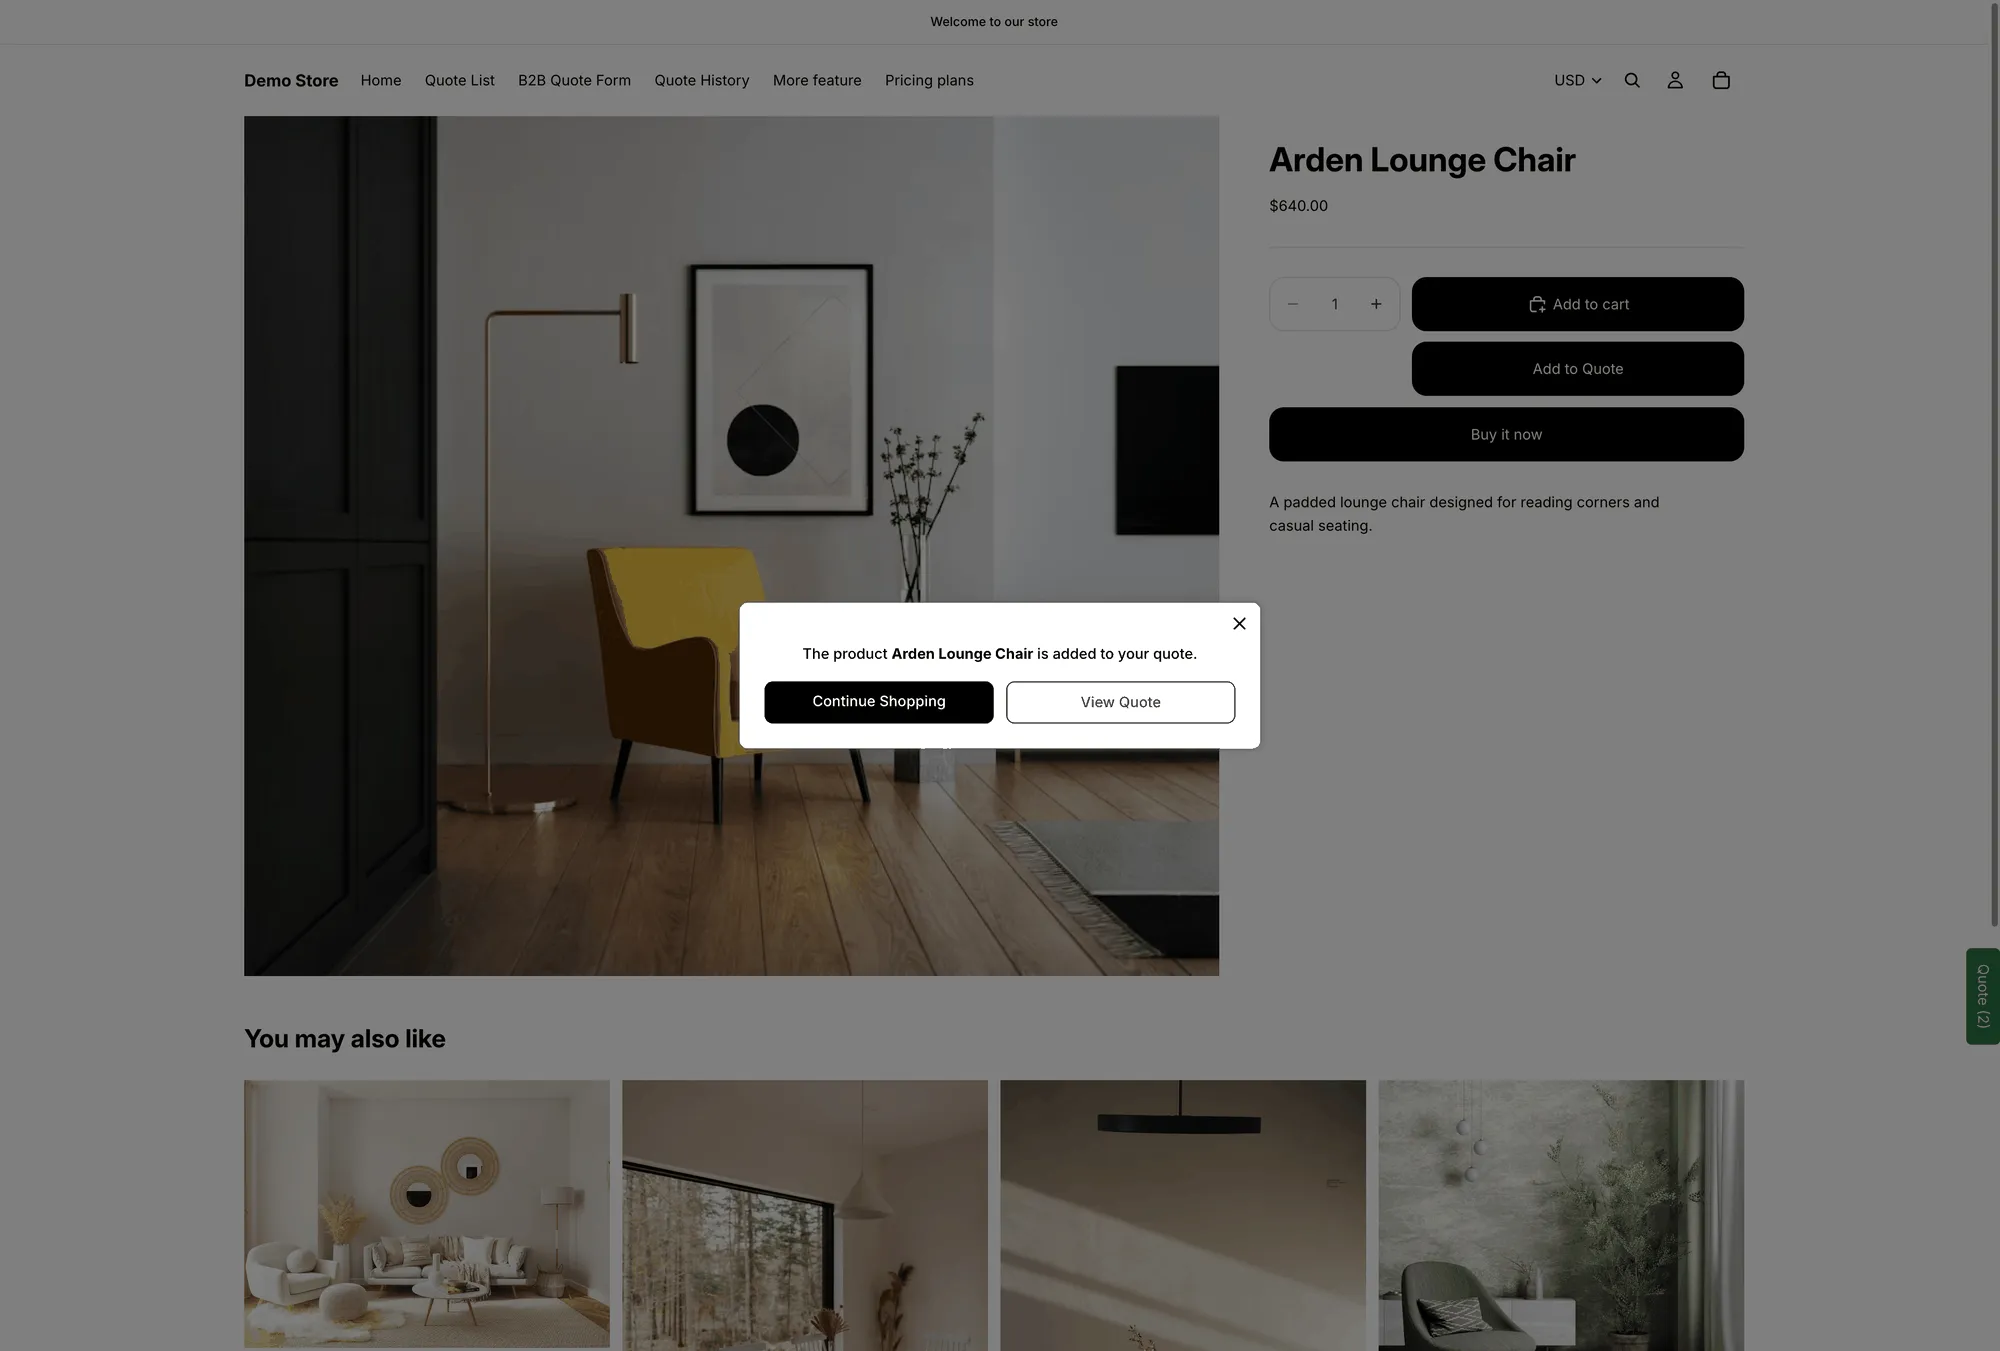
The popup on a live storefront, after a product is added to a quote.
Where the quote goes next
Section titled “Where the quote goes next”Once the customer has everything they want, they open the quote cart page, fill in the form and send the request. It arrives in Quote list in the app. The fields they filled in come from the Quote form tab.
What they see at the moment they send it comes from the Success message tab of the same editor: Success message holds the confirmation — Thank you, “Thank you for submitting a request a quote!” and Continue Shopping — and After submit can send them somewhere else instead.
Send customers to your own page after they submit
Section titled “Send customers to your own page after they submit”If you have written a thank-you page of your own, Redirect to custom URL takes customers there instead of leaving them on the confirmation.
-
Open the Success message tab
Section titled “Open the Success message tab”In the app, go to Quote settings, click Customize, and open the Success message tab.
-
Find After submit
Section titled “Find After submit”Scroll to the After submit section and turn on Redirect to custom URL.
-
Enter the page URL
Section titled “Enter the page URL”Paste the address of the page you want customers to land on — your own thank-you page, for example
https://your-store.com/pages/thank-you. Copy it from the page’s own address bar so you know it resolves. -
Click Save at the top right of the editor, then submit a test quote from your own storefront and check you land on the right page.
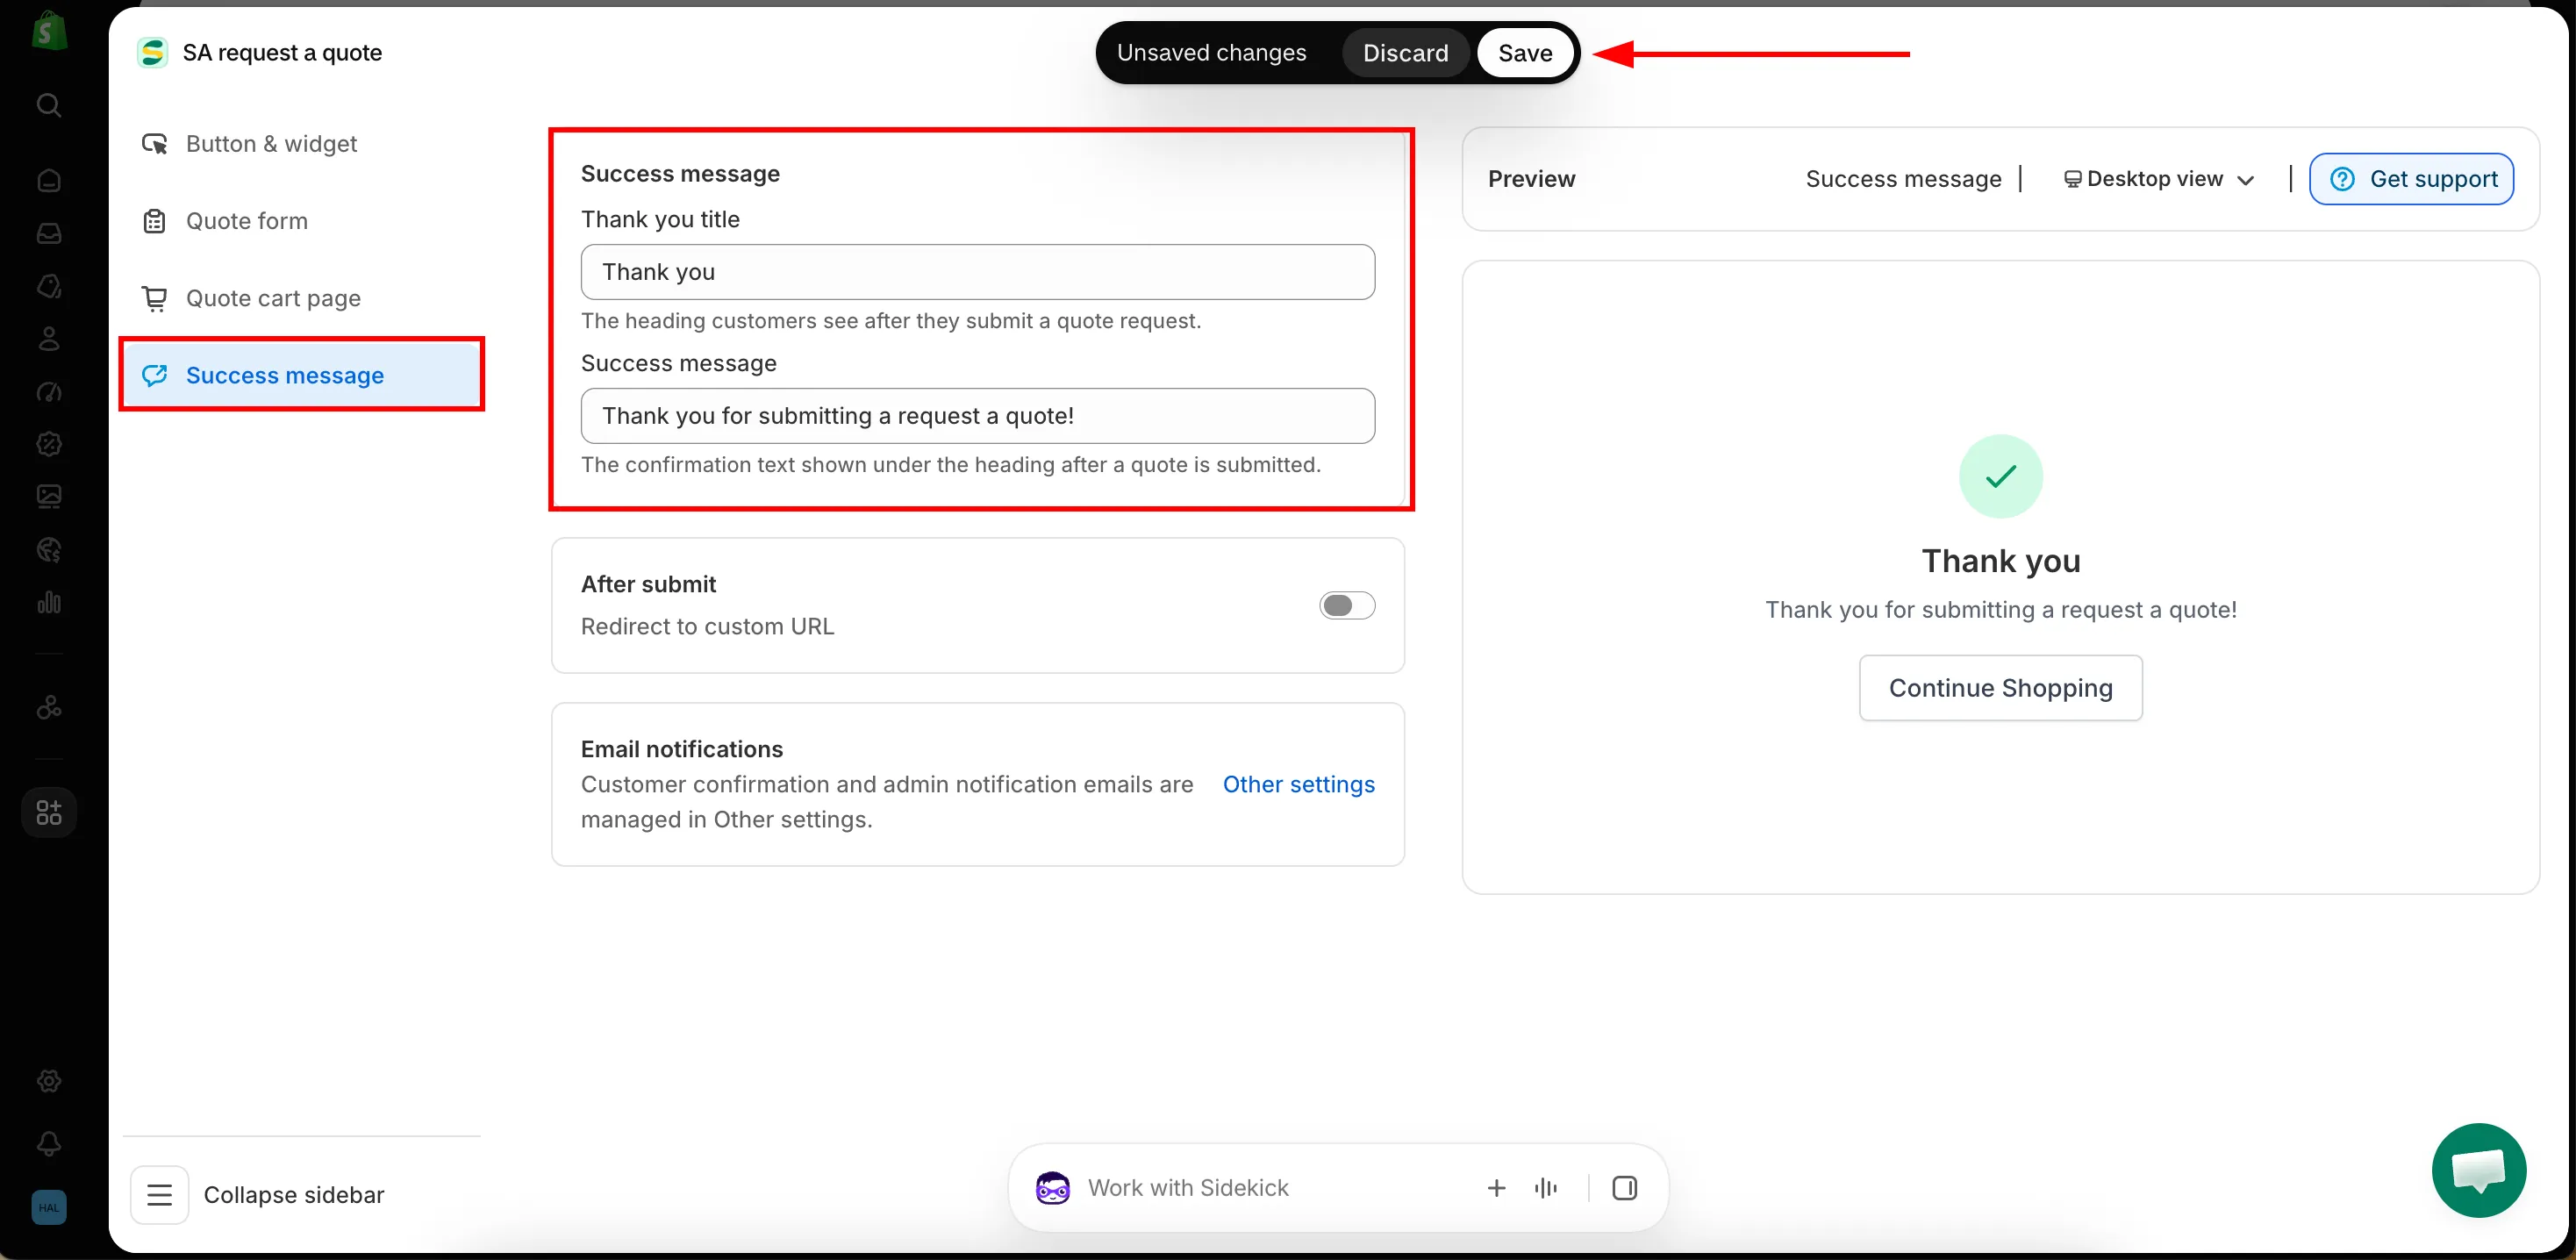
Email notifications are not set here. The Success message tab only points at them: customer confirmation and admin notification emails are managed in Other settings — see Emails sent to customers.
Need a hand?
Section titled “Need a hand?”If a click action does something other than what this page describes, tell us which one you picked and what happened — see Contact support.
Next steps
Section titled “Next steps”- Floating quote widget — a floating way back to the quote cart
- Change button text and colors — the wording and look of the button itself
- Request a Quote page — the quote cart page customers land on