
Company self-service page
Add a page to your customer accounts where approved buyers update their company's details and manage the people who order for it.
The Company self-service page is a page in your customer accounts made by Sami B2B Onboarding. An approved buyer opens it to update their company’s details and addresses, and a company admin uses it to add colleagues, change what they may do, and remove them. Changes to people go straight to the Shopify company, and each one is recorded in your activity log.
Add the page to customer accounts
Section titled “Add the page to customer accounts”-
Open the checkout and accounts editor
Section titled “Open the checkout and accounts editor”In the app, go to Settings › Customer accounts. In the Extensions card, click Add blocks in Customer accounts. Shopify opens its checkout and accounts editor.
-
Add Company self-service
Section titled “Add Company self-service”In the editor’s list of app blocks, under Sami B2B Onboarding, Company self-service has a card of its own below the Company application group. Click + beside it and choose Accounts.
Then link the page from the account menu: on the note above the page’s sections, click Add to menu, click Save when Shopify asks you to save your changes, and click Save in Edit menu. Shopify names the link Company self-service. You can rename it there before saving, for example to Manage company, the page’s heading. If you skip the note, save your changes in the editor and add the link later in Shopify admin under Content › Menus.
-
Check the status in the app
Section titled “Check the status in the app”Back in the app, open Settings › Customer accounts and click Refresh statuses (the circular arrow). Company self-service page shows Active.
Buyers also reach the page from the Manage company button on the Company application page and on the Profile page’s account banner.
What’s on the page
Section titled “What’s on the page”The page is headed “Manage company”. From top to bottom it shows:
- A card for each account form you turned on: Company profile, Company location and Contact profile, under the headings you gave them. Each card lists what Shopify has on file, for example the legal company name and website, or the location’s name, city and country. Edit opens the form in a dialog. A buyer who is admin of more than one location picks which one to edit with Location at the top of the dialog. On the location card, Add a location opens an empty location form when you allow it.
- People on this account: everyone who can order for the company, with their email, their role at each location (“Location admin · Main warehouse”), and You and Administrator badges. From six people up, a Search people box appears, plus a Location filter when the company has more than one location.
A signed-in customer who isn’t a contact of any company sees “Your account is not linked to a company yet…” and an Apply for a business account button to the Company application page.
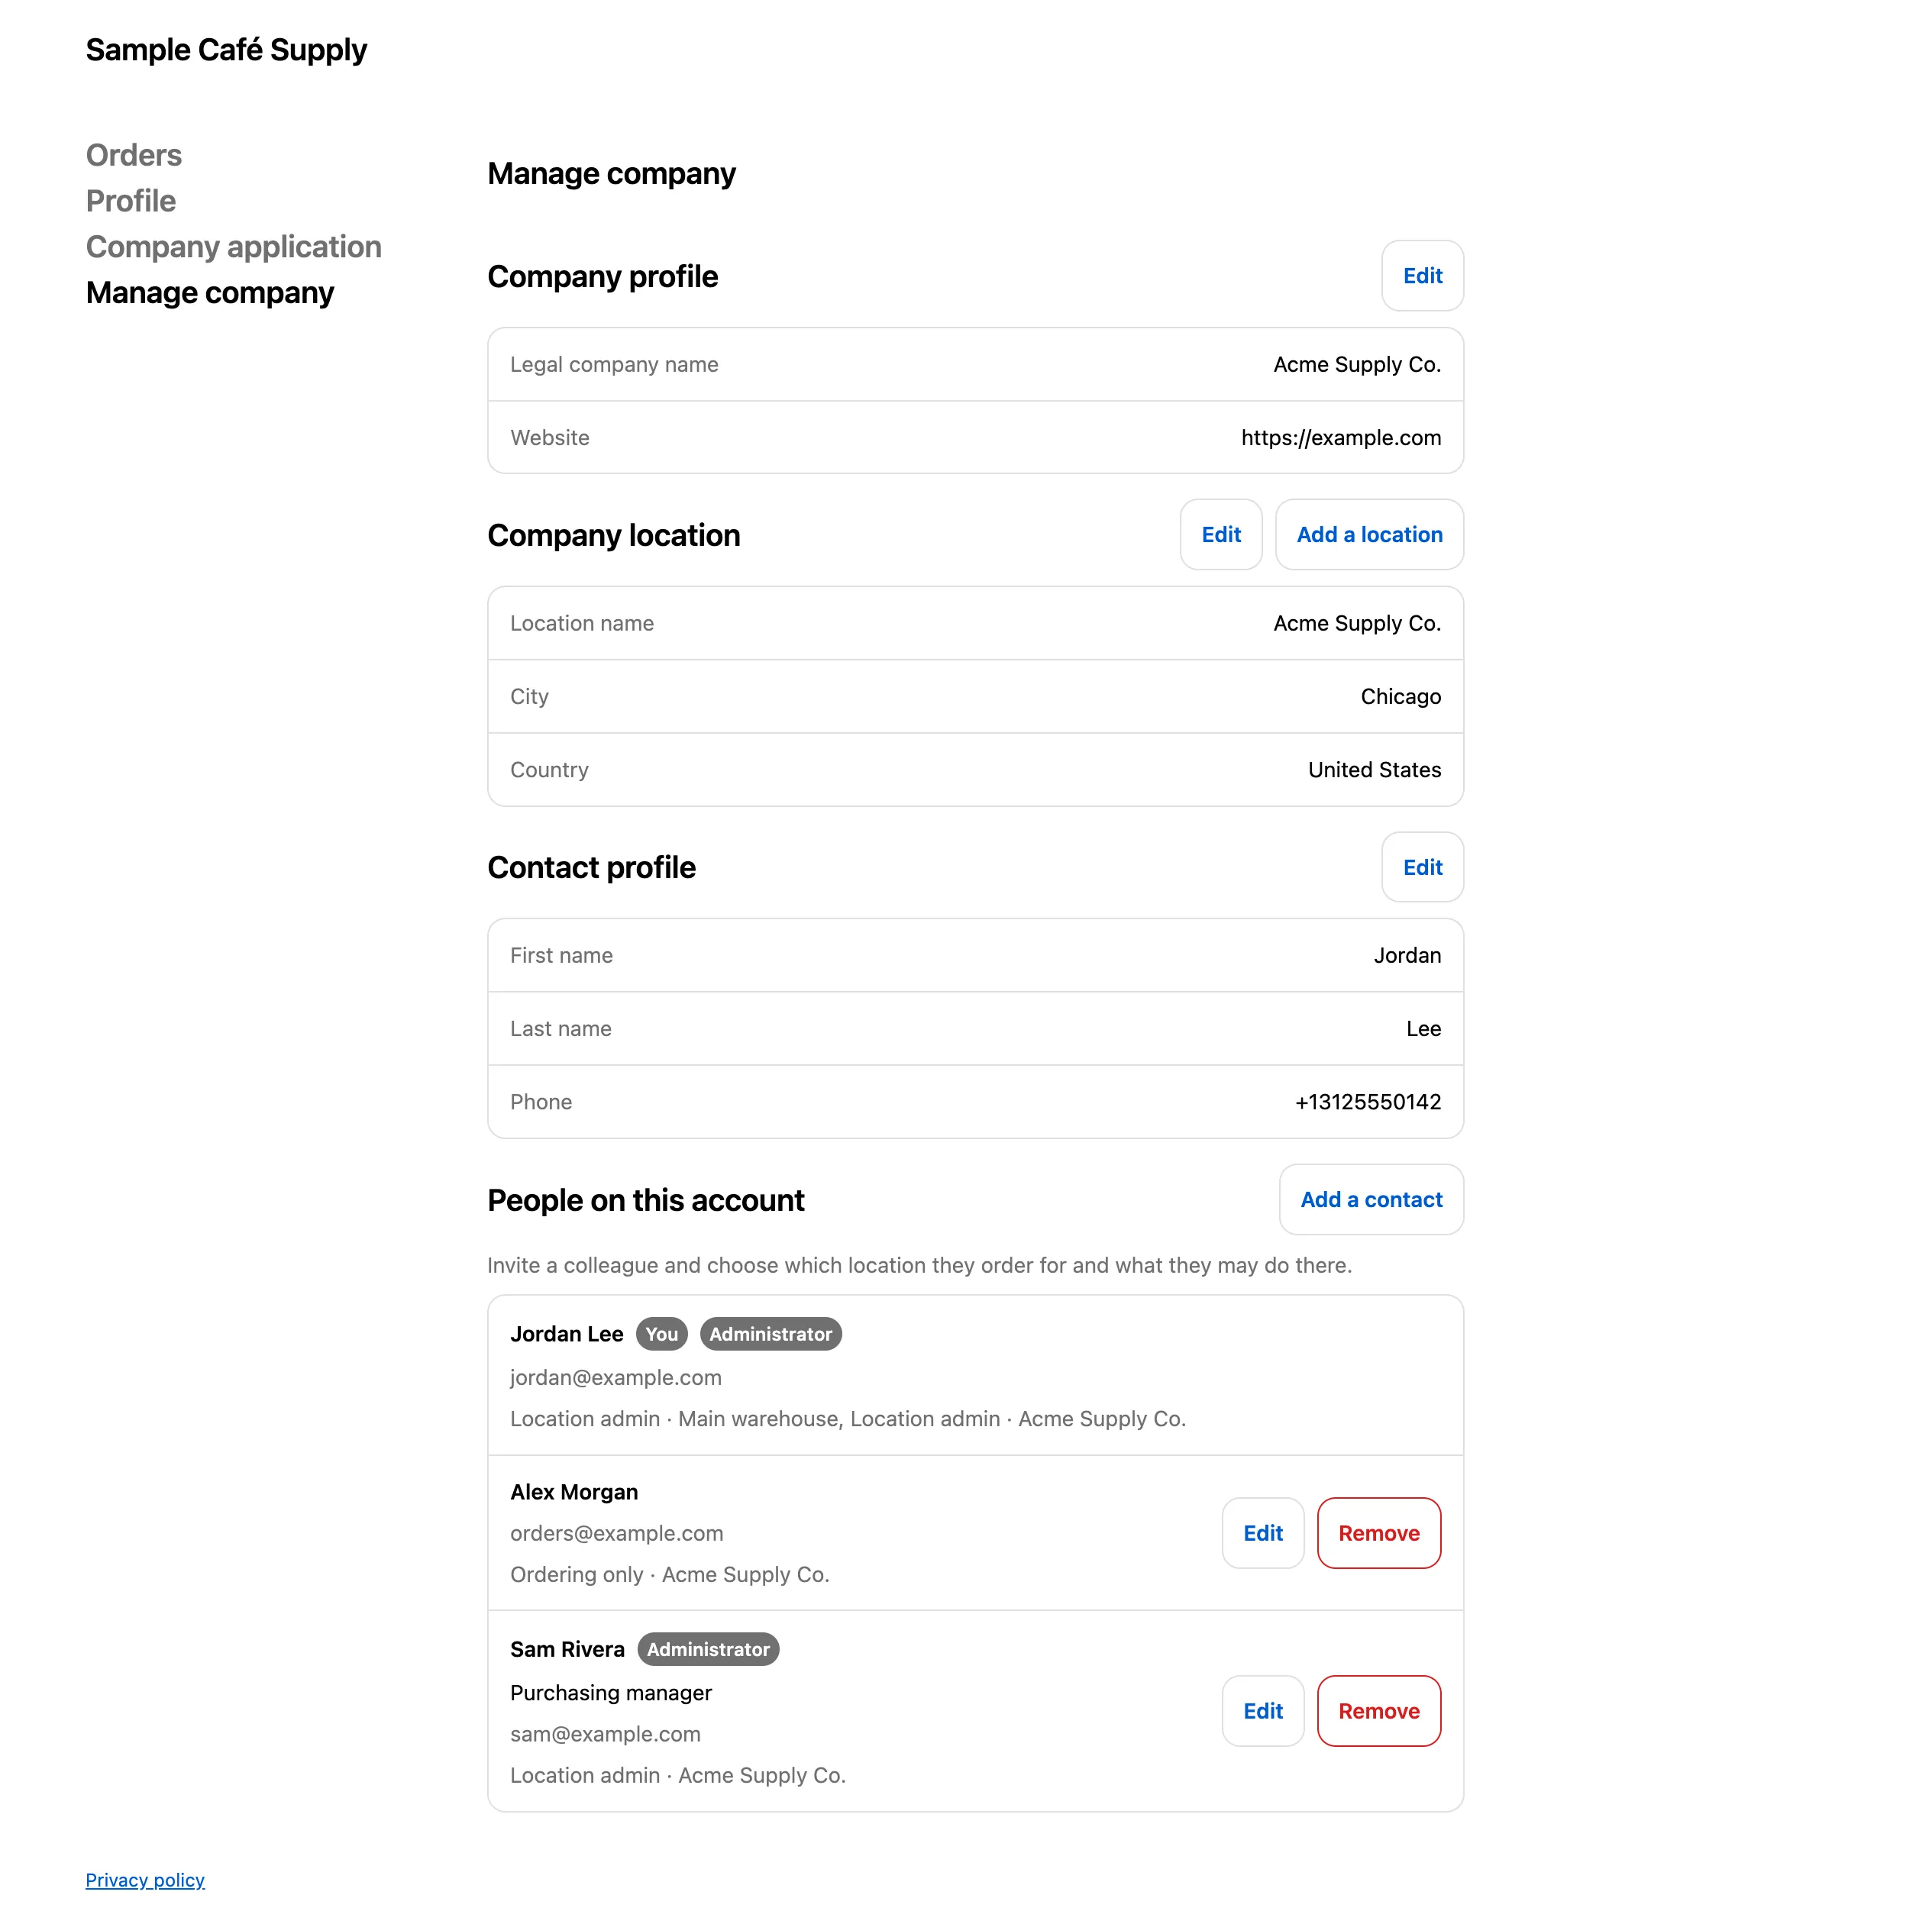
Company admins manage their own people here, and see the details you have on file for the company.
What each buyer can do
Section titled “What each buyer can do”What a buyer may do depends on their Shopify role at each company location. The app treats the Location admin role as admin.
| Task | Location admin | Other roles, such as Ordering only |
|---|---|---|
| See the company’s details and people | Yes | Yes |
| Edit their own Contact profile | Yes | Yes |
| Edit Company profile | Yes | No. The card reads “Only a company admin can change these details.” |
| Edit Company location | For the locations they’re admin of | No |
| Add a location | Yes, when you allow it in the Company location form | No |
| Add a colleague | At the locations they’re admin of | No |
| Change a colleague’s role | At the locations they’re admin of | No |
| Change a colleague’s name or job title, or remove them | When they’re admin of every location that colleague works at | No |
Edits to the account forms may wait for your approval first. See Account change requests. Changes to people never wait: they go to Shopify straight away.
How a buyer adds a colleague
Section titled “How a buyer adds a colleague”-
Open the invite
Section titled “Open the invite”On the Manage company page, the buyer clicks Add a contact. The Add someone dialog opens.
-
Fill in the colleague’s details
Section titled “Fill in the colleague’s details”They enter the colleague’s Email, and optionally First name, Last name, Job title and Phone. They pick the Location the colleague orders for (only locations the buyer is admin of are listed) and a Role. The role starts on one that isn’t an admin role, such as Ordering only.
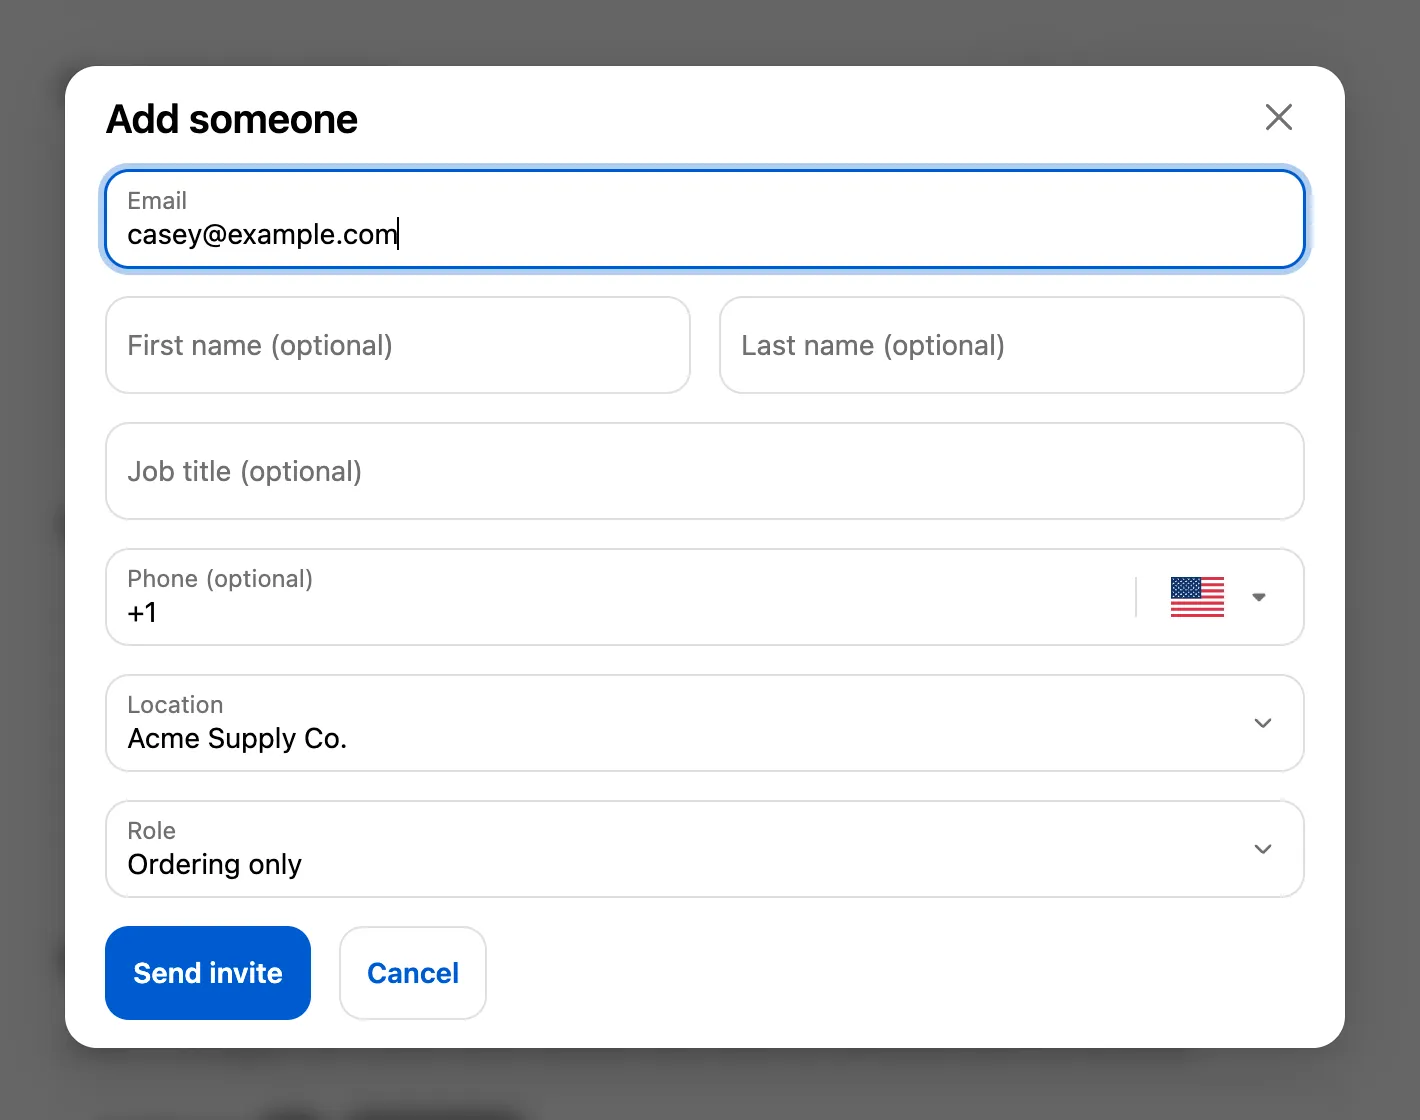
The colleague gets a role at one of the buyer’s own locations.
-
Send the invite
Section titled “Send the invite”They click Send invite. Shopify adds the colleague to the company with that role at that location. The colleague appears in the list.
The colleague receives the Company contact invited email (“You’ve been added to …”) with where to sign in. It is on by default. Turn it off or change its wording in Settings › Email. See Edit email templates. Shopify itself sends no email.
You can change the labels of the Add someone boxes, and hide the optional ones, in the Company contact account form. Your wording shows only while that form is turned on. While it’s off, the dialog still works with its standard wording. See Account forms.
Change or remove a colleague
Section titled “Change or remove a colleague”- Edit on a person’s row opens a dialog with their name and roles. The buyer can change the Role at a location they’re admin of, and the first name, last name and job title of someone whose every location they’re admin of. Save changes saves both.
- Remove asks once more: “… won’t be able to order for your company anymore.” Remove from company takes the person off the company in Shopify, at every location.
A few rules hold on the list:
- Nobody can edit or remove themselves, so a company admin can’t lock themselves out. Buyers change their own name and phone in Contact profile, when you turn that form on.
- Names and job titles can be up to 80 characters.
See what buyers changed
Section titled “See what buyers changed”Every change to people is recorded in Settings › Activity log, with Buyer as who did it:
- “Added orders@example.com to Acme Supply Co.”
- “Changed the role of orders@example.com at Acme Supply Co.”
- “Changed the name or job title of orders@example.com at Acme Supply Co.”
- “Removed orders@example.com from Acme Supply Co.”
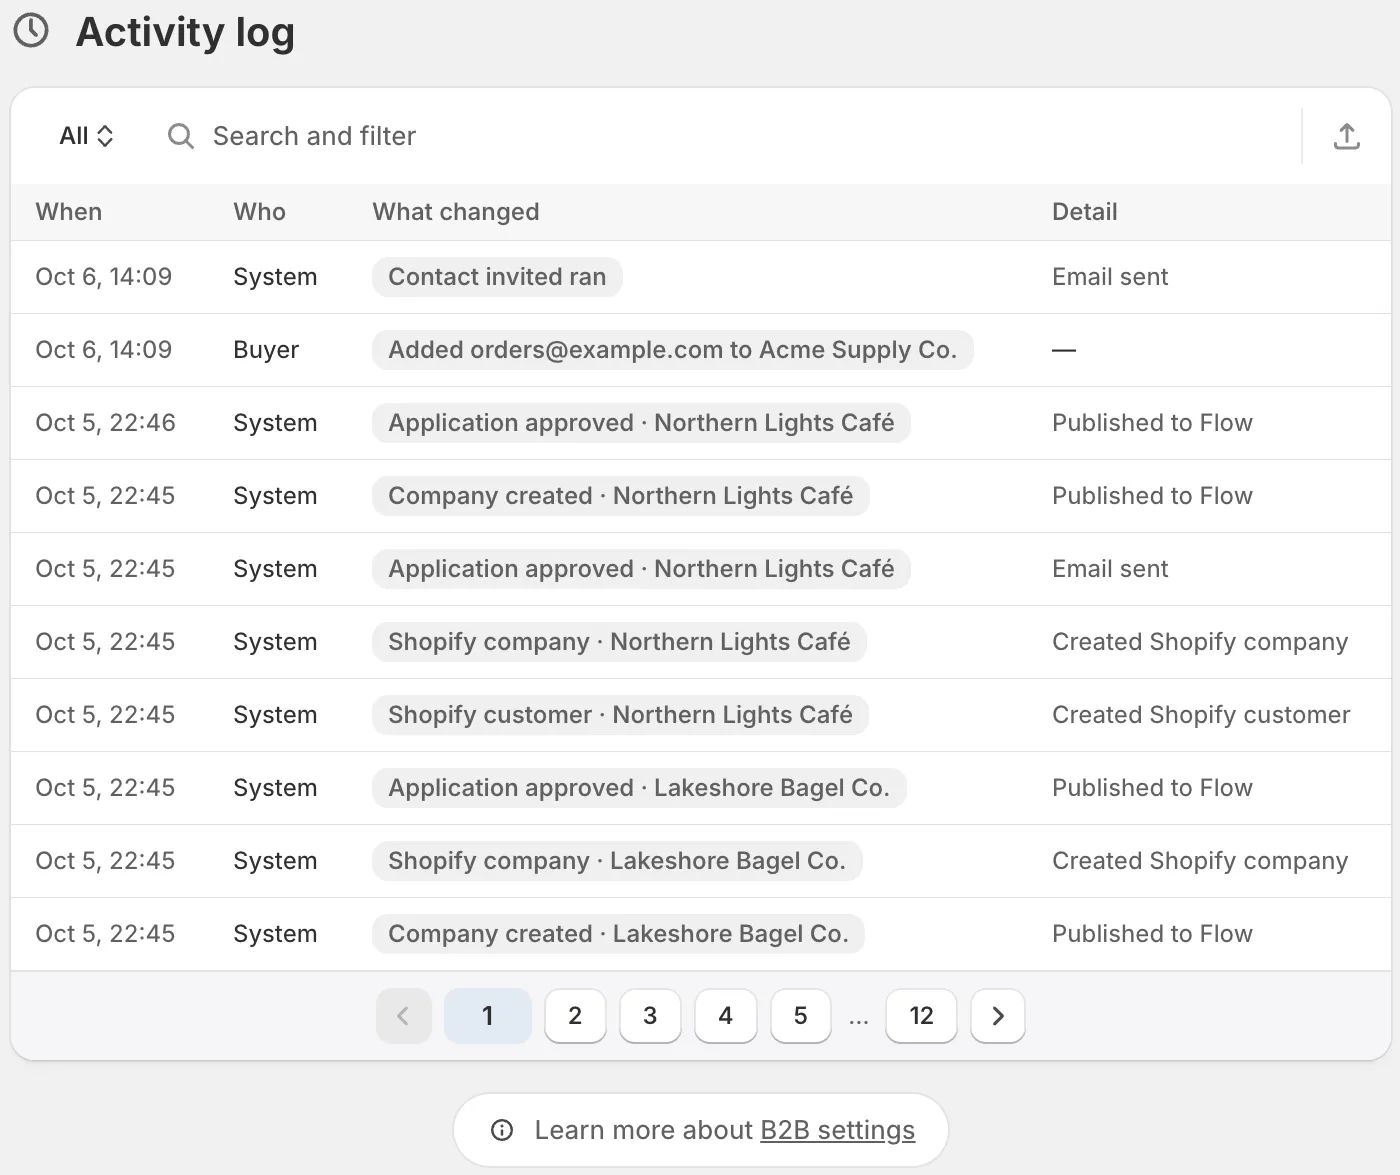
Changes buyers make to their company’s people show in your activity log.
Change the wording
Section titled “Change the wording”The page’s headings, buttons and messages are in Settings › Translate. Open your default language (Edit) or another language (Translate), choose Storefront messages and find the Customer account pages card. For example, Manage company heading, People on this account heading, Add contact button and Send invite button. See Translate.
Next steps
Section titled “Next steps”- Account forms — choose which company details buyers can edit here.
- Account change requests — approve the edits that wait for you.
- Activity log — follow what buyers and your team change.