
Application forms
Design the form
Change your form's font, width, field style, colors and logo so it matches your store.
The Appearance settings in Sami B2B Onboarding change how the whole form looks: its font, size, width, field style and colors. They apply to one form, so each of your forms can have its own look, and they never change your theme.
Open the Appearance settings
Section titled “Open the Appearance settings”-
Open the form
Go to Forms and click Edit beside the form. The builder opens.
-
Open Appearance
In the rail on the left, click Appearance. The panel lists every setting below, and the preview in the middle changes as you change them.
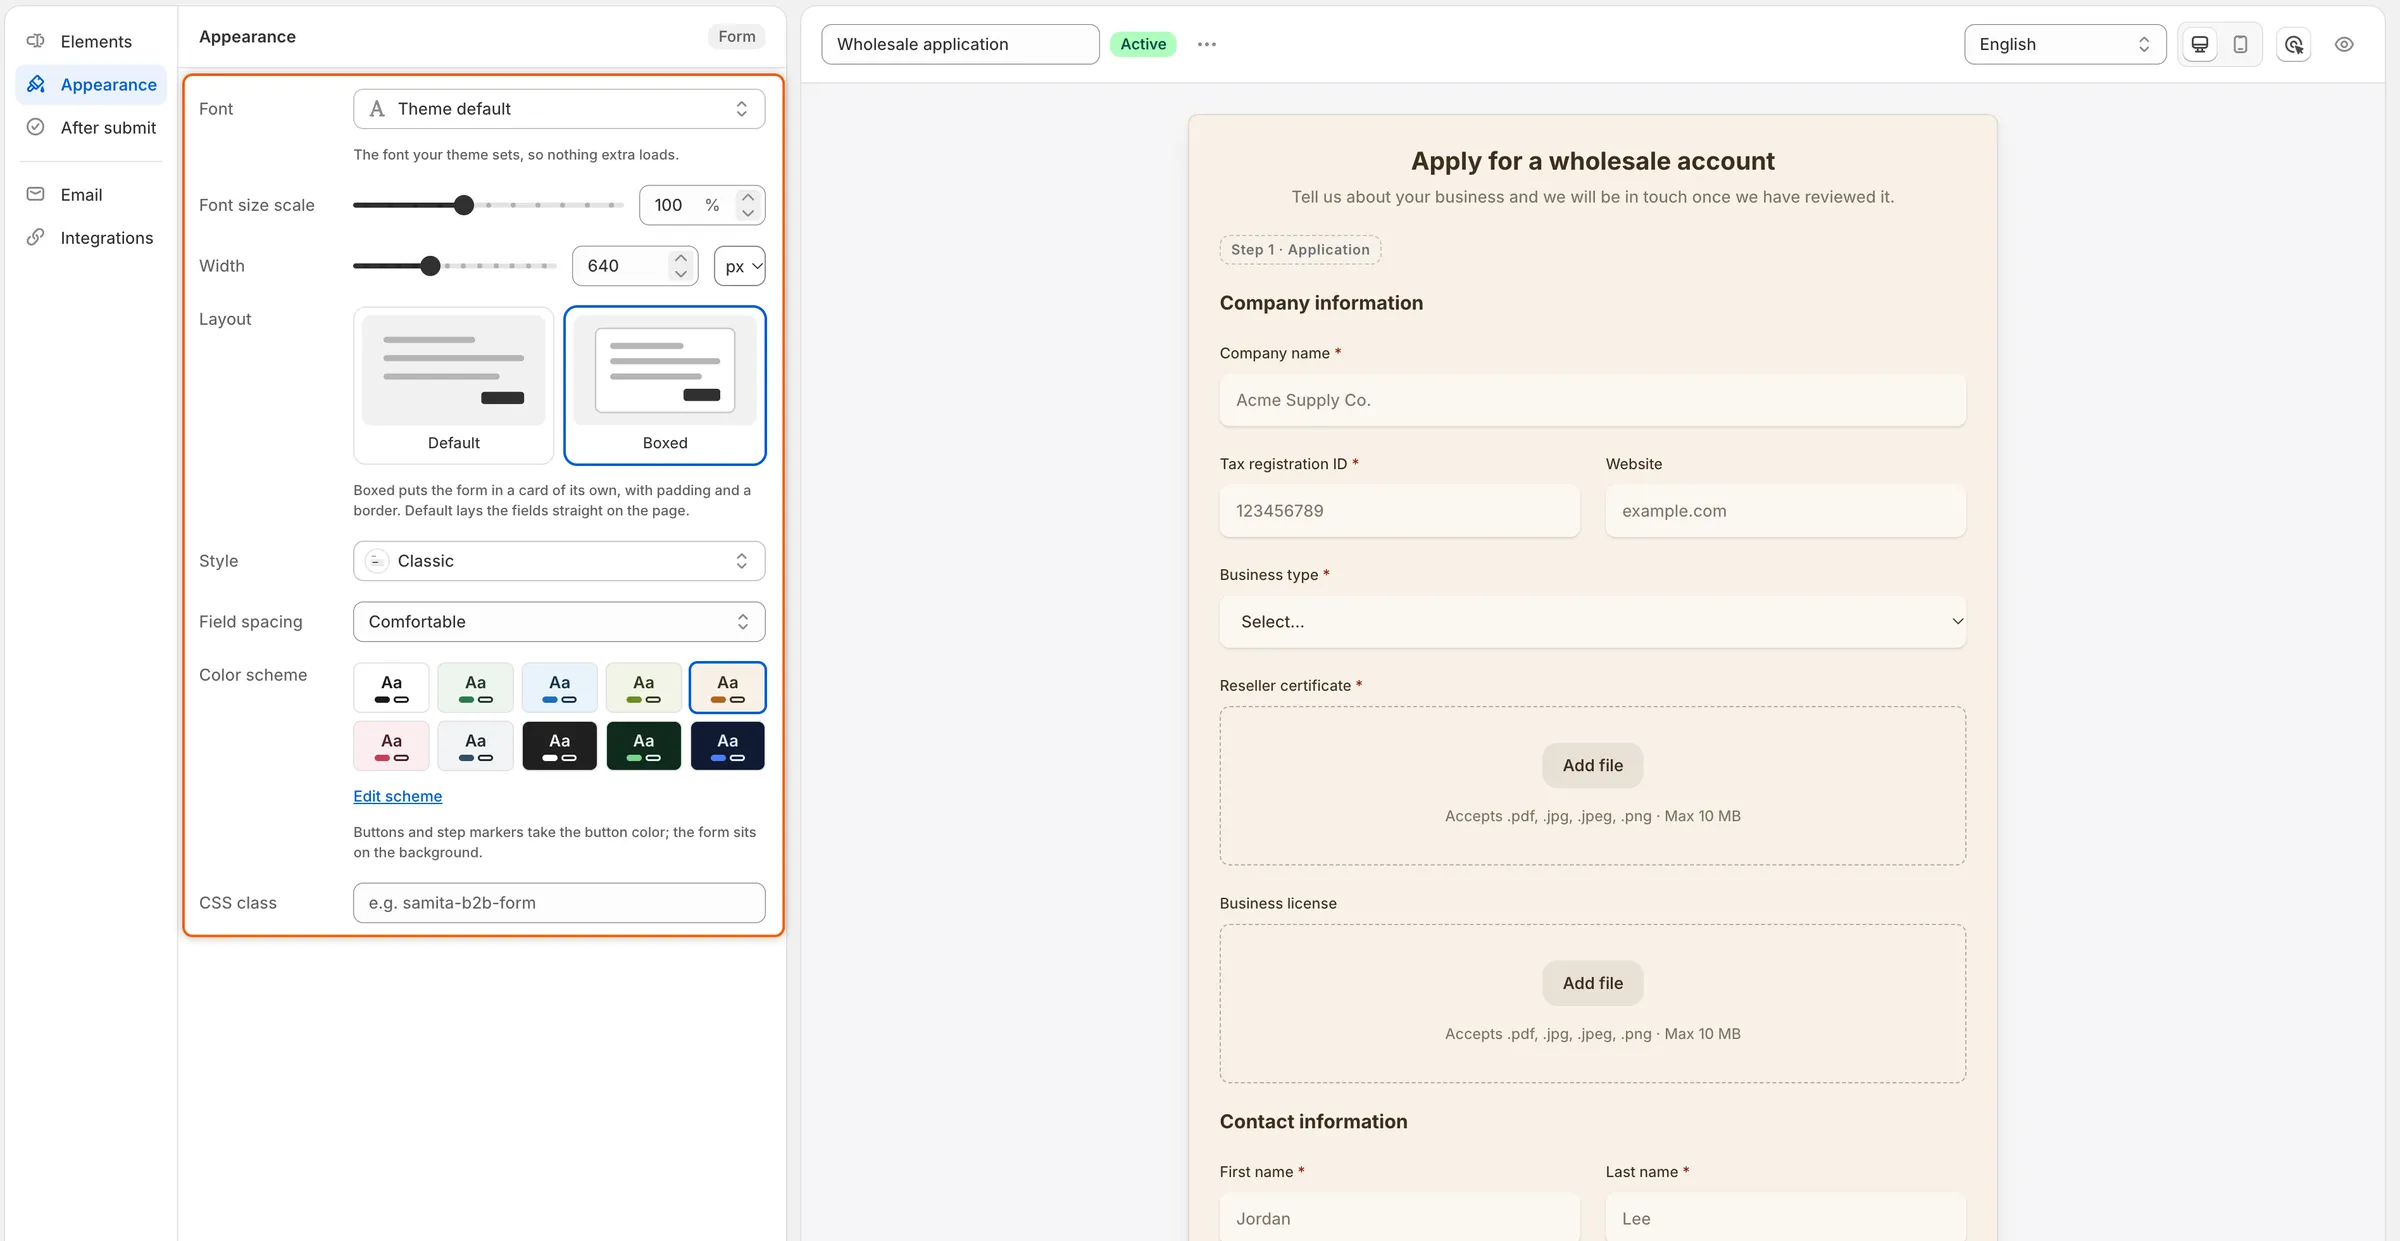
Every Appearance setting changes the preview straight away.
-
Save
When the form looks right, click Save in the save bar. If the form is published, buyers see the new look the next time they open it.
Appearance settings
Section titled “Appearance settings”| Setting | What it changes | Default |
|---|---|---|
| Font | The typeface of the whole form. Opens the Select font panel. | Theme default |
| Font size scale | The size of all the form’s text, from 80% to 130% of your theme’s size, in steps of 5%. | 100% |
| Width | The form’s widest size, in px (320 to 1200) or % of the space it sits in (30 to 100). The form is centered, and narrows on small screens. | 640 px |
| Layout | Default lays the fields straight on the page. Boxed puts the form in a card of its own, with padding and a border. | Default |
| Style | The look of every field box. See Field styles. | Classic |
| Field spacing | The space between fields: Comfortable or Compact. | Comfortable |
| Color scheme | The form’s background, text and button colors. See Colors. | Default |
| CSS class | Adds a class name of your own to the form, so styles in your theme can target it, for example wholesale-form. |
Empty |
When you switch Width between px and %, it starts again at 640 px or 100%.
Pick a font
Section titled “Pick a font”-
Open the font list
In Appearance, click the Font box. The Select font panel opens.
-
Find a font
Type in Search, or scroll. The list has two groups:
- System fonts: Theme default, the font your theme already uses, then System UI, Helvetica, Arial, Georgia, Times New Roman and Monospace. Nothing extra loads for these.
- Other fonts: nearly 1,000 web fonts. Each one is shown in its own typeface. They load from Google Fonts on your storefront, which can make the page a little slower to load.
-
Pick it and its weight
Click a font. The preview changes at once. If the font comes in several weights, pick one in the Weight list at the bottom of the panel, for example Regular, Bold or Italic. Click Done.
The note under Font confirms what you picked, for example Bold. Loads from Google Fonts on the storefront.
Field styles
Section titled “Field styles”Click the Style box to see all eight styles, each drawn as a sample Company name field. Click one to apply it to every field on the form.
| Style | What a field looks like |
|---|---|
| Material filled | A grey box with the label inside it, at the top. |
| Material outlined | A bordered box with the label sitting on its top edge. |
| Classic | A soft grey box with a light shadow and rounded corners. The default. |
| Classic rounded | Classic, with fully round one-line boxes. |
| Flat | A grey box with square corners and no shadow. |
| Flat rounded | Flat, with fully round one-line boxes. |
| Line | Only a line under the answer. |
| Line rounded | Looks the same as Line: an underline has no corners to round. |
In the rounded styles, boxes that hold several lines, such as Long text, keep softly rounded corners rather than going fully round.
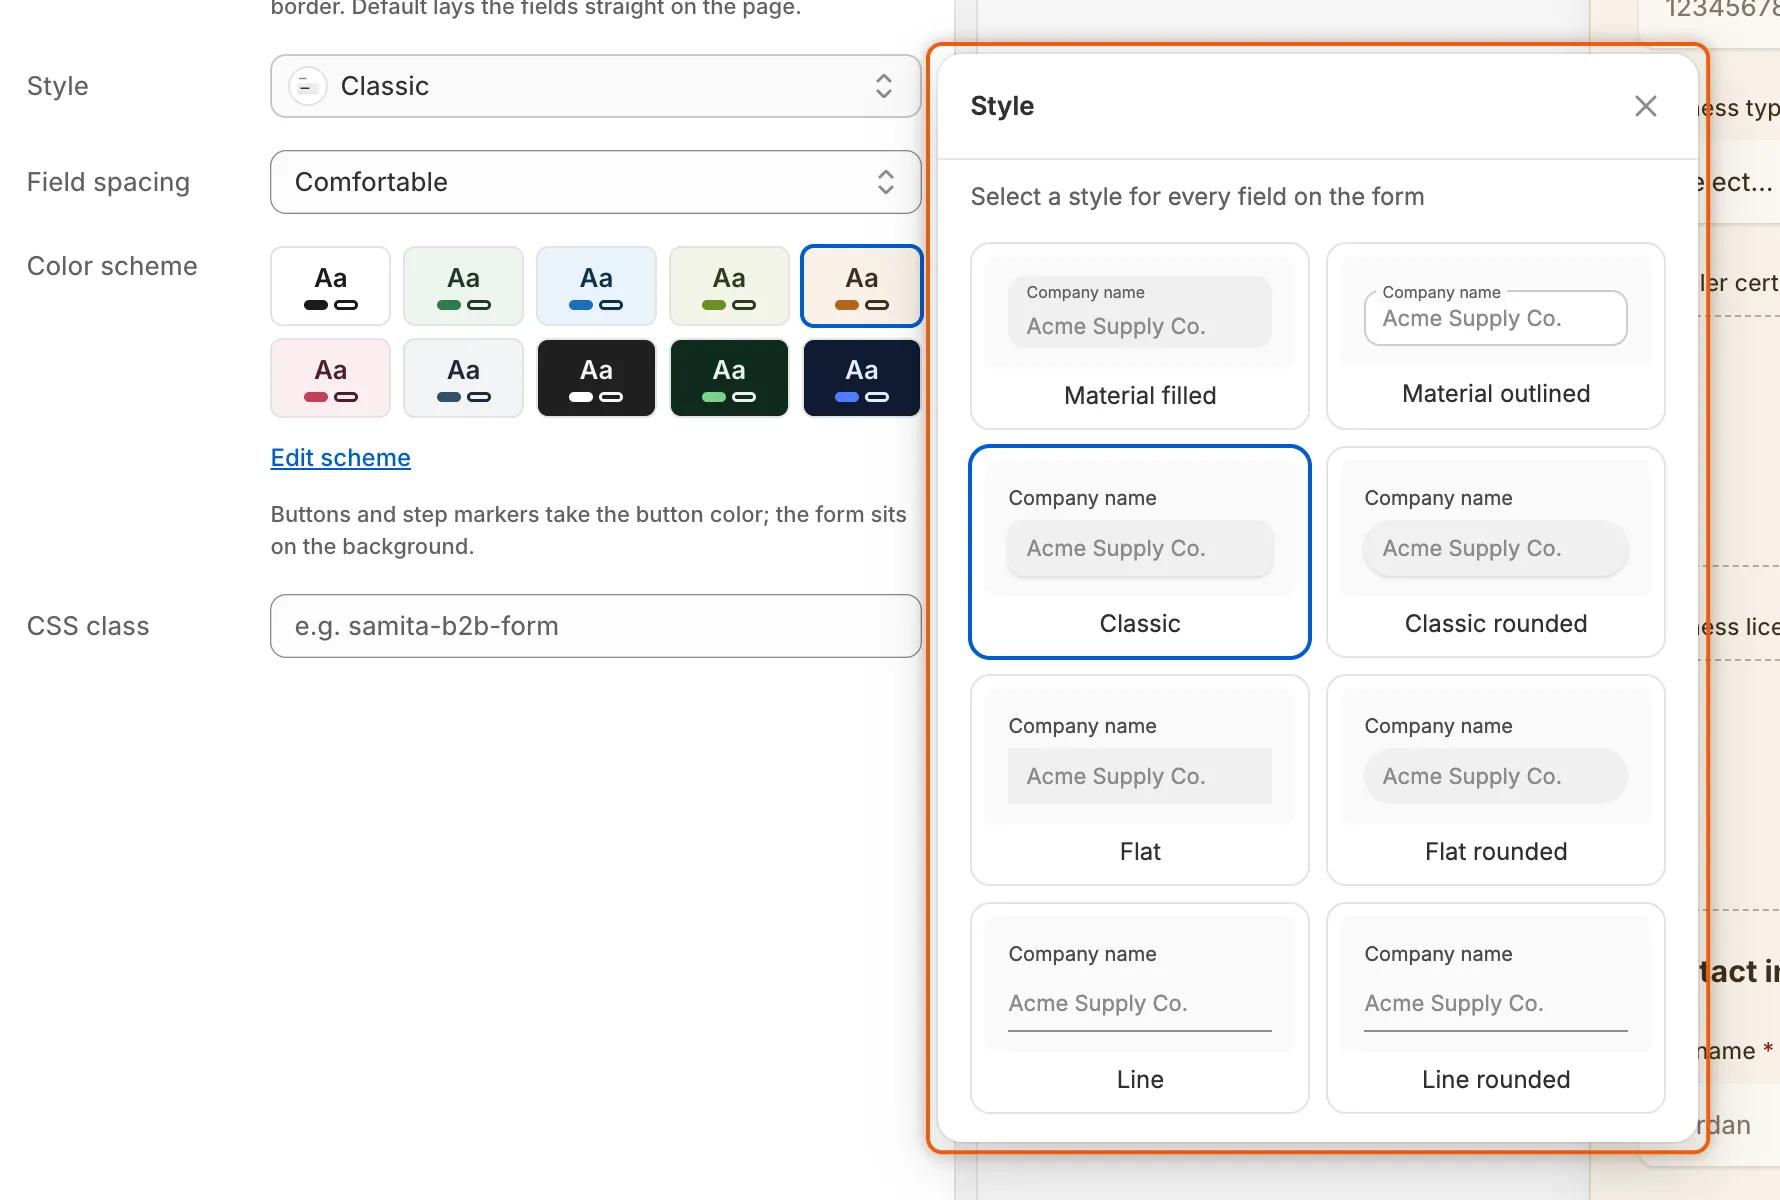
Each card shows how a field looks in that style.
Colors
Section titled “Colors”The Color scheme row shows ten ready-made schemes: Default, Forest Light, Cool Ocean, Matcha Calm, Warm Sand, Blush, Slate, Charcoal, Forest Dark and Midnight. Each swatch shows its background, text and button colors. Click one to use it.
- Default takes the page’s own colors, so the form matches your theme. To change those colors, change your theme’s settings.
- Any other scheme paints the form’s own background behind it. Buttons and step markers take the scheme’s button color.
Make your own colors
Section titled “Make your own colors”-
Open the scheme
Under the swatches, click Edit scheme. The Editing panel opens for the scheme you picked, for example Editing Warm Sand.
-
Change the colors
Click a color to open the color picker. Drag in the square and the color strips, type a hex code, or use the eyedropper to pick a color from your screen if your browser offers it. The colors you can set:
Color What it paints Background Behind the form. Text Labels, headings and answers. Solid button background The main buttons, such as Submit application, and the step markers. Solid button label The text on those buttons. Outline button The border of outline buttons, such as Back. Background, Text and Outline button can read Theme color, which means the form uses your theme’s color there.
As soon as you change a color, the scheme becomes Custom and a Custom swatch is added to the row. These colors apply to this form only. Your theme’s own color schemes don’t change.
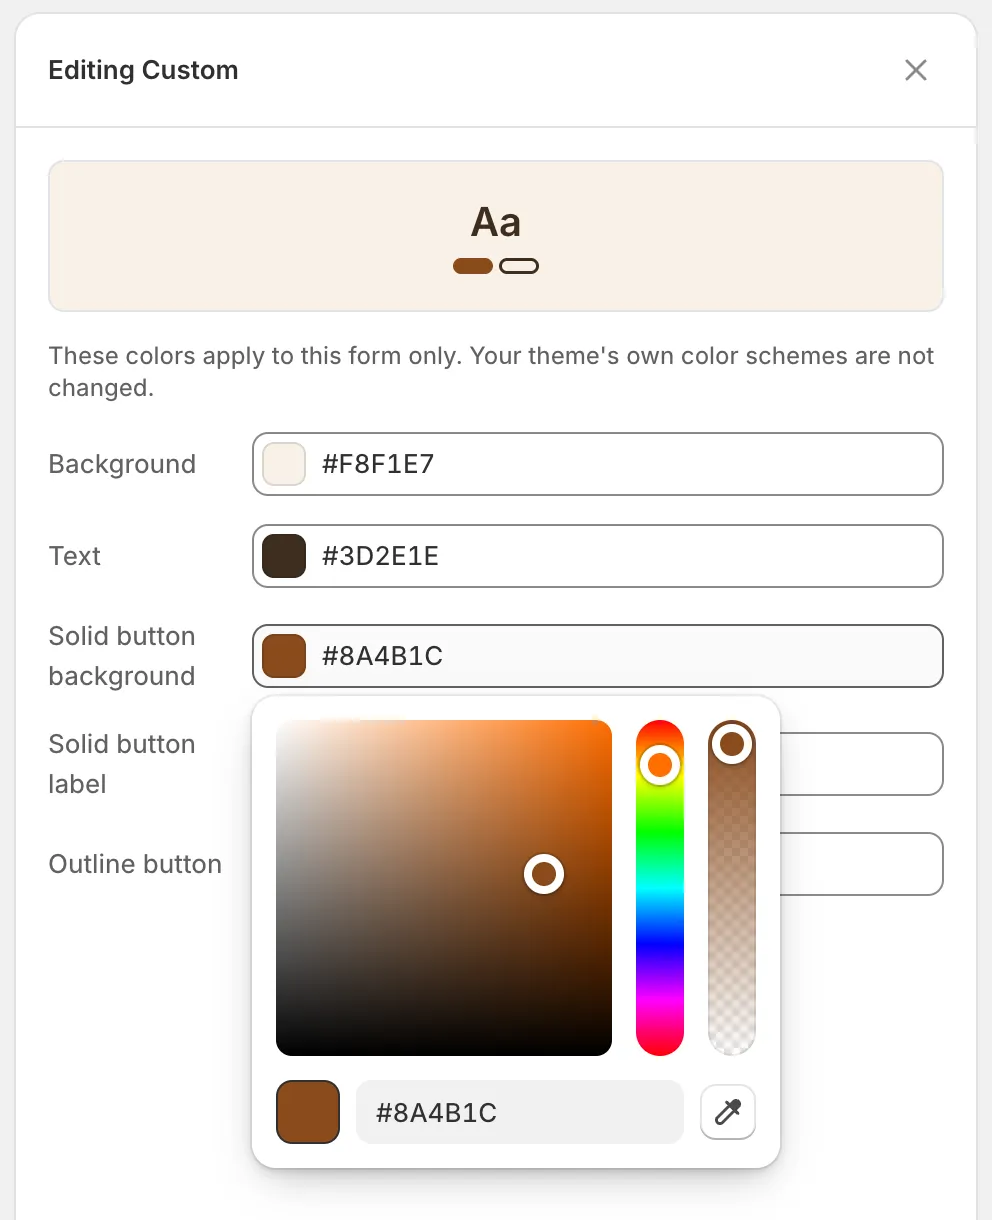
Change any color and the form gets a Custom scheme of its own.
-
Close or reset
Close the panel to keep your colors. To go back to your theme’s colors, click Remove color scheme at the bottom of the panel: the form returns to Default.
Add your logo
Section titled “Add your logo”The logo sits in the form’s header, above its heading.
-
Open the header
In the rail, click Elements, then click Header at the top of the list.
-
Upload the logo
Turn on Show store logo, then click Upload image and choose the file. It must be a .jpg, .png or .svg image of 1 MB or less. A size of about 200×60 px fits best.
To change it later, click Replace image. To take it off, click Remove.
-
Save
Click Save in the save bar.
Check the design
Section titled “Check the design”The preview in the builder draws your form with the same code your storefront uses, so the layout, field style, spacing and scheme you see are what buyers get.
- Use the Desktop preview and Mobile preview buttons above the preview to check both screen sizes.
- Settings you leave to your theme, Theme default for the font and Default for the colors, take your theme’s font and colors on the storefront. To see them, click Preview (the eye button) in the toolbar. It opens the form’s page on your store in a new tab, as it was last saved.
Next steps
Section titled “Next steps”- Build your form — set each field’s width, label and placeholder.
- After the buyer submits — write the thank-you screen buyers see after this form.
- Add a form to your store — put the finished form on a page, in a theme section or anywhere with HTML.