
Customize the quote PDF
Set up the quote PDF template in Advanced settings so the document you send shows exactly what you want it to.
Business buyers rarely act on an email alone. They file the quote, forward it for approval, or attach it to a purchase order — so the document matters as much as the message.
In the app, Quote PDF is the “Template used to convert a quote to a PDF file”. It is what a customer gets whenever you download a quote or send it on, so it is worth setting up before a real quote goes out.
Where to find it
Section titled “Where to find it”In the app sidebar, click Advanced settings, then choose the PDF template tab. It holds two templates:
| Template | What it produces |
|---|---|
| Quote PDF | "Template used to convert a quote to a PDF file" — the offer you send a customer. |
| Invoice PDF | "Template used to convert a draft order to a PDF file" — the document that goes with a quote you have turned into a draft order. |
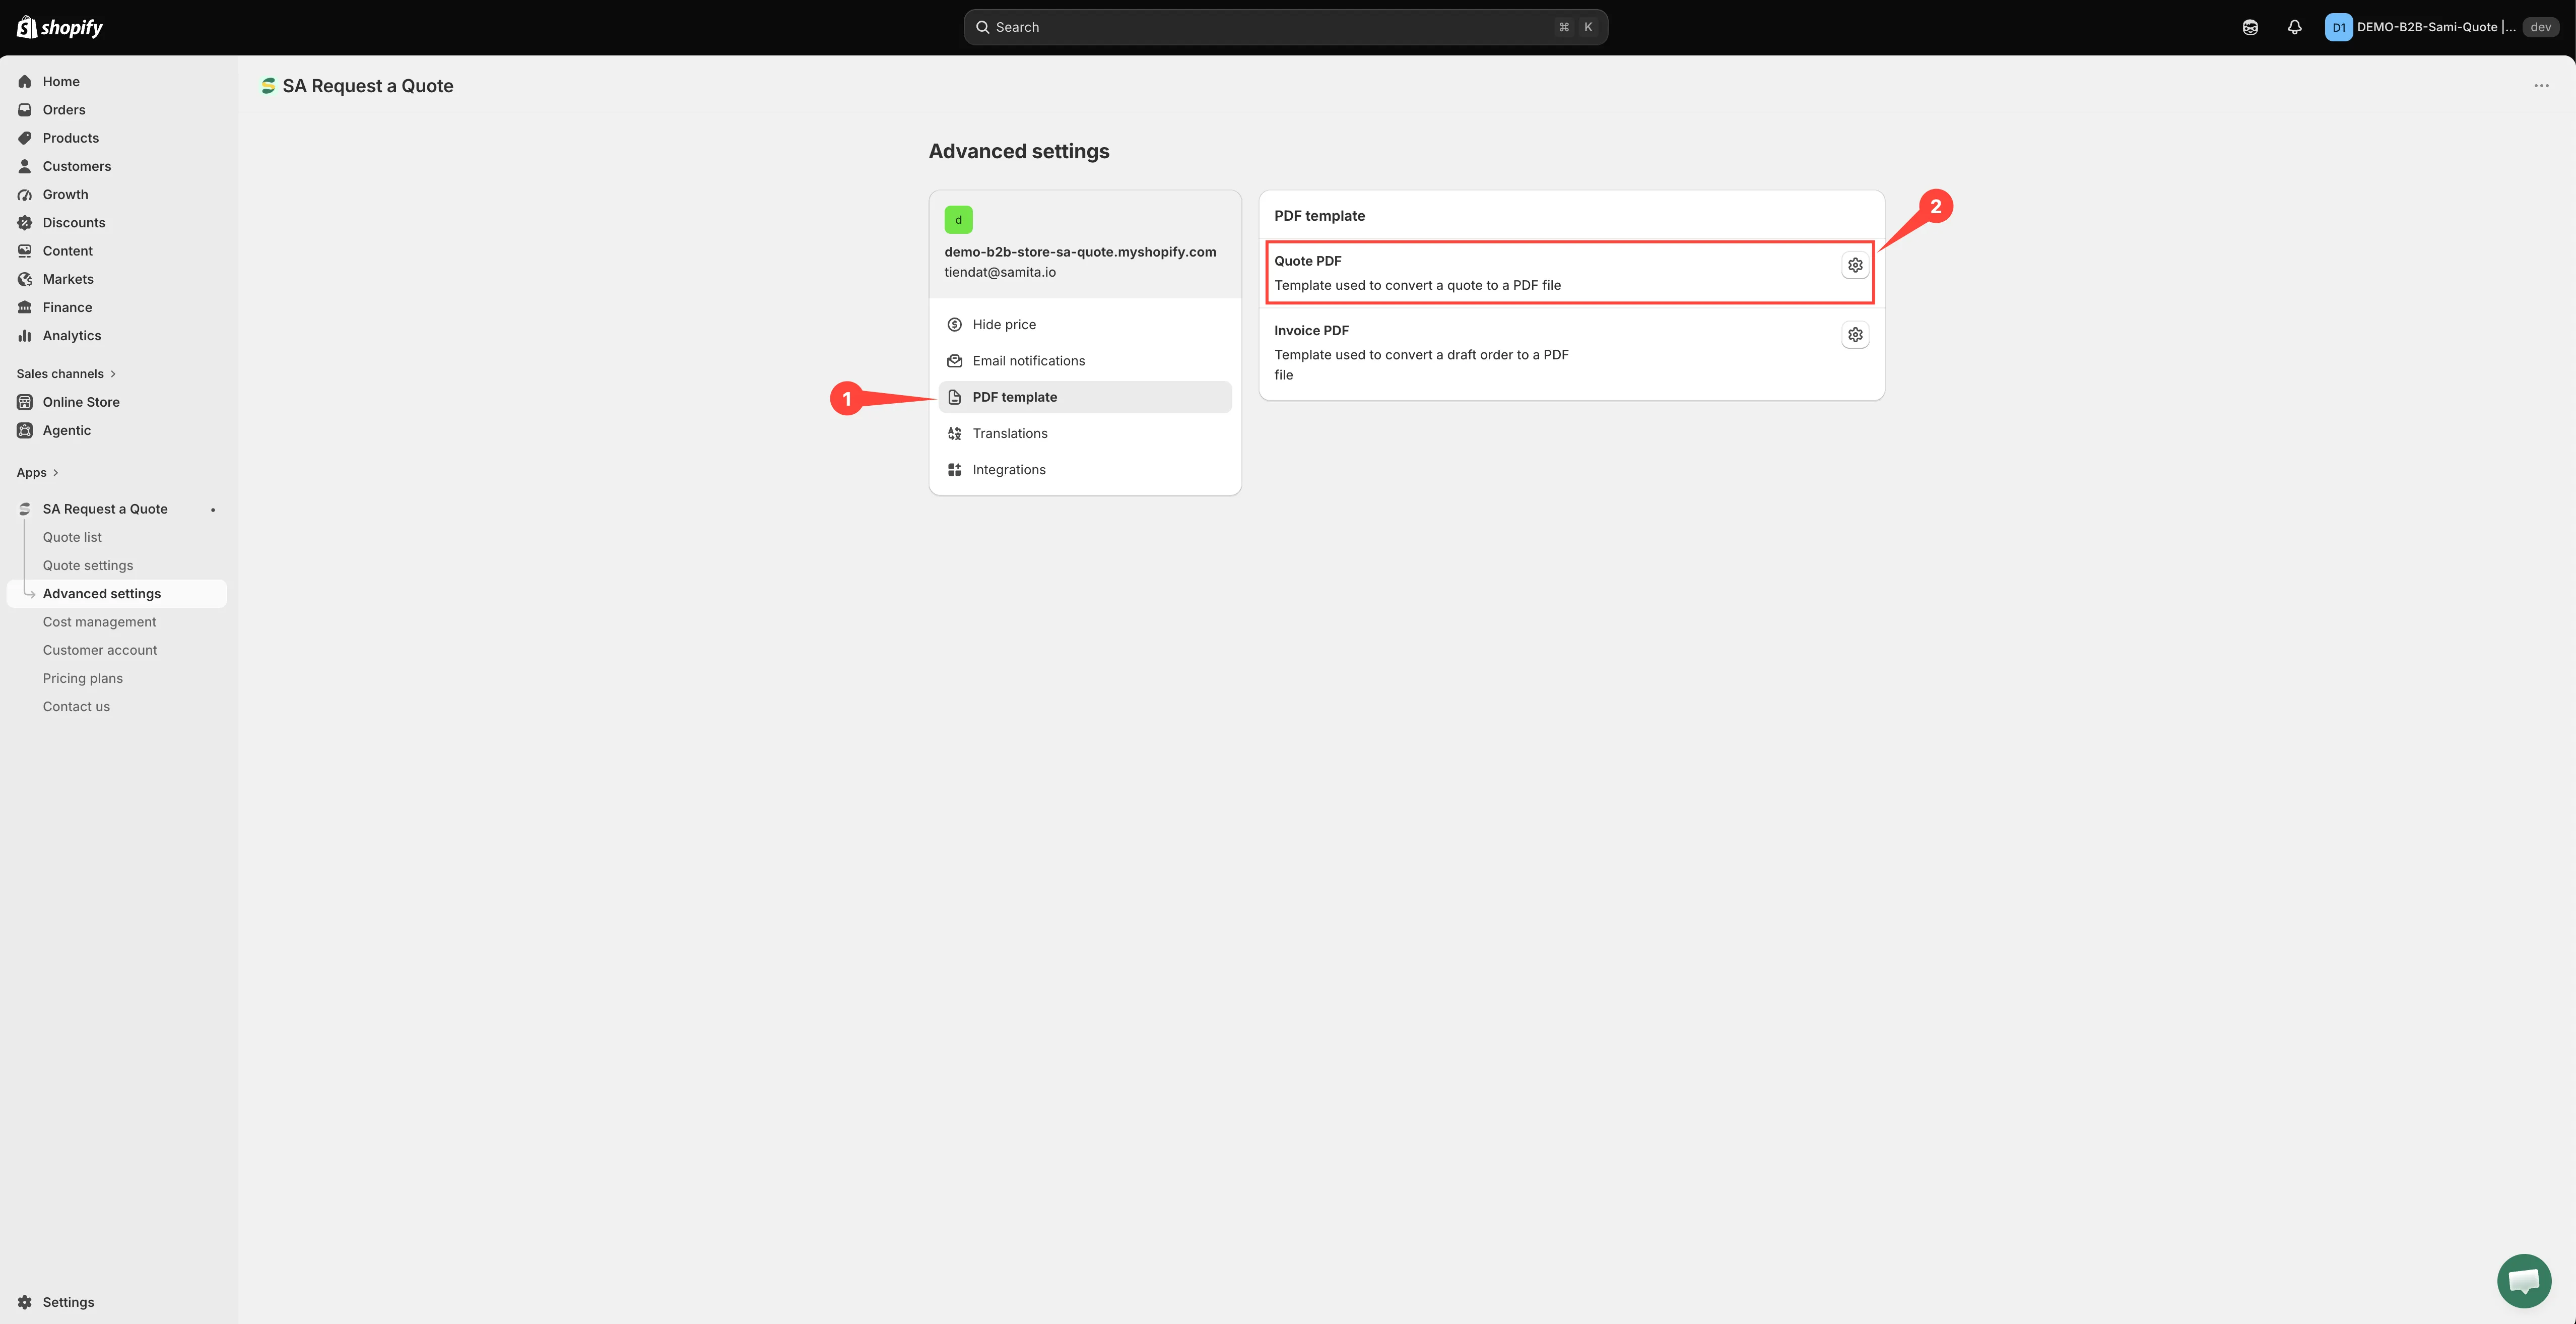
Quote PDF is the document your customer receives.
Set the template up
Section titled “Set the template up”-
Open Advanced settings
Section titled “Open Advanced settings”In the app sidebar, click Advanced settings.
-
Go to the PDF template tab
Section titled “Go to the PDF template tab”Choose PDF template from the list of tabs.
-
Open Quote PDF
Section titled “Open Quote PDF”Open Quote PDF. The editor is headed Quote PDF template.
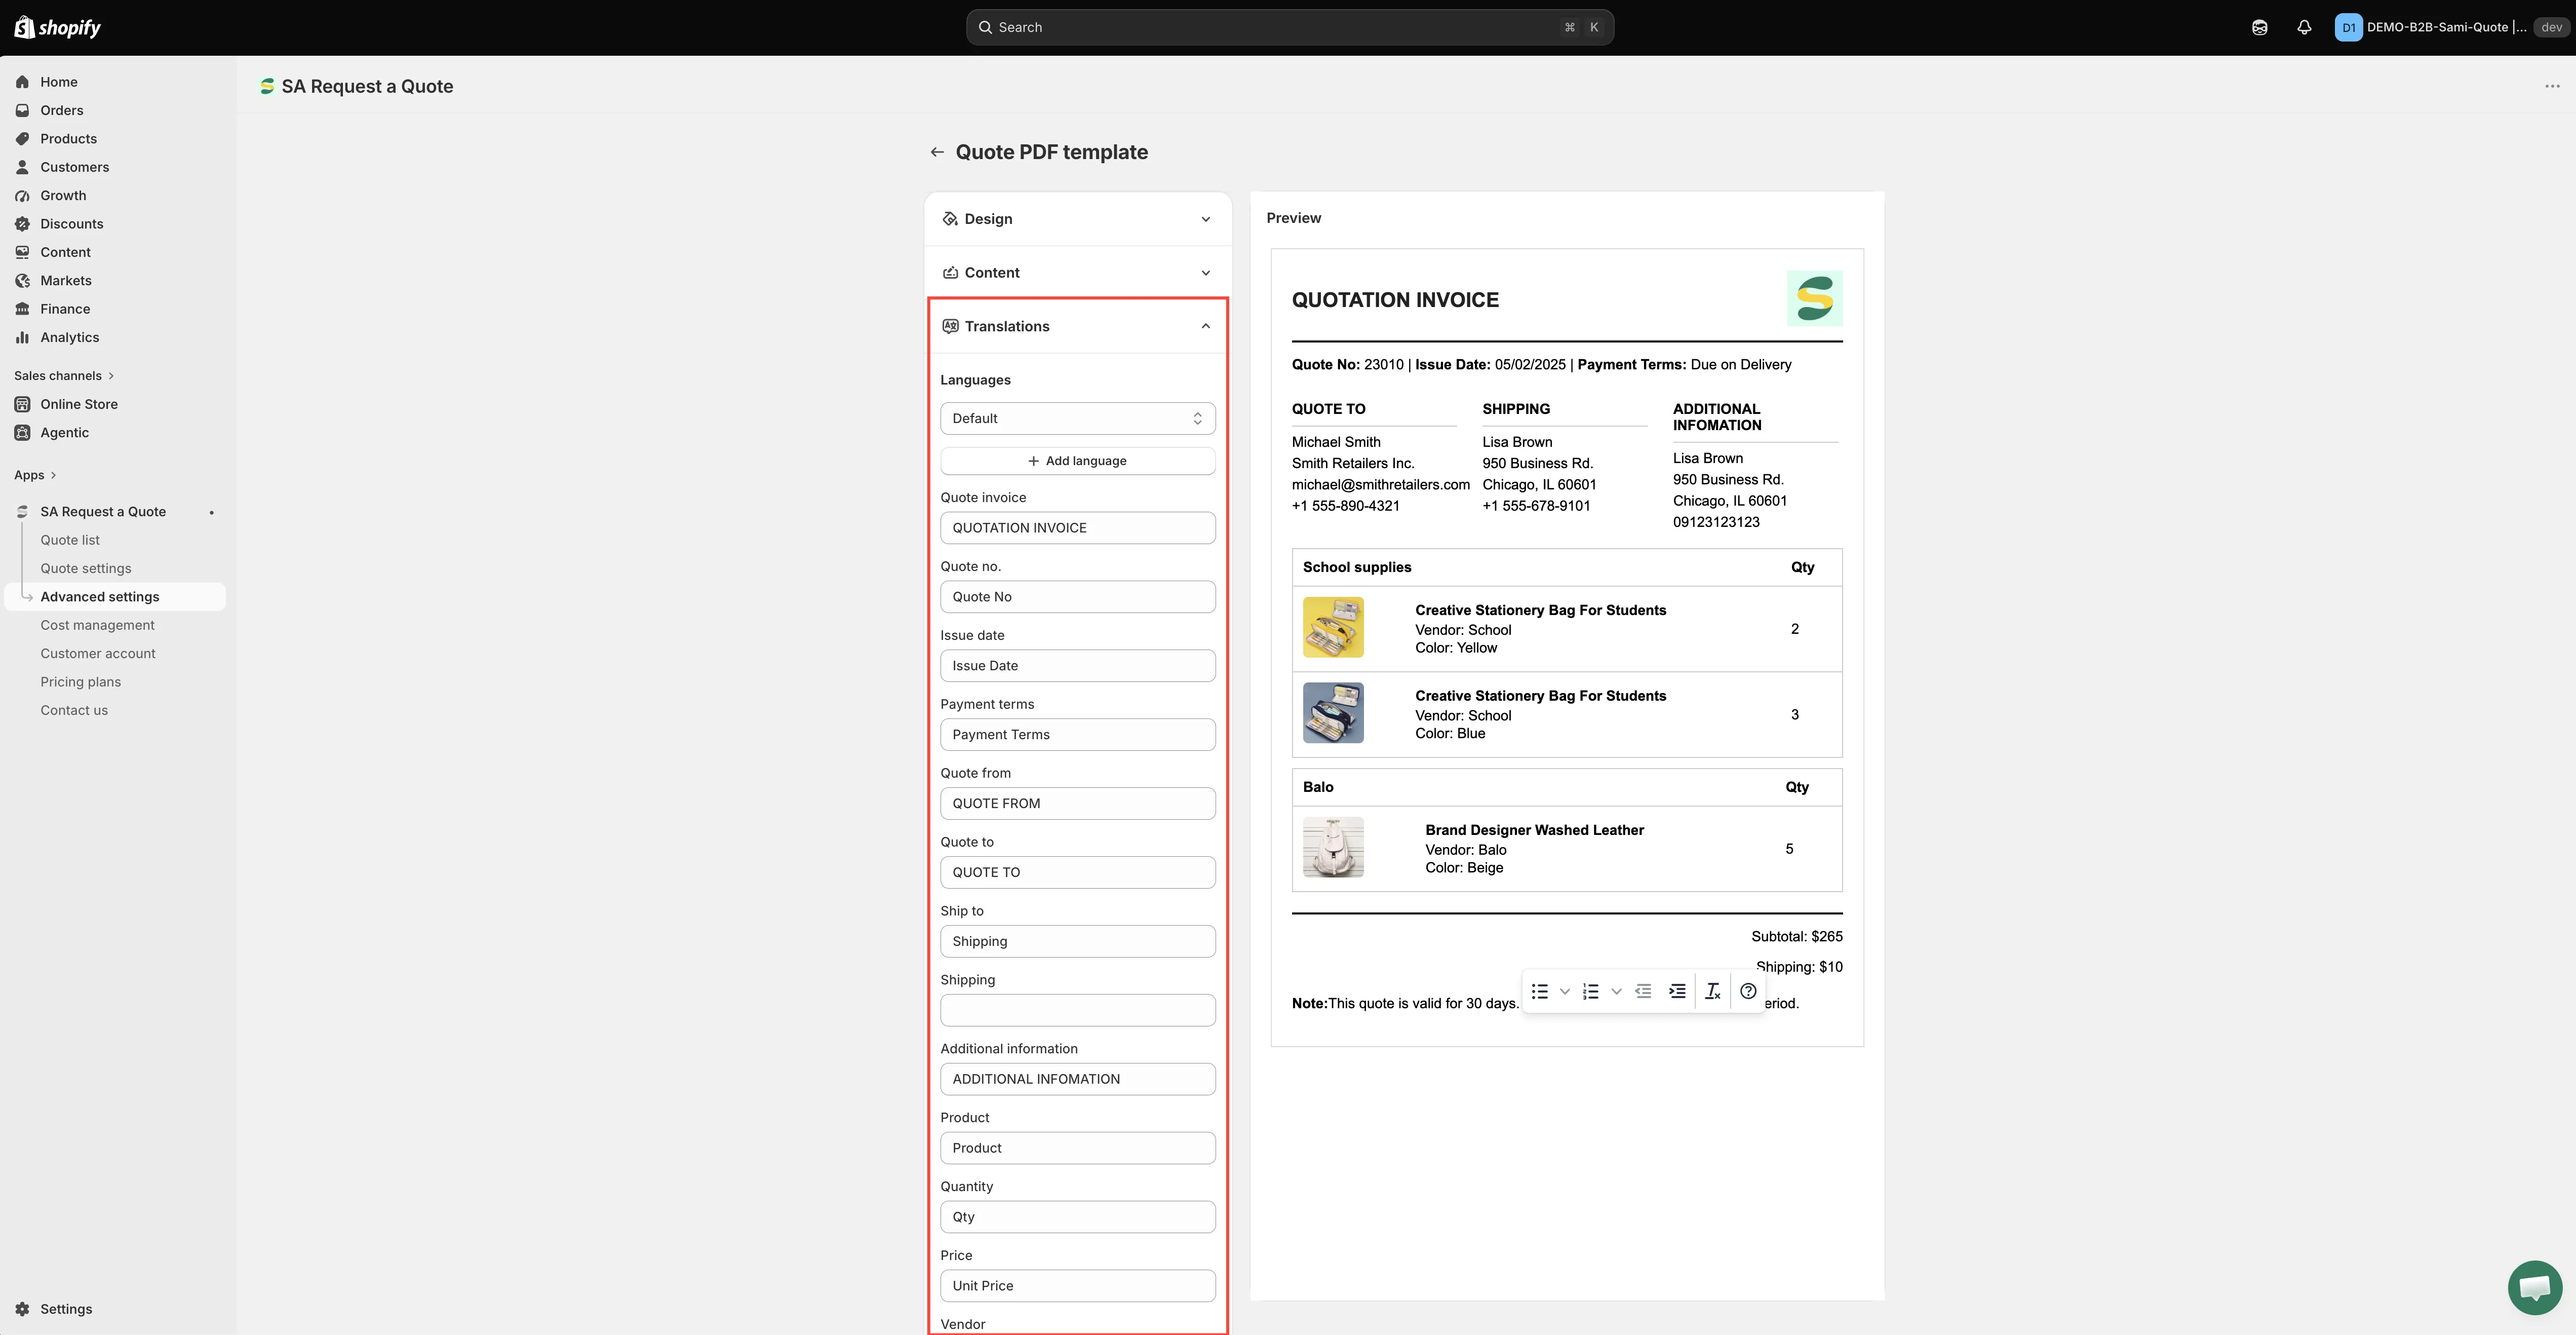
The left-hand column holds three sections you expand one at a time — Design, Content and Translations — with the Preview beside them on the right.
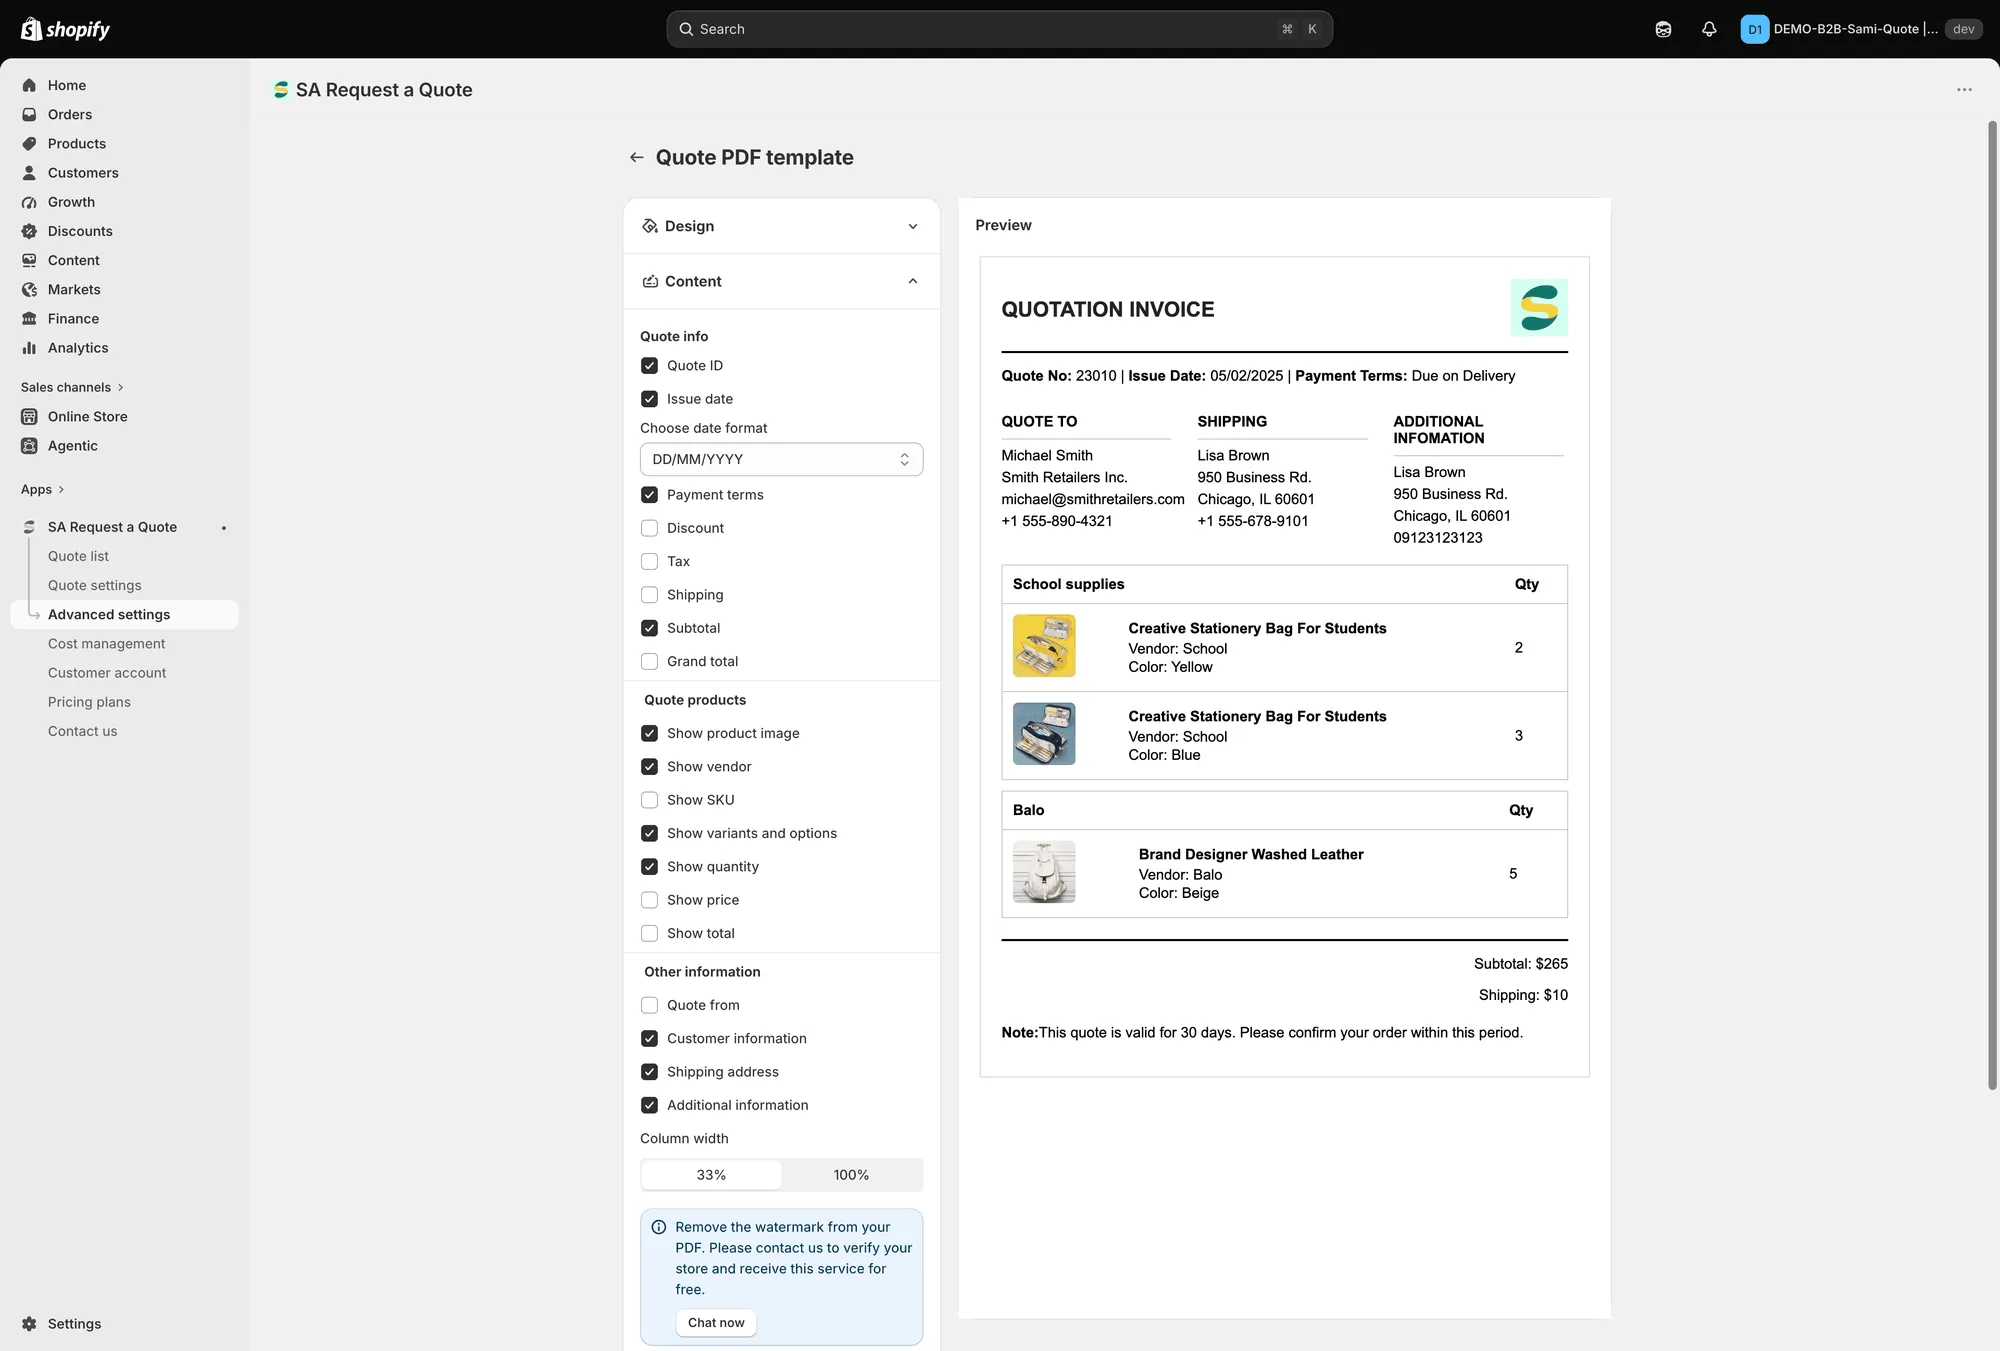
The Quote PDF template editor. Switches on the left, Preview on the right.
-
Put your logo and colours on it in Design
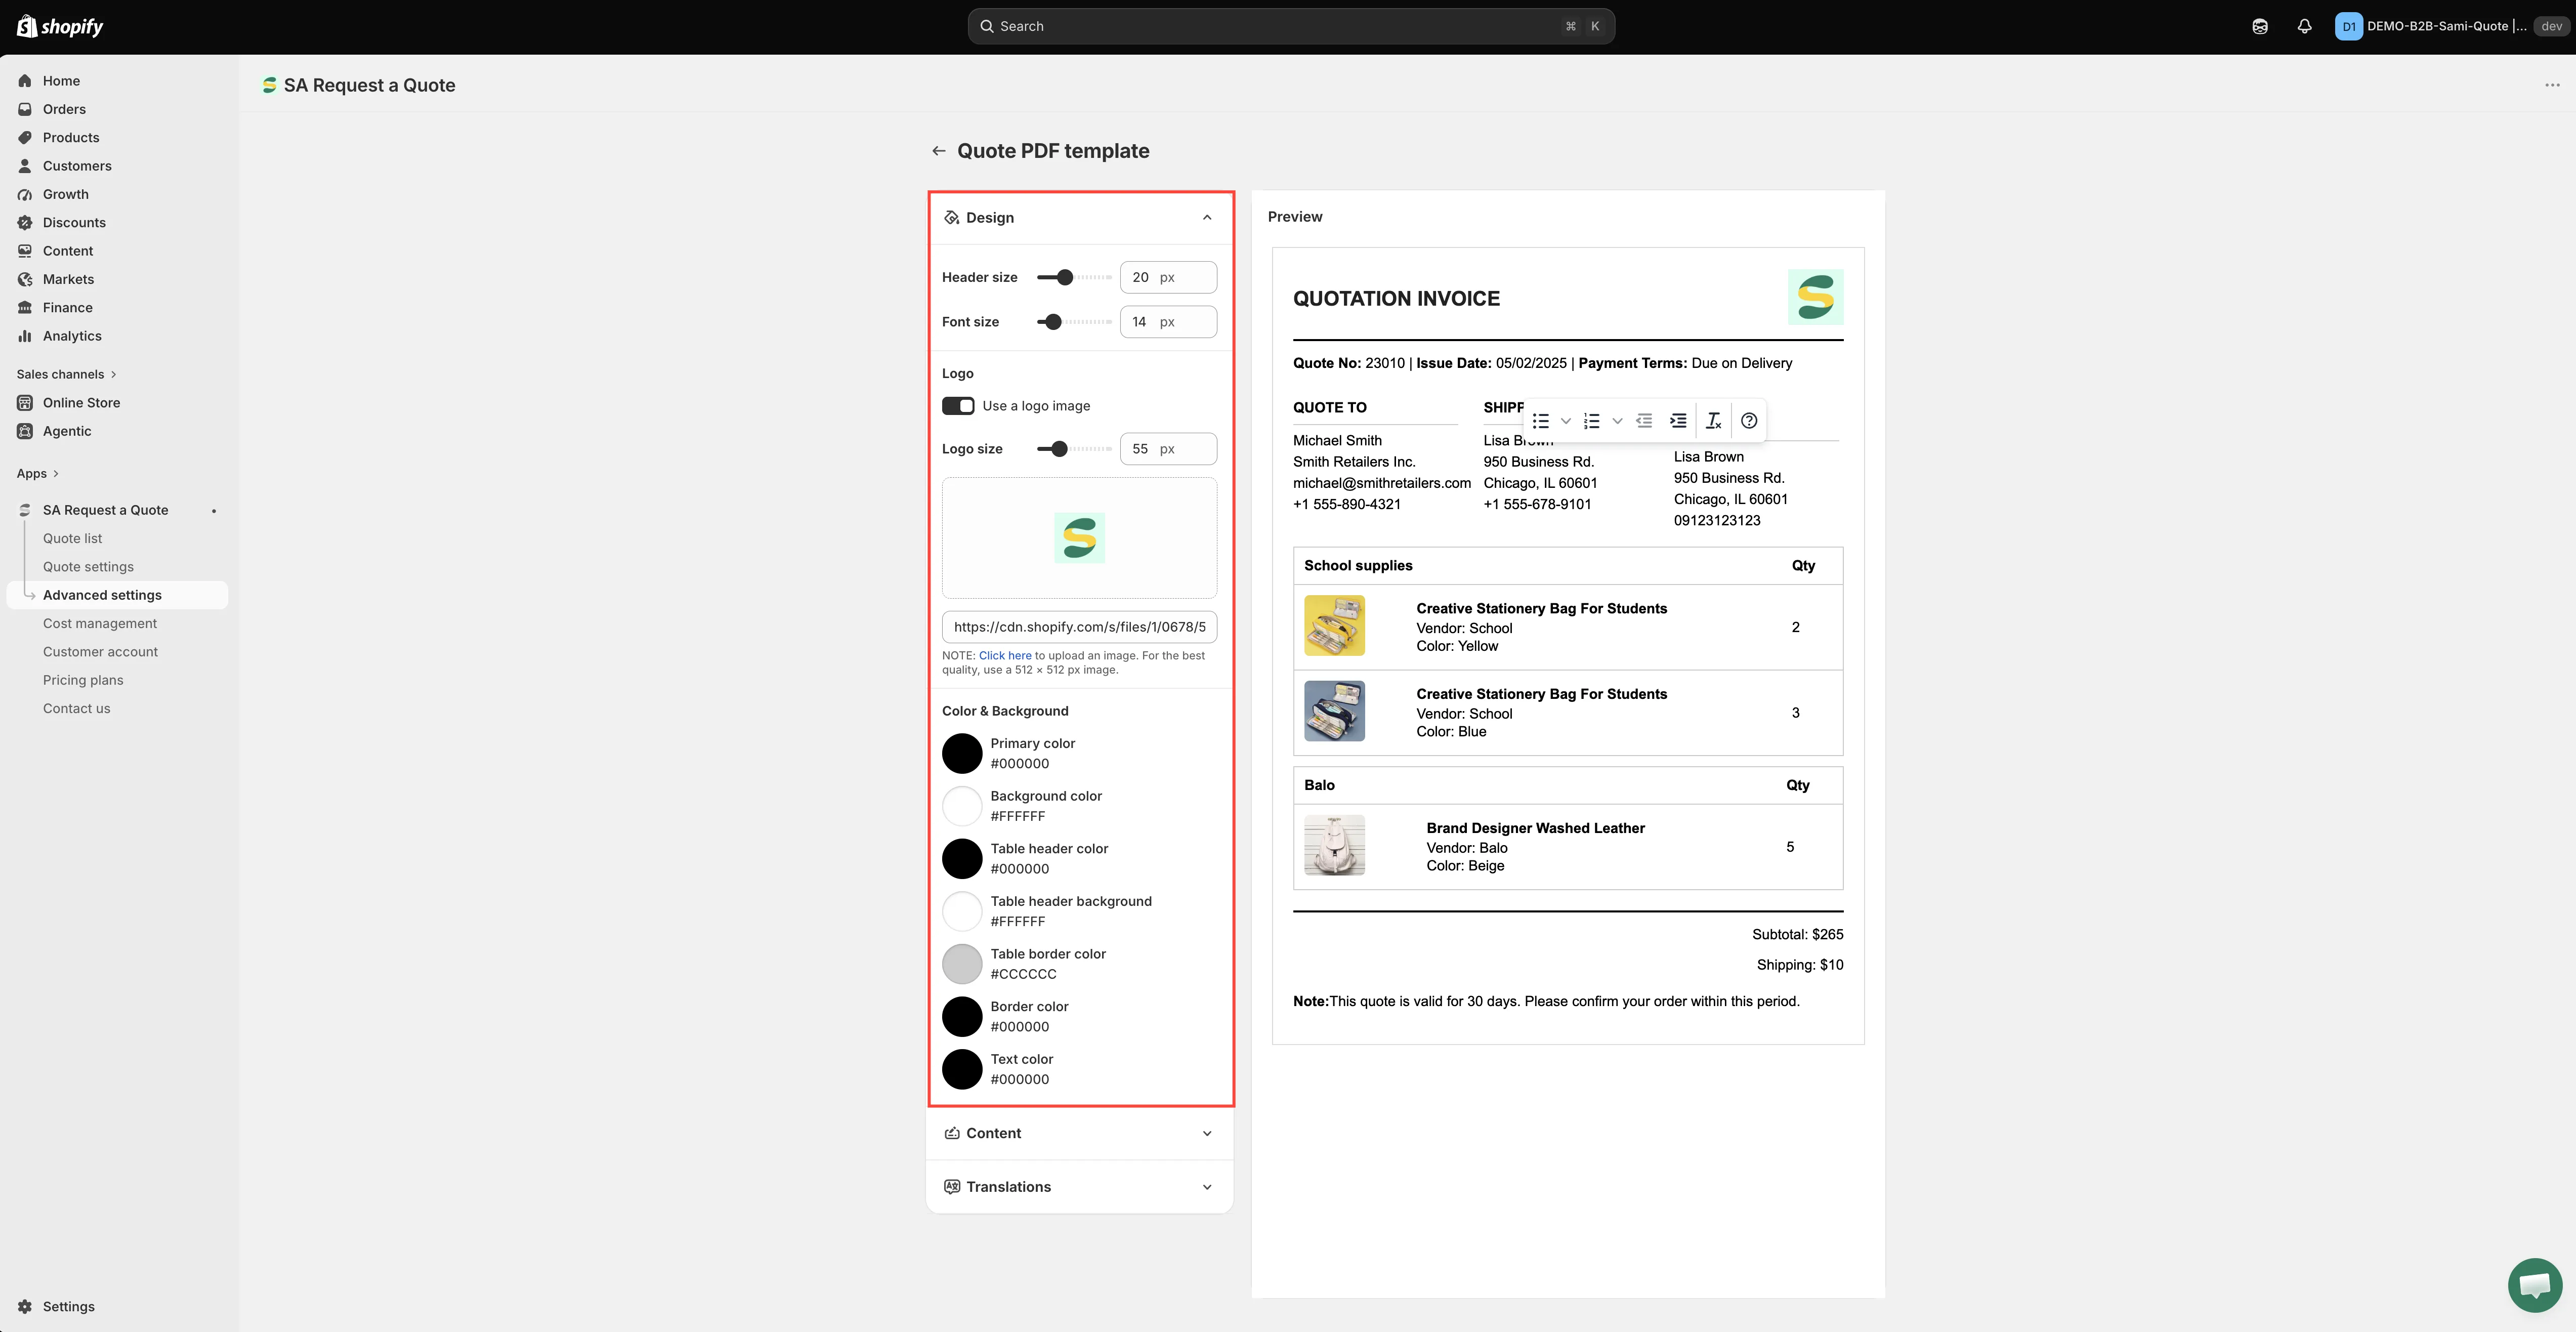
Section titled “Put your logo and colours on it in Design”Expand Design. This is the section that makes the document look like it came from you rather than from an app:
- Header size and Font size, both in px.
- Logo — tick Use a logo image, set Logo size in px, then click the upload area to add the file. The app’s own note reads: “Click here to upload an image. For the best quality, use a 512 × 512 px image.” The field below it takes an image address instead, and is labelled Enter an image URL to change it.
- Color & Background — seven swatches, in this order: Primary color, Background color, Table header color, Table header background, Table border color, Border color and Text color.
-
Work through Content
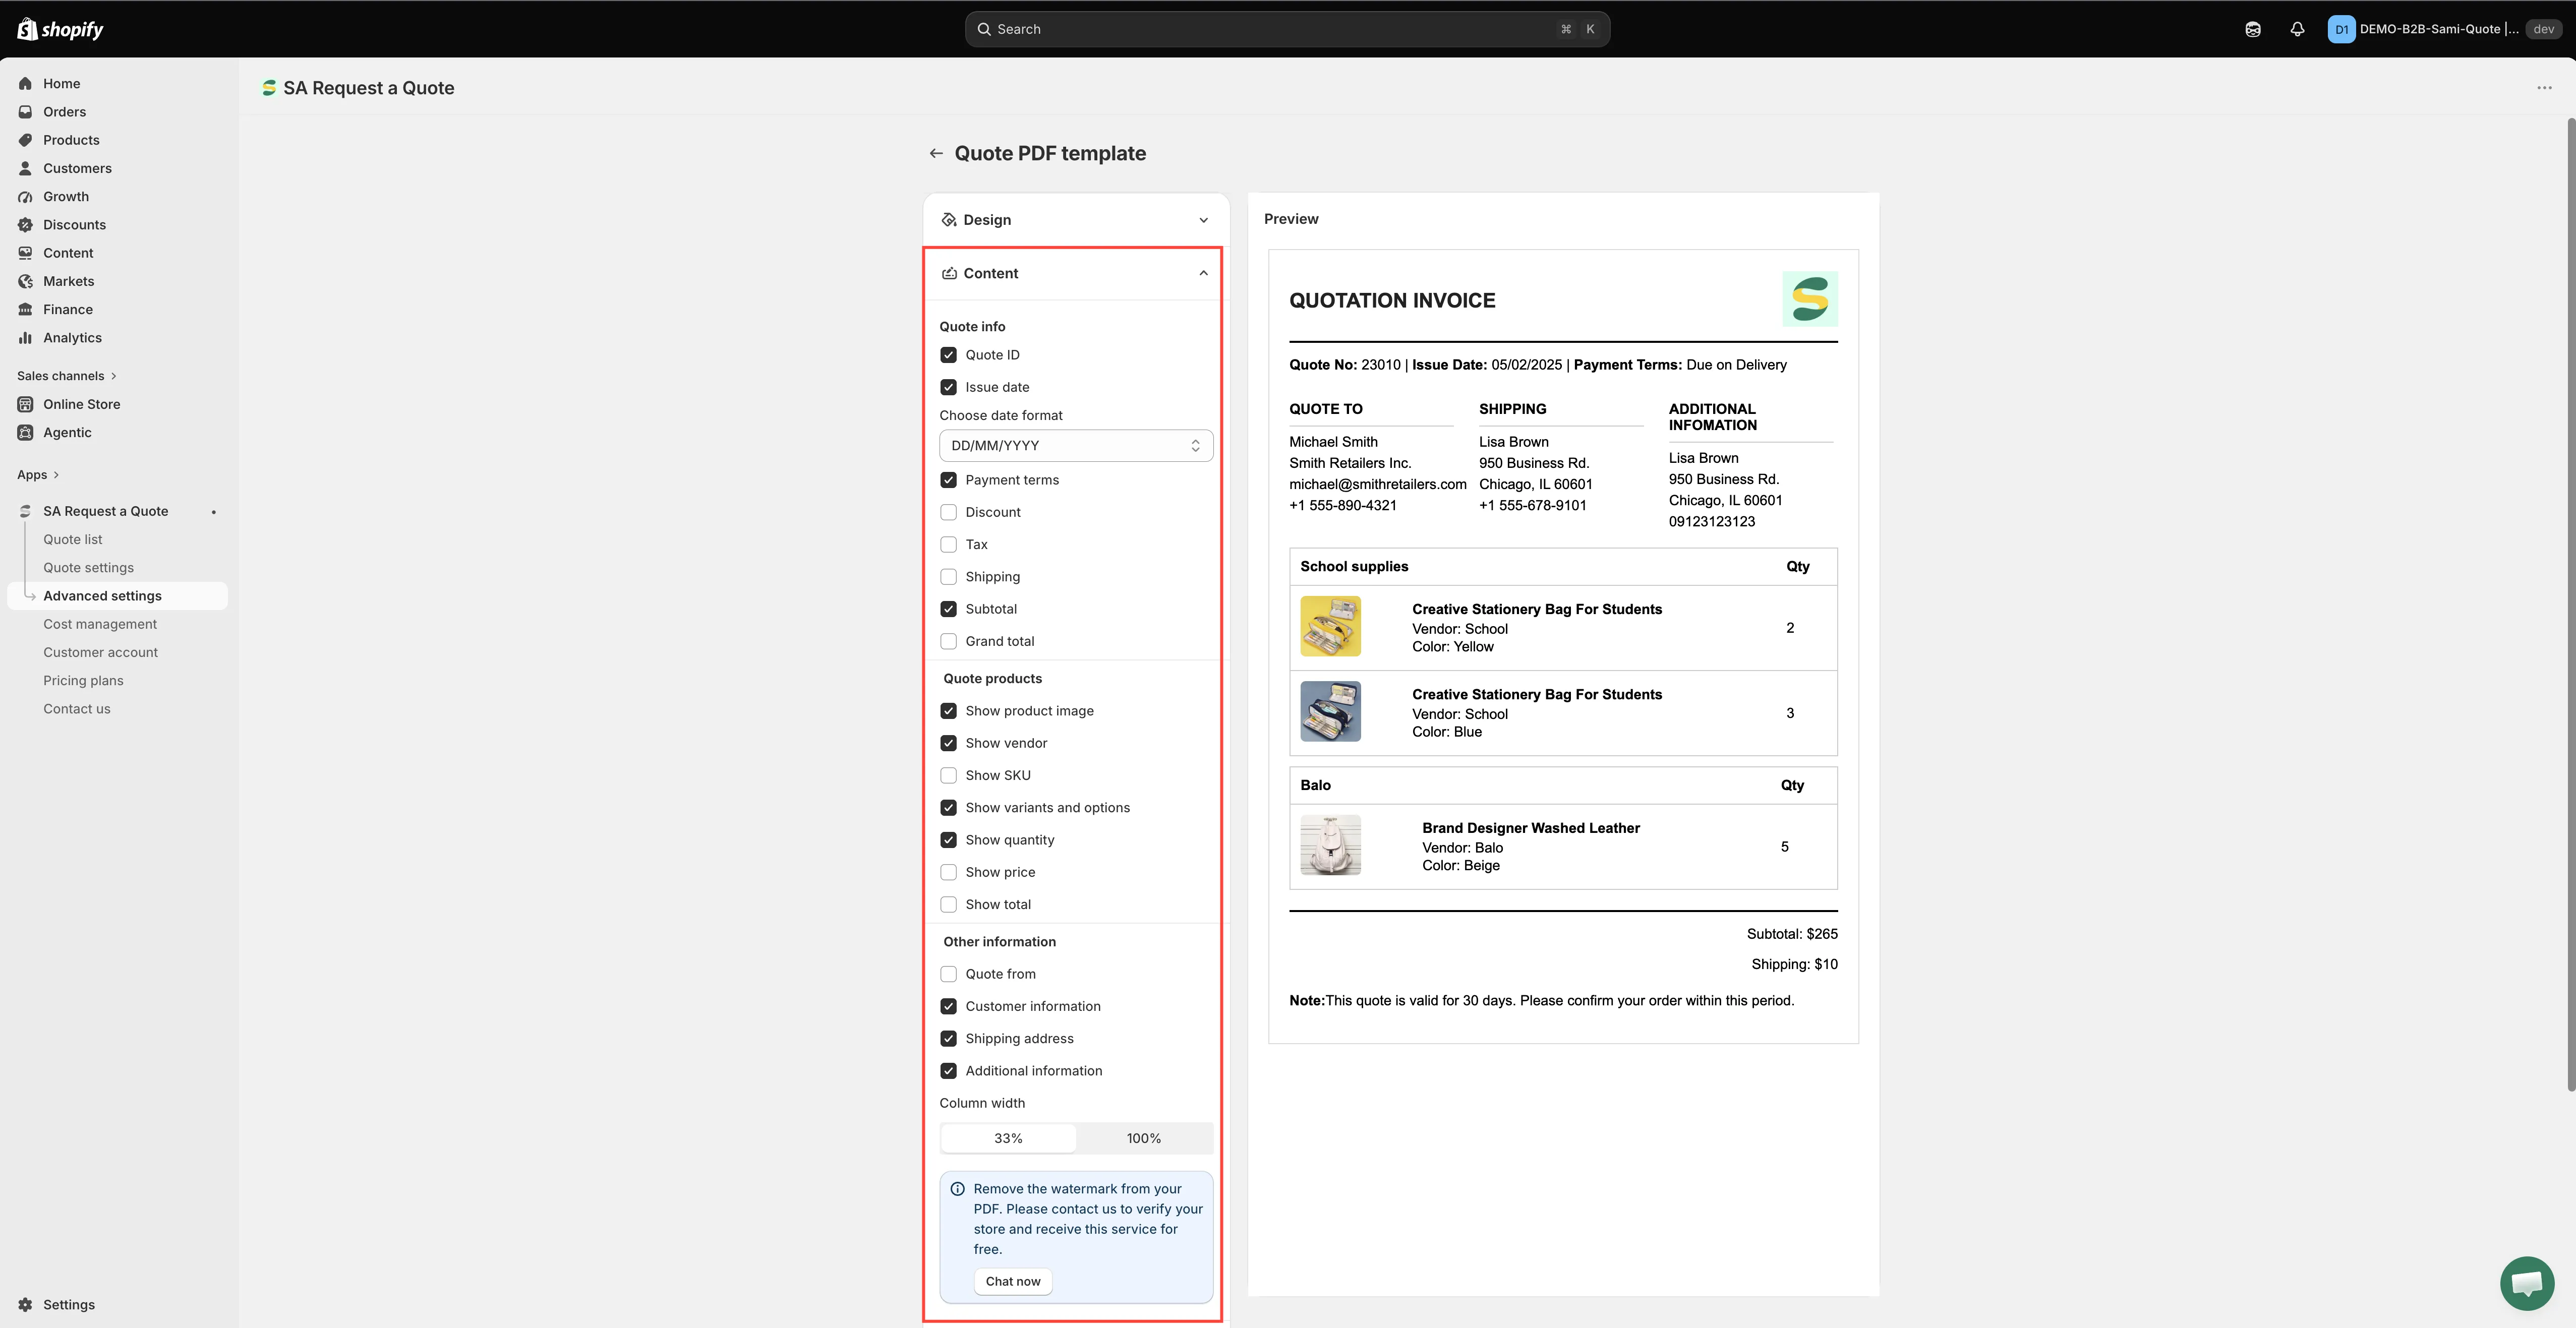
Section titled “Work through Content”Open Content and turn each row on or off. The groups are Quote info, Quote products and Other information, followed by Column width and Note — they are listed in full below.
-
Edit the wording in Translations
Section titled “Edit the wording in Translations”Expand Translations. It does two jobs, and most merchants only need the first.
- To reword a label in English, type over it. Every label printed on the document has its own box — among them Quote invoice, Quote no., Issue date, Payment terms, Quote from, Quote to, Ship to, Shipping, Additional information, Product, Quantity, Price, Total, Subtotal, Discount, Tax, Grand total and Note. If your trade calls it an “Estimate” rather than a “Quote invoice”, this is where you change it.
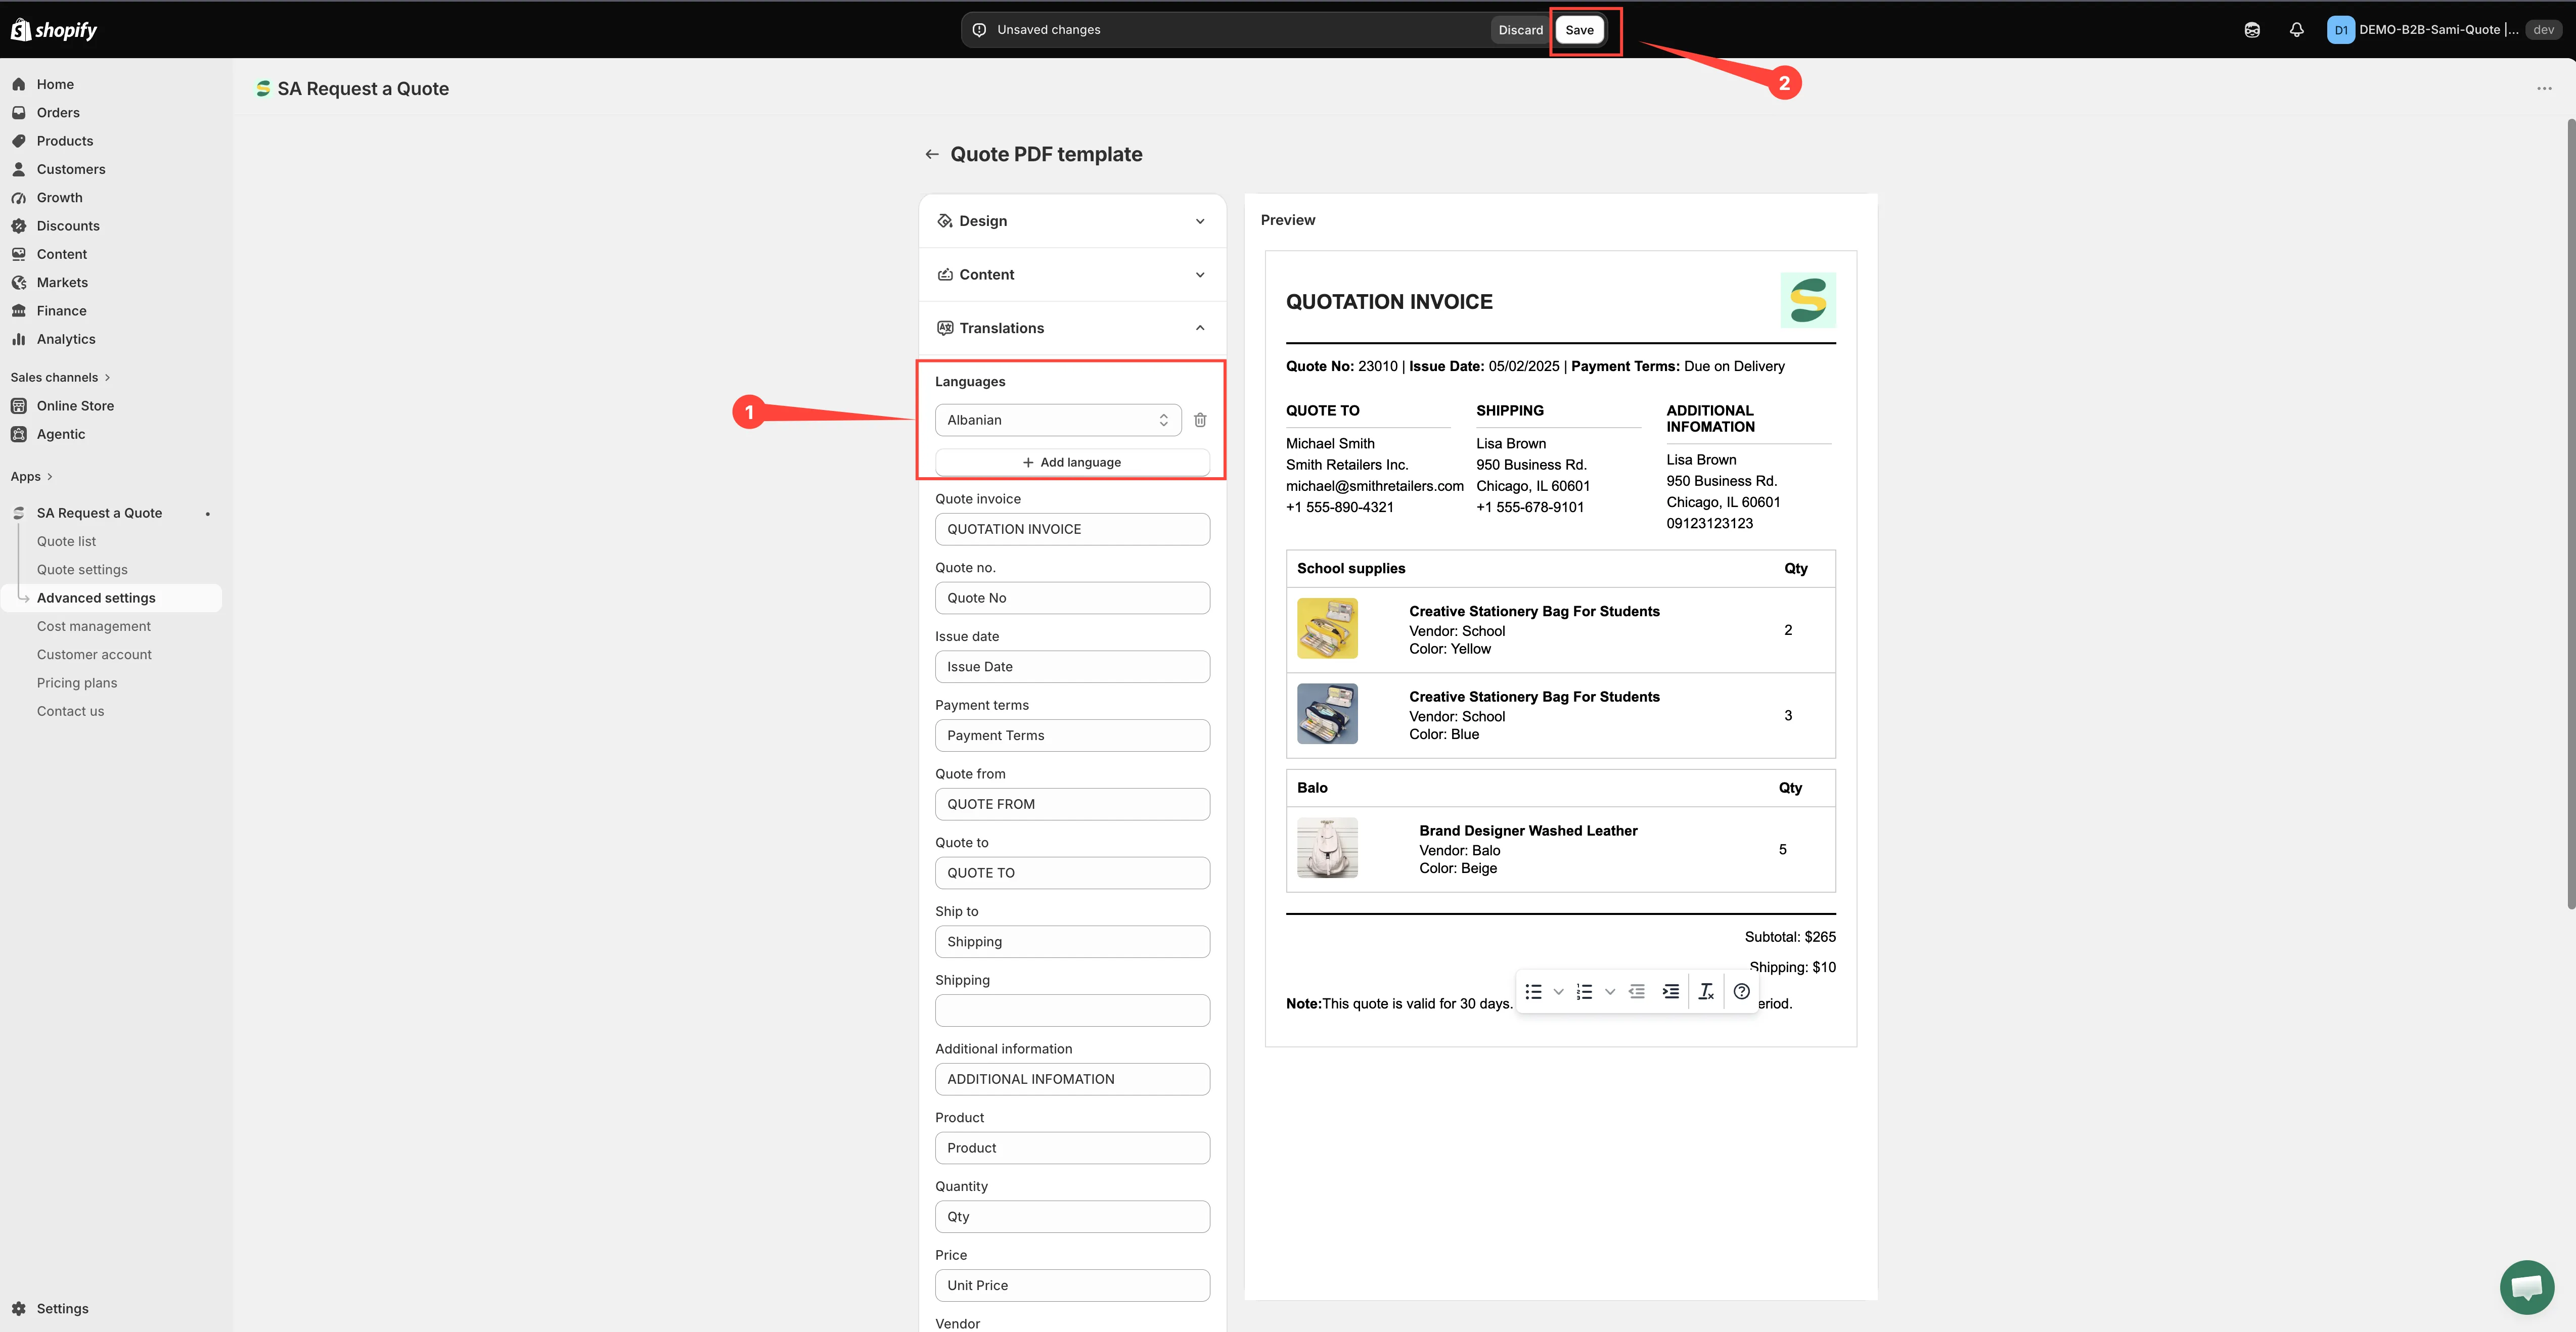
- To add another language, click Add language, pick it, then fill in the same boxes. Languages switches which one you are editing, and the bin icon beside a language removes it. The default language has no bin icon and cannot be removed.
-
Read the Preview
Section titled “Read the Preview”Preview shows the finished document beside the switches, so you can see the effect of each one as you go.
-
Change anything and Shopify’s save bar appears at the top of the admin. Click Save to keep the template, or Discard changes to drop it. Until you save, nothing you did here reaches a real quote.
-
Download a test quote
Section titled “Download a test quote”Open Quote list in the sidebar and use the download PDF action on one of your own test quotes. Read the document end to end — it is worth seeing the real file, not just the preview.
Quote info
Section titled “Quote info”The header block: who the quote is from, when it was issued, and how the money breaks down.
| Switch | What it adds |
|---|---|
| Quote ID | The quote reference, so you and the customer can name the same document weeks later. |
| Issue date | The date the quote was raised. |
| Choose date format | Not a switch — a dropdown. Pick DD/MM/YYYY, MM/DD/YYYY or YYYY/MM/DD to match how your customers read dates. |
| Payment terms | The terms agreed on the quote. |
| Discount | Any discount applied to the quote. |
| Tax | Tax shown as its own line rather than buried in the total. |
| Shipping | The shipping amount. |
| Subtotal | The total before discount, tax and shipping. |
| Grand total | The final figure. |
Quote products
Section titled “Quote products”The line-item table. Each switch adds a detail to every product on the document.
| Switch | What it adds |
|---|---|
| Show product image | A thumbnail beside each line. |
| Show vendor | The product's vendor. |
| Show SKU | The SKU — worth having if your customer orders against part numbers. |
| Show variants and options | The chosen variant and options, such as size or colour. |
| Show quantity | How many of each line. |
| Show price | The unit price. |
| Show total | The line total. |
Other information
Section titled “Other information”| Switch | What it adds |
|---|---|
| Quote from | Your side of the document. Switch it on and it opens out into five of its own — Store name, Email, Company name, Address and Phone number — so you decide exactly which of your details the buyer gets. |
| Customer information | Who the quote is for. |
| Shipping address | Where the goods would go. |
| Additional information | The extra detail collected on your quote form. |
Column width sets how those blocks sit on the page. The choices are 33% and 100% — switch between them and read the Preview to see which suits your document.
Add your own wording
Section titled “Add your own wording”Note is where your own text goes on the document. Use it for the two things a quote needs and the switches cannot supply:
- How long the quote is valid. “Valid for 30 days” is both commercial protection and a gentle reason for the customer to decide.
- How to accept. A quote with no next step stalls.
Selling in more than one language
Section titled “Selling in more than one language”The document’s own wording lives in the Translations section of this editor, not in the app’s general translation settings — so a second language on the quote PDF is something you add here, label by label, as described in the stepper above.
Multi-language (PDF & email) is included on the FREE plan, so a customer reading in another language can still be sent a document they understand. For the storefront and email side, see Translate quote emails.
The watermark
Section titled “The watermark”PDFs carry a watermark until your store is verified. The editor says so directly: “Remove the watermark from your PDF. Please contact us to verify your store and receive this service for free.”
What your plan includes
Section titled “What your plan includes”| Plan | What you get |
|---|---|
| FREE | PDF: quote & invoice, and Multi-language (PDF & email). |
| PRO | Customizable PDF, on top of everything in PREMIUM. |
See Plan comparison for the full list.
Next steps
Section titled “Next steps”- Customize the invoice PDF — the document that goes with a draft order
- Download a quote as PDF — download a quote as a PDF
- Attach a PDF to quote emails — get the document to your customer