
Rules that decide applications
Build rules that approve, reject, assign, flag or ask for more information on applications automatically, based on their answers.
Rules let Sami B2B Onboarding act on an application as soon as it arrives, without anyone opening it. Each rule reads as a sentence: When its conditions match, Then it takes one action, for example “When Country is United States and Tax ID is valid, then Approve automatically using Wholesale standard”.
How rules run
Section titled “How rules run”- Rules run when a buyer submits an application, and again when a buyer sends the information you asked for.
- The app tests your Live rules in order, top to bottom. The first rule that matches decides what happens, and the rules below it don’t run.
- If no rule matches, nothing changes. The application waits on Companies › Applications for your team, as it would with no rules at all.
- When someone on your team asks a buyer for more information, the buyer’s answer comes back to that person. Rules still run and note on the timeline what they would do, but they don’t approve, reject or ask again.
Add a rule
Section titled “Add a rule”-
Open the Rules tab
Section titled “Open the Rules tab”In the Shopify admin, open Sami B2B Onboarding, click Automation in the app menu, then click the Rules tab.
Click Add rule. With no rules yet, the button sits under No rules yet. Otherwise it’s below the last rule. A card called New rule appears, open and Paused.
-
Name the rule
Section titled “Name the rule”Click the name New rule and replace it with a name your team will recognize, for example
US with valid tax ID. PressEnterto keep it, orEscapeto undo. This name appears on the application’s timeline when the rule acts. -
Set the first condition
Section titled “Set the first condition”On the When line, click the dashed condition. The Edit condition box opens:
- Click the field box on the first row (it shows the current field, such as Country) and choose what to test. When the list is long, type in Search fields to find a question quickly.
- In the box beside it, choose an operator, such as is or is valid.
- Below them, pick a value from the list, or type one in the box. Some operators, such as is valid and is missing, don’t need a value.
- Click Done.
-
Add more conditions
Section titled “Add more conditions”Click + Condition to add another. Its Edit condition box opens straight away. Once a rule has two or more conditions, a choice appears at the start of the When line:
- all of these: every condition must match. The chips are joined by AND.
- any of these: one matching condition is enough. The chips are joined by OR.
One choice covers every condition in the rule. To mix “and” with “or”, make two rules.
To remove a condition, click it, then click Remove condition. A rule always keeps at least one condition.
-
Choose the action
Section titled “Choose the action”On the Then line, click the action and pick one from the list. Some actions need one more choice:
- Approve automatically: click the preset after using and pick one. No preset approves without terms.
- Assign to a reviewer: click Anyone and pick a person from your team. Left on Anyone, the rule assigns no one.
-
Turn it on and save
Section titled “Turn it on and save”Turn on the switch on the rule’s card. The badge changes from Paused to Live. Then click Save in the save bar. You see Automation saved.
Everything on this tab is a draft until you save: names, conditions, switches, order, new rules and deleted ones. Click Discard in the save bar to undo all of it.
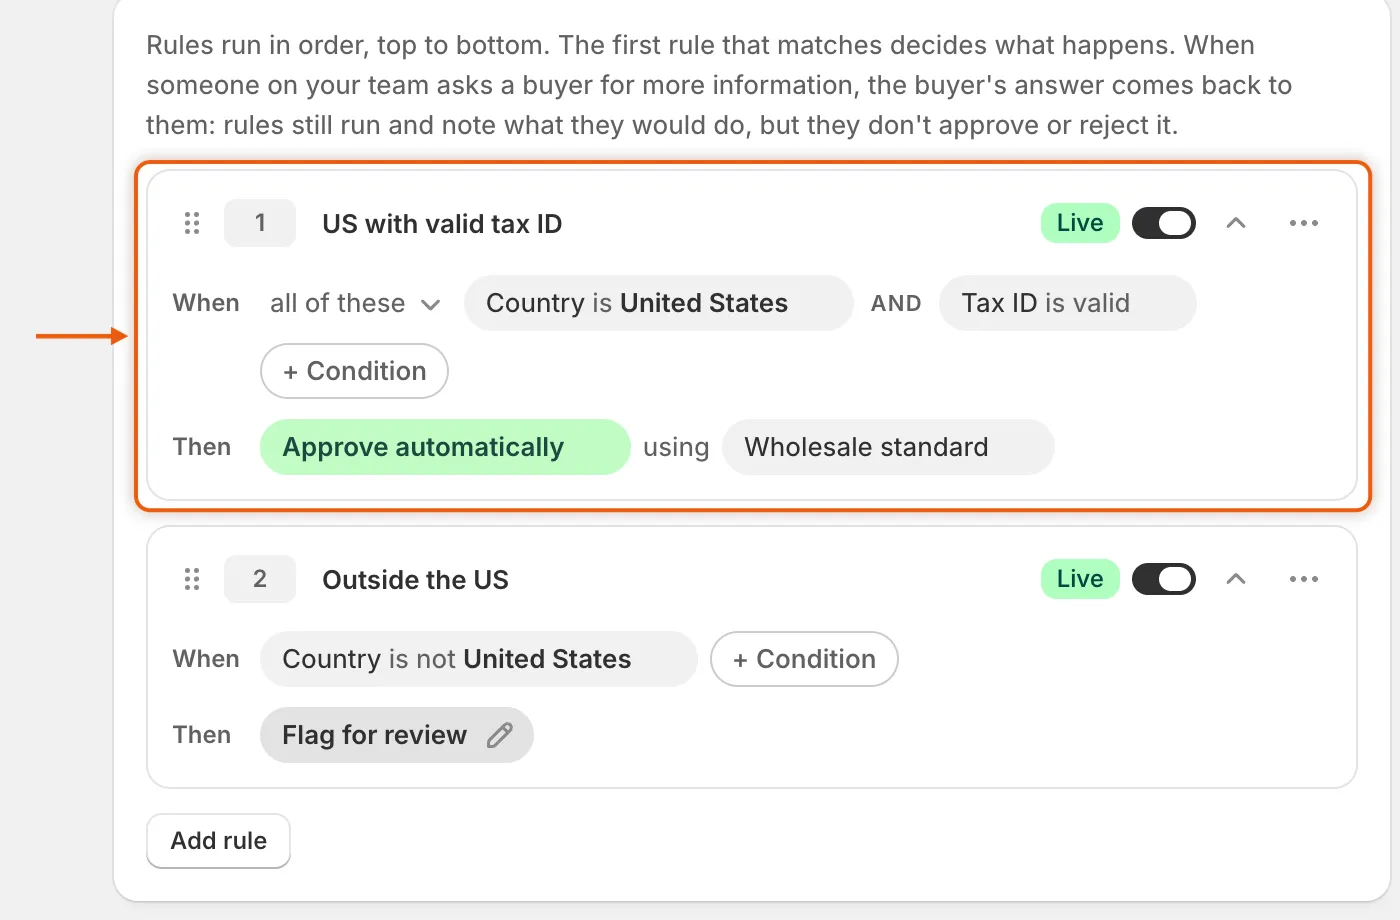
Each rule reads as a sentence, and you click any chip to change it.
What a condition can test
Section titled “What a condition can test”The field list starts with Application details, the facts the app records on every application. Below them come the questions on your application forms. With one form, its questions are listed under the form’s name. With several forms, pick a form under Form questions to see its questions.
| Field | What it reads | Operators |
|---|---|---|
| Country | The answer to the form’s first Country question. | is, is not |
| Tax ID | The answer to the form’s Tax ID question. | is valid, is missing, is |
| Email domain | The part of the contact email after the @, for example example.com. |
is, contains |
| Form | The form the buyer applied through. | is, is not |
| Uploaded document | Whether the buyer uploaded any file. | is missing |
| A Dropdown, Radio buttons, Checkbox, Checkboxes or Country question | The option the buyer chose. A single consent checkbox offers Ticked and Not ticked. | is, is not, is missing |
| A Number question | The number the buyer typed. | is over, is under, is, is missing |
| Any other question (Short text, Long text, Email, Phone, State / province, Date and time) | What the buyer typed or picked. | is, is not, contains, is missing |
How the operators compare:
| Operator | Matches when |
|---|---|
| is / is not | The answer equals the value, or doesn’t. Capitals and spaces at either end are ignored. On a question with several ticked answers, is matches if any of them is the value. |
| contains | The value appears anywhere in the answer. |
| is over / is under | The answer is a number above or below the value. |
| is missing | The buyer left it blank. For Uploaded document, no file was uploaded. |
| is valid | The tax ID passed the tax ID check. With the check off, it has the right number format for the buyer’s country. See Tax ID checks. |
File upload questions and layout elements, such as headings and paragraphs, aren’t in the list. To test for uploads, use Uploaded document.
When you have more than one form, the Edit condition box shows which forms ask the question you picked, for example Asked by Wholesale application. If the forms offer different options for that question, it adds with different options on each.
Guards that keep rules safe
Section titled “Guards that keep rules safe”- A condition on a form question that the buyer’s form never asked doesn’t match. This holds for every operator, is not and is missing included. To aim a rule at one form, add the condition Form is and pick that form.
- A rule with an unfinished condition can’t be saved. If a condition has no value, or points to a question that was deleted from the form, Save stops with a message such as “Rule 2, condition 1 has no value to match against.” and the condition turns red. A live rule with a deleted question shows Needs attention. Click the red chip and pick another field.
- A rule can’t approve past a required answer. If a form question that’s mapped to Shopify is set to If the answer is empty › Don’t allow approval and the buyer left it blank, an Approve automatically rule doesn’t approve. The timeline shows that the rule couldn’t approve it and lists the missing answers. See Map answers to Shopify.
Actions
Section titled “Actions”| Action | What happens |
|---|---|
| Approve automatically | The application is approved and the Shopify company is created with the chosen preset’s terms. Its status reads Approved, with the note Auto-applied. |
| Assign to a reviewer | The application is assigned to the person you chose and stays in the queue. If a buyer answers a request and someone already holds the application, it stays with them. |
| Request information | The application moves to Needs info and the buyer gets the More information needed email, asking them to check their answers and add anything missing. |
| Reject automatically | The application is rejected. If the decline email is on, the buyer is told their application didn’t meet the criteria for an account. |
| Flag for review | Nothing changes except the timeline, which notes that the rule matched. The application waits for your team, and the rules below don’t run. |
The emails go out only when the event’s switch is on under Automation › Automations and the email itself is turned on. The Application declined email starts turned off. See Automations and Shopify Flow.
Manage your rules
Section titled “Manage your rules”Each rule card has these controls in its top row:
- The number: the rule’s place in the order.
- The name: click it to rename the rule.
- The badge and switch: Live rules run. Paused rules don’t. A paused rule folds to one line, such as “2 conditions · Approve automatically”.
- The chevron: opens or folds the card.
- The … menu: Move up, Move down, Duplicate and Delete.
To change the order, drag a card by its grip at the left edge, or use Move up and Move down. Duplicate adds a copy straight below the original, with “copy” after its name, for example “Outside the US copy”. The copy is Live or Paused like the original. Delete removes the rule from the list. All of these are saved only when you click Save.
Worked example
Section titled “Worked example”A café-supply store wants to approve US resellers with a valid tax ID, send everyone outside the US to a reviewer, and look at the rest by hand.
-
Create the preset
Section titled “Create the preset”On the Presets tab, create a preset called
Wholesale standardwith your wholesale catalog and Net 30 payment terms. See Approval presets. -
Rule 1: approve US resellers
Section titled “Rule 1: approve US resellers”Add a rule named
US with valid tax ID:- When all of these: Country is United States, and Tax ID is valid.
- Then Approve automatically using Wholesale standard.
-
Rule 2: assign the rest of the world
Section titled “Rule 2: assign the rest of the world”Add a second rule named
Outside the US:- When Country is not United States.
- Then Assign to a reviewer, and pick the person who handles export accounts.
-
Turn both on and save
Section titled “Turn both on and save”Turn on both switches and click Save. The Rules tab count shows 2.
-
See the result
Section titled “See the result”Acme Supply Co. applies from Springfield, United States, with a 9-digit tax registration ID:
- Rule 1 matches. The application is approved straight away with the Wholesale standard terms, and Jordan Lee gets the Account approved email.
- An application from Germany fails rule 1 on the country, then matches rule 2. It’s assigned to your export reviewer.
- A US application with a 6-digit tax ID fails rule 1 on the tax ID and rule 2 on the country. No rule matches, so it waits on Companies › Applications for your team.
Open an application that a rule acted on to see what happened. Its Timeline shows the rule by name, for example “Rule “US with valid tax ID” approved it”.
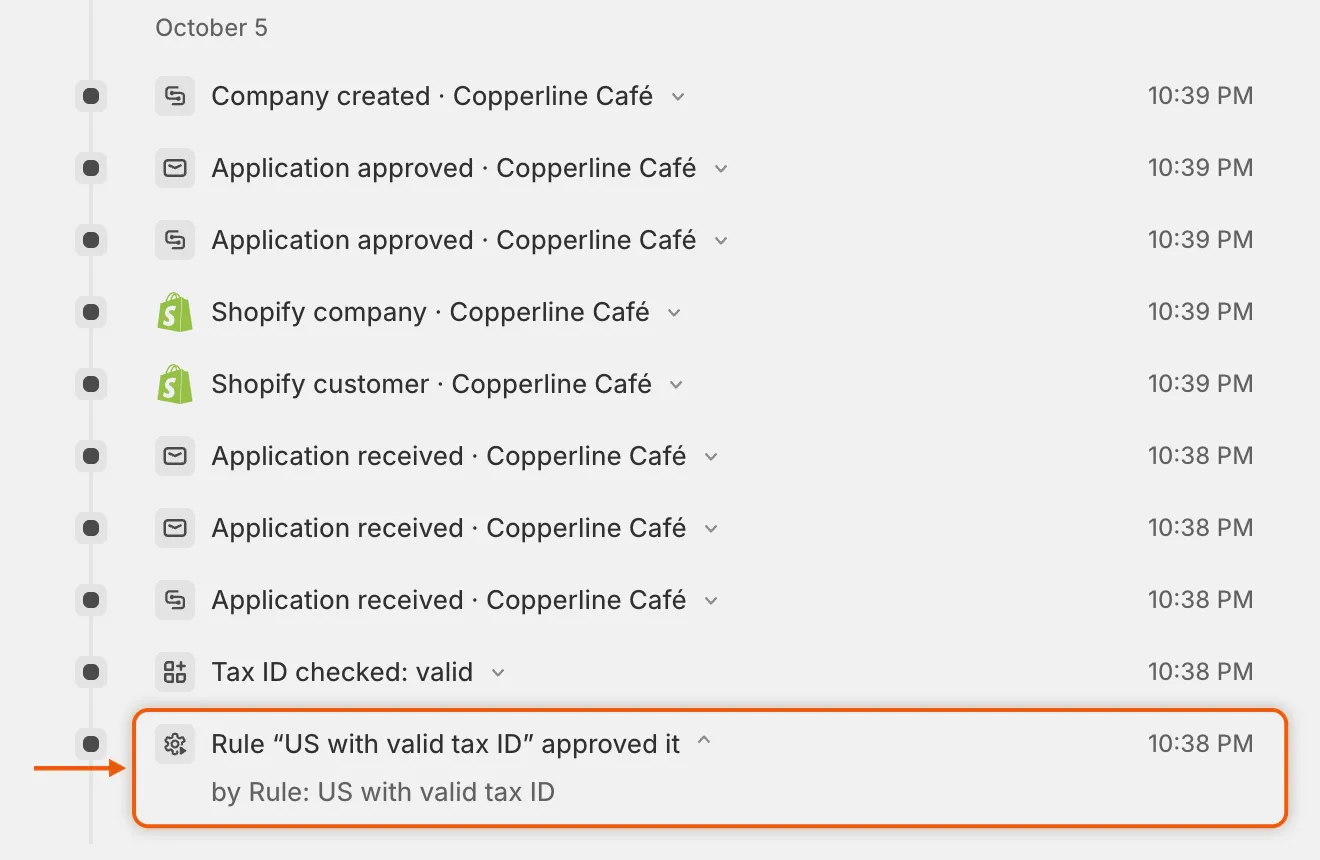
The timeline names the rule that acted, so your team can see why an application was decided.
Next steps
Section titled “Next steps”- Tax ID checks — decide what Tax ID is valid checks for each country.
- Approval presets — set the terms your Approve automatically rules give.
- Automations and Shopify Flow — choose which emails go out when a rule decides.
- Review an application — handle the applications no rule decided.