
Getting started
Quickstart
Set the app up and approve a test application, from opening the app to a buyer who can check out.
This guide sets up Sami B2B Onboarding and runs one test application all the way through. You turn on the app embed, check the ready-made form, choose who can buy, then apply as a test buyer and approve yourself. At the end, the test buyer has a company in Shopify, has the approval email in their inbox, and can check out on your store.
Set up and approve your first application
Section titled “Set up and approve your first application”-
Open the app
In Shopify admin, click Apps, then Sami B2B Onboarding.
The app opens on Home. You see a search box and three setup cards: Turn on the app embed, Publish a registration form and Decide who can browse and buy. The app’s menu in the Shopify sidebar holds Companies, Forms, Automation, Settings and Contact us.
-
Turn on the app embed
The app embed puts your application form and your access rules on the storefront.
- On the Turn on the app embed card, click Activate embed. Shopify’s theme editor opens in a new tab. The Sami B2B Onboarding app embed is already switched on.
- Click Save in the theme editor, then close that tab.
Back in the app, the card shows Done. In the Recent activity card, App embed reads On.
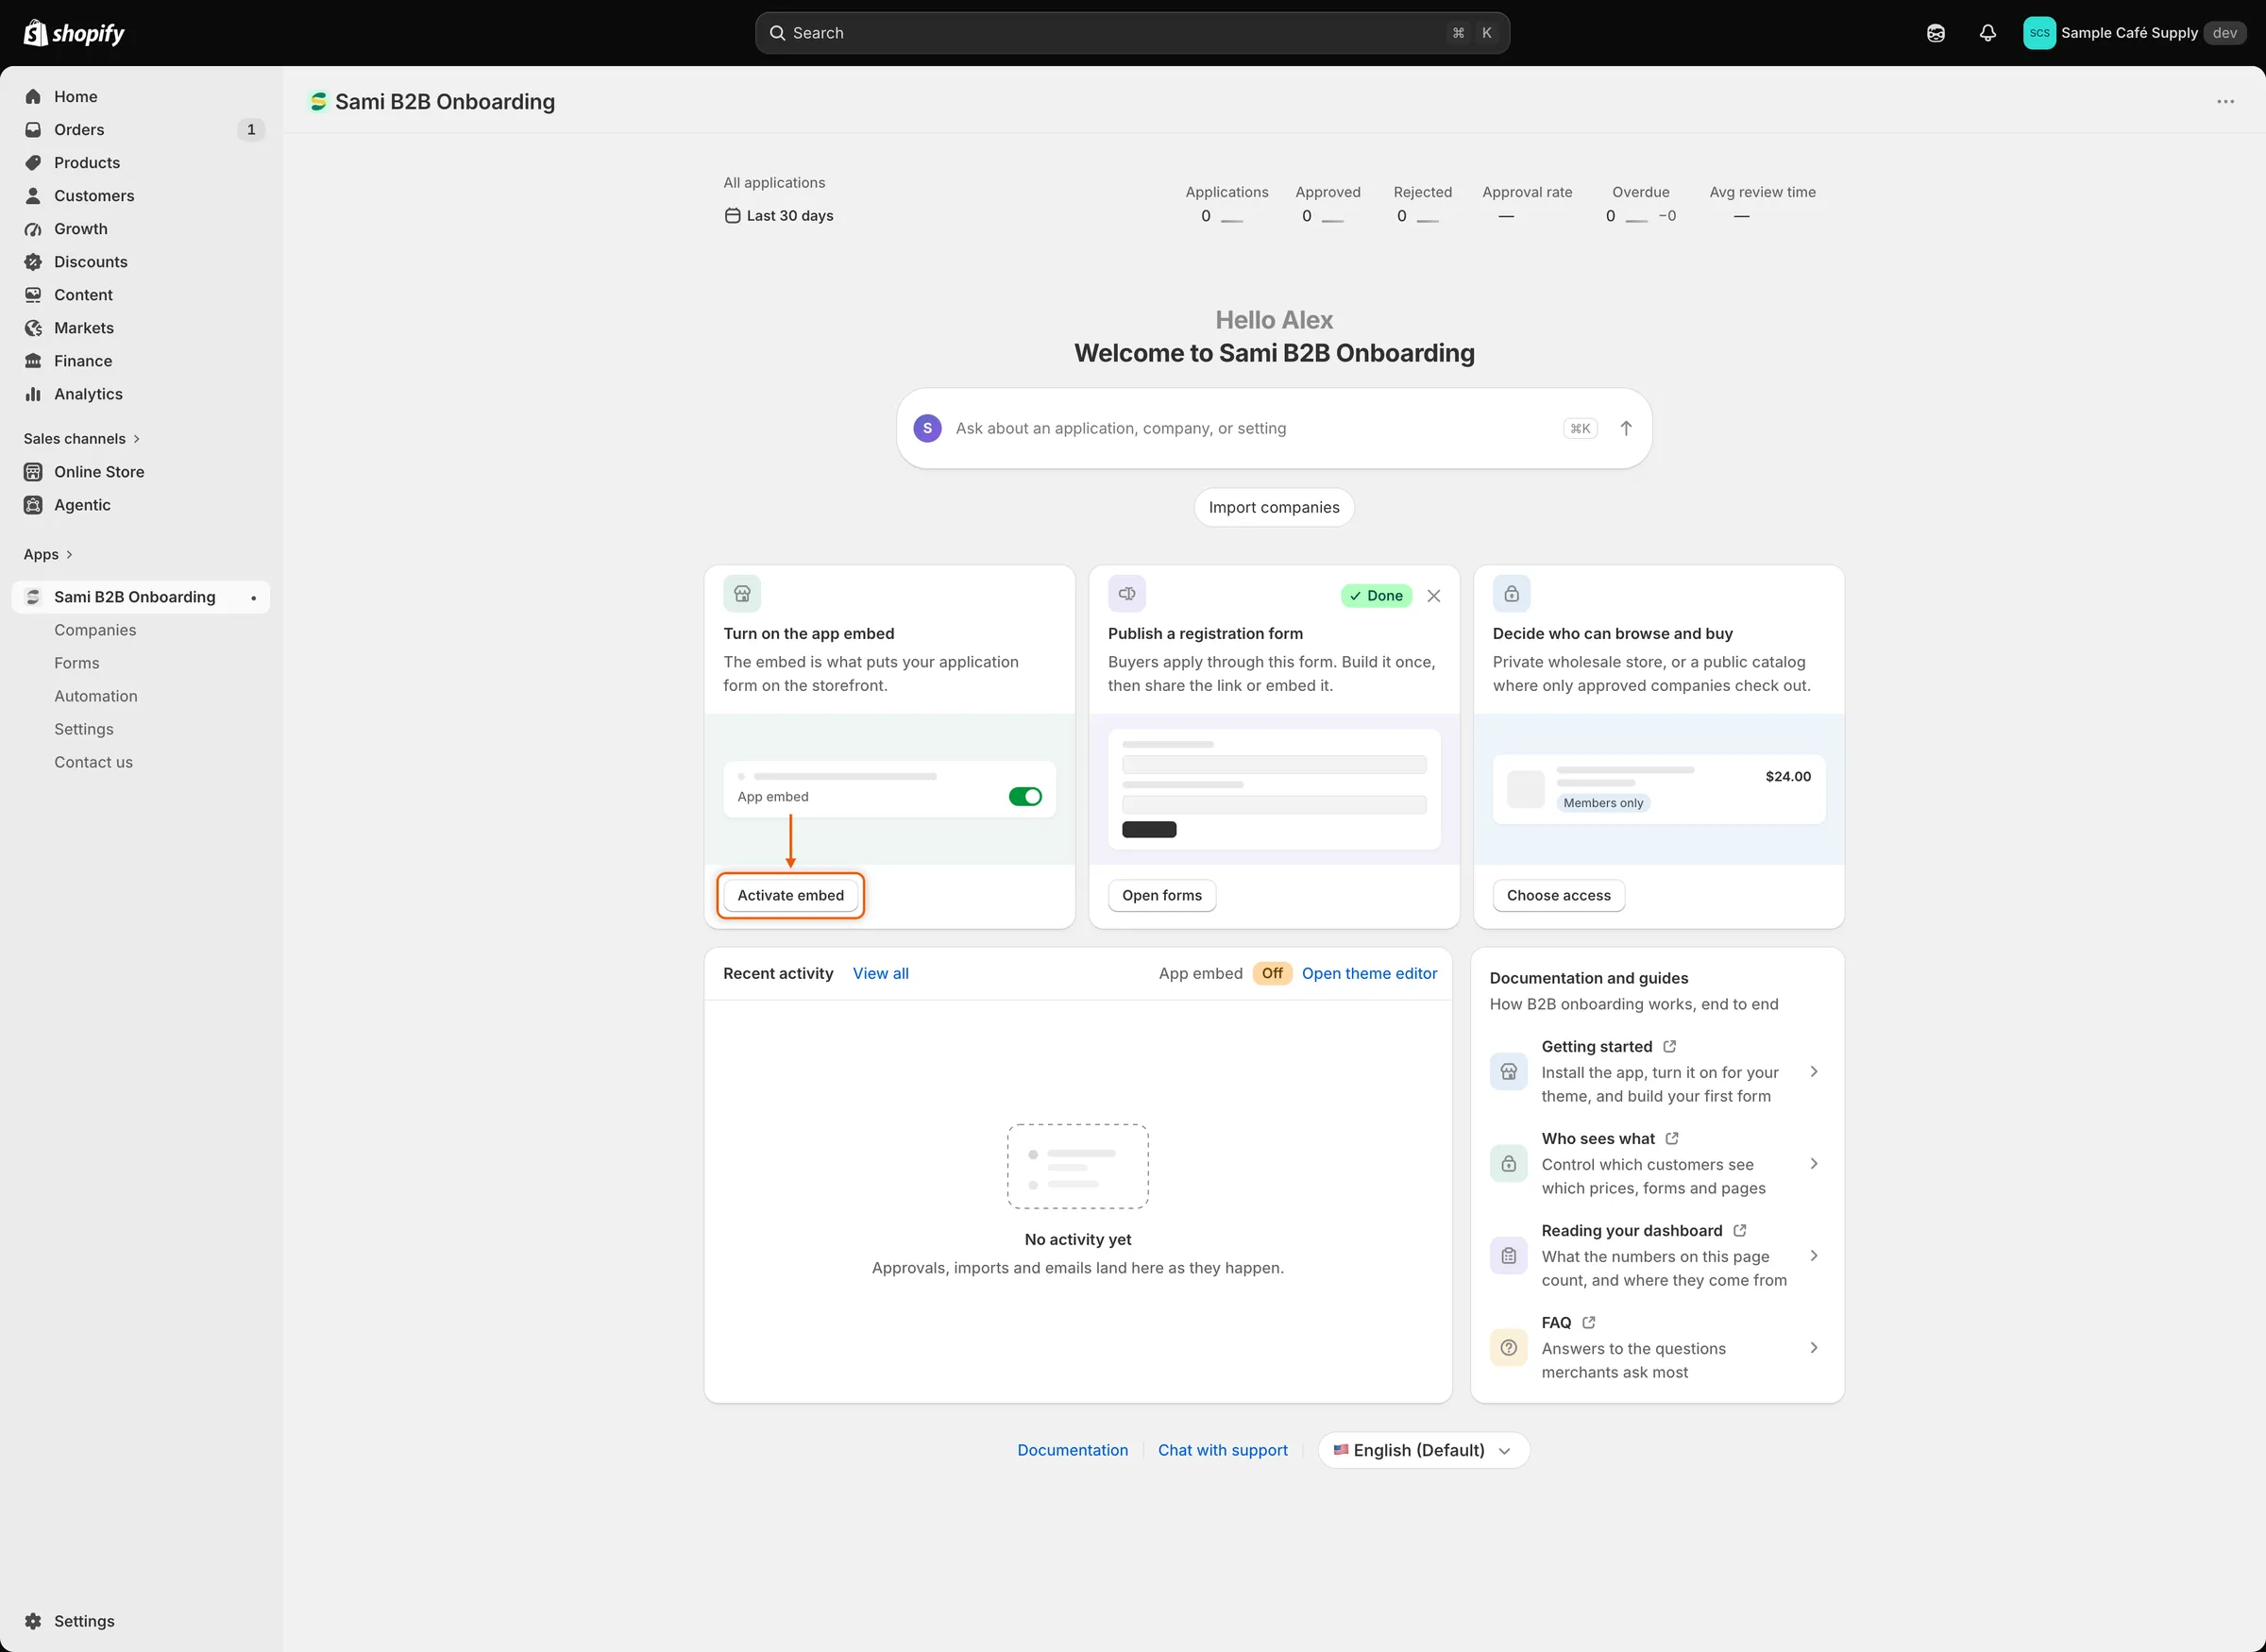
Click Activate embed to open the theme editor with the app embed already switched on.
-
Check your application form
On the Publish a registration form card, click Open forms. You can also click Forms in the app menu.
Under Application forms, you see Wholesale application with the Active and Default badges. The app created this form when you installed it. It’s already published. The app also created a page on your store that shows it. The page’s address appears under the form name, usually
/pages/wholesale-application.The form asks for the company, the contact person, a shipping address and a billing address. Its answers are already mapped to the Shopify customer and company, so you don’t need to change anything for this test.
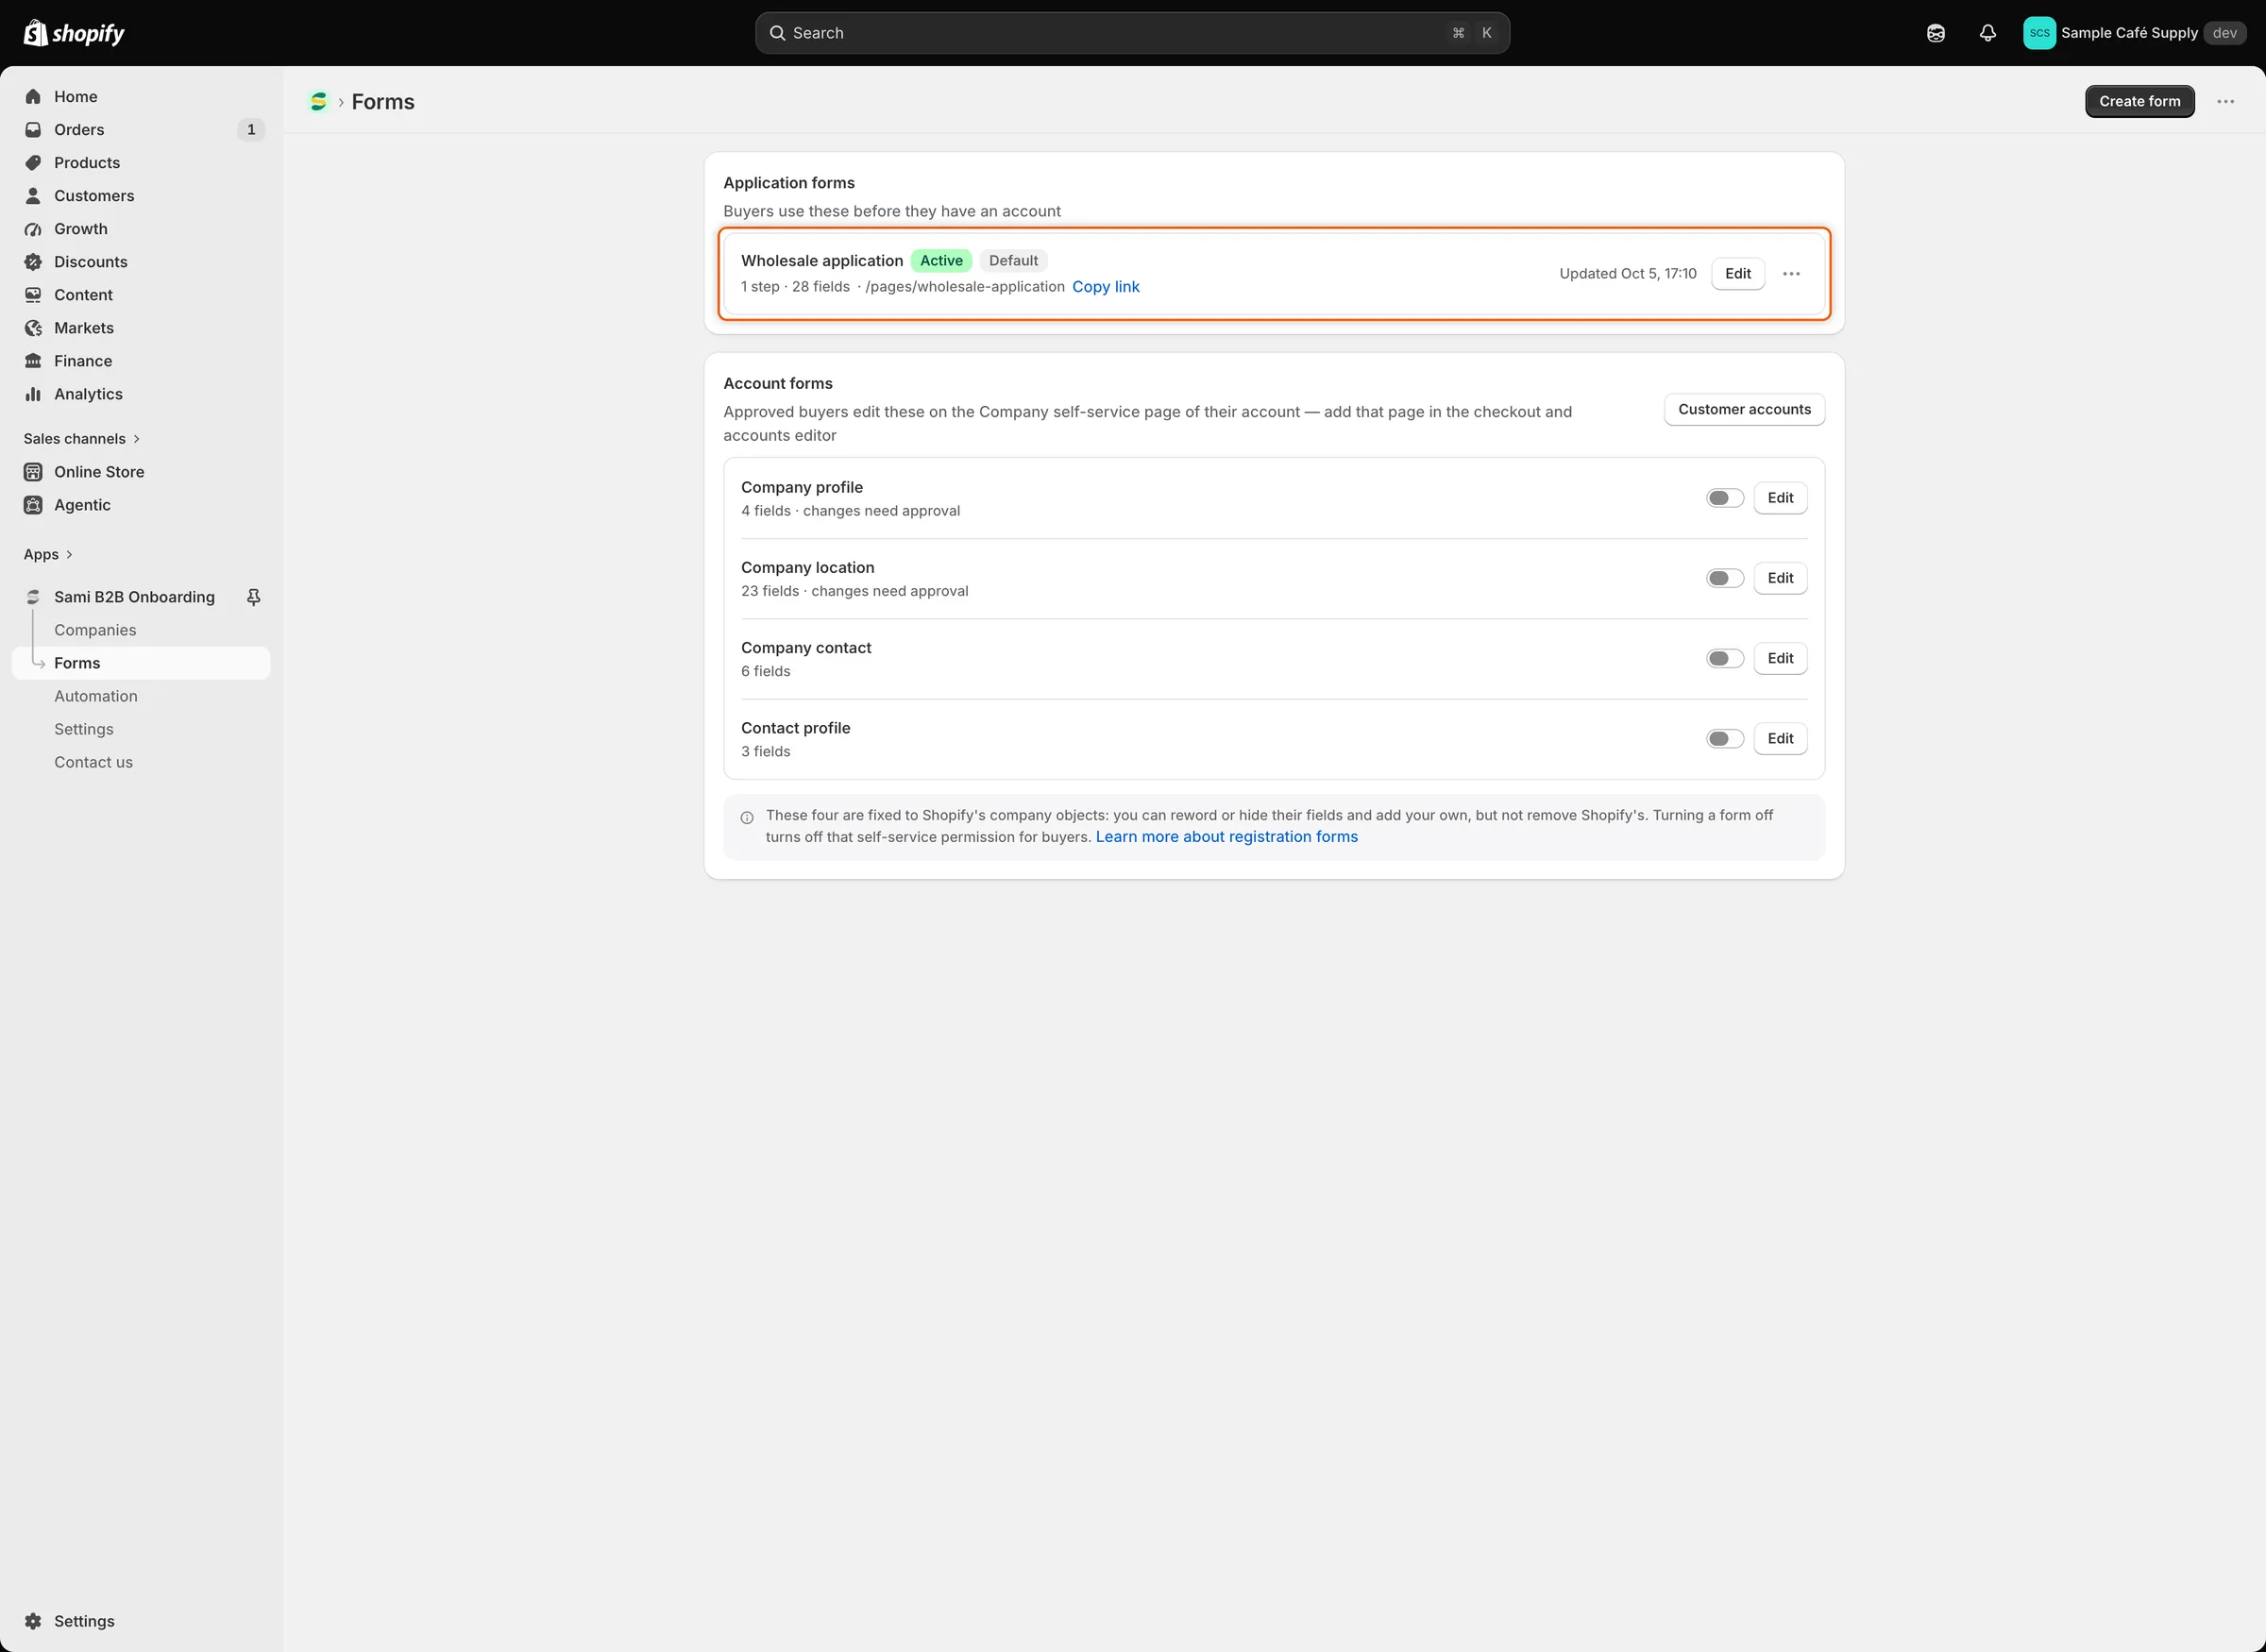
The Wholesale application form is already published, and its page address is listed under its name.
-
Choose who can browse and buy
Go back to Home. On the Decide who can browse and buy card, click Choose access. This opens Settings › Access.
Under Storefront visibility, Who can browse, who can buy starts on Public catalog, private purchasing: everyone can browse, and only approved companies can buy. Keep it for this guide. The three options are:
Option Browse Buy Private wholesale store Approved companies Approved companies Public catalog, private purchasing Everyone Approved companies Public catalog, public purchasing Everyone Everyone - Under Prices and checkout, turn on Hide prices from retail visitors. Block checkout while pending is already on. Keep it on.
- Click Save in the save bar.
The save bar only appears after you change a setting. Nothing changes on your storefront until you save, and that includes the checkout block. After you save, the setup card on Home shows Done.
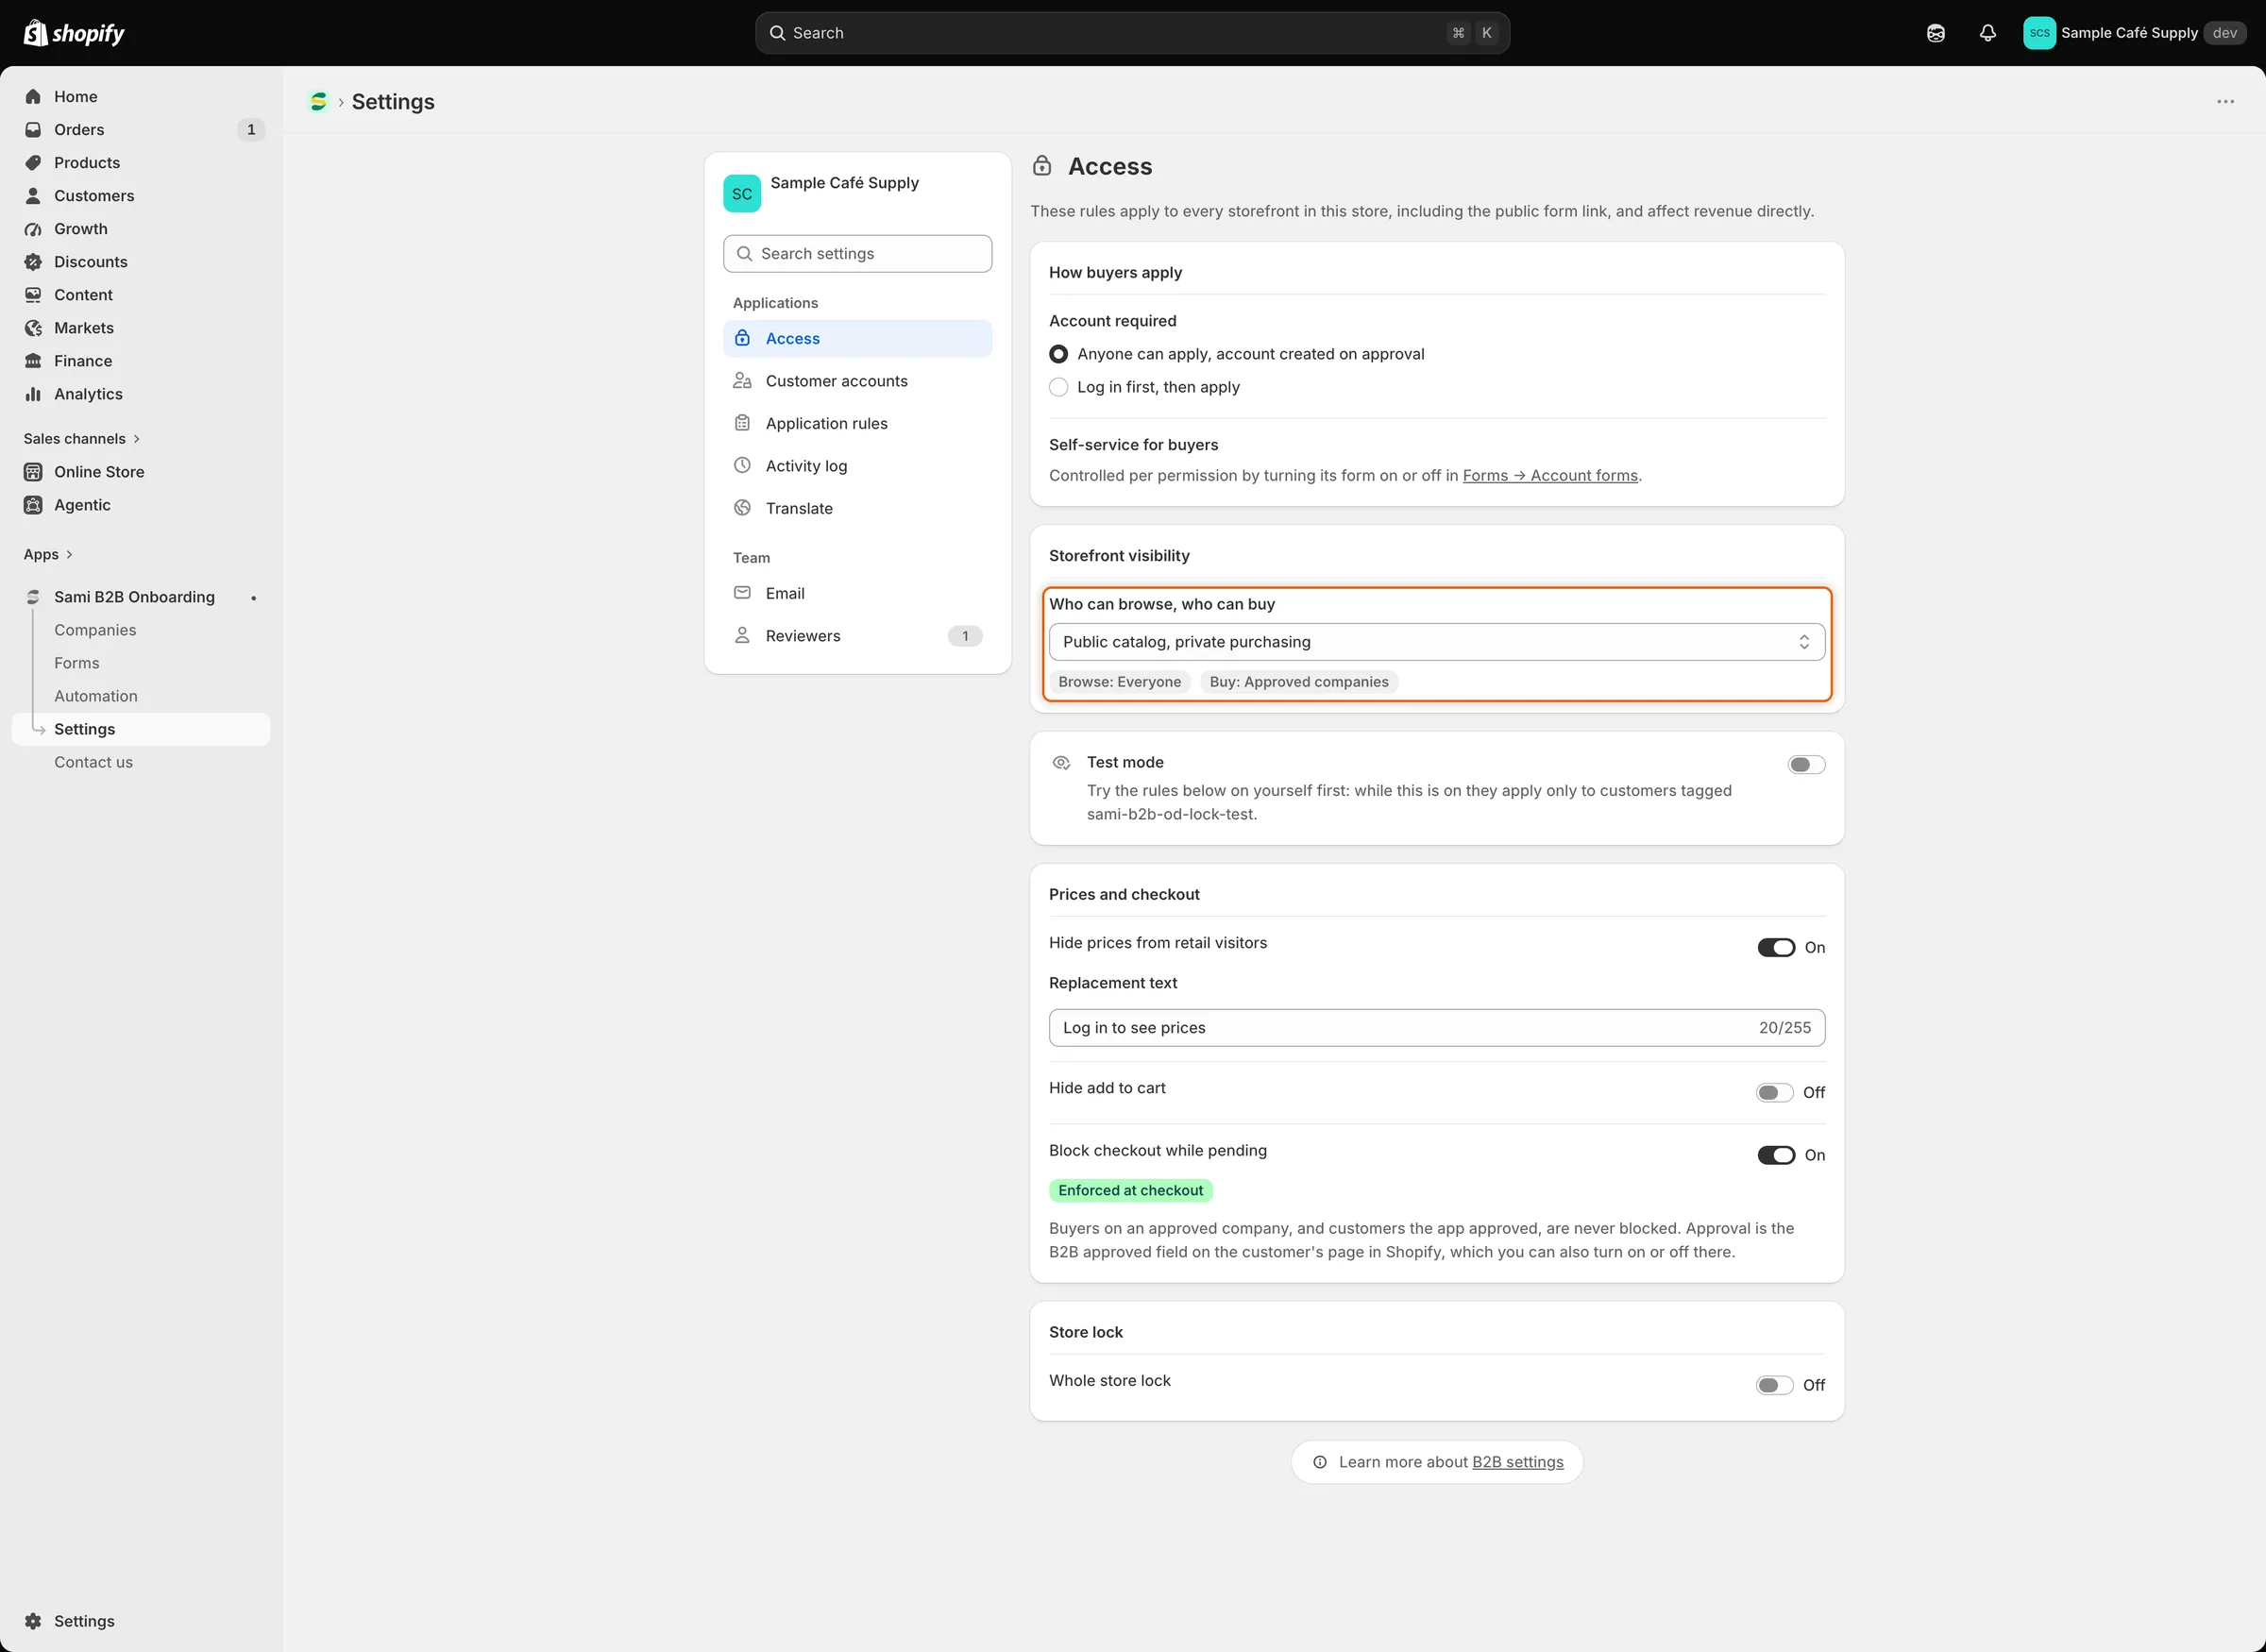
The badges under the select sum up who can browse and who can buy.
-
Submit a test application
- Go to Forms and click Copy link beside Wholesale application.
- Open a private browser window, so you’re not signed in to your store as a customer. Paste the link. If your store has a password page, enter the store password first.
- The form opens under the heading Apply for a wholesale account. Fill it in:
- Company name: Acme Supply Co.
- Tax registration ID: 12-3456789
- First name: Jordan, Last name: Lee
- Email: an address you can open
- Under Shipping address: Address line 1 123 Main Street, City Springfield, ZIP code 62701, Country United States, State Illinois. The address labels follow the country, so with United States picked they read ZIP code and State.
- Under Billing address, tick Same as shipping address.
- Click Submit application.
The form is replaced by a Thank you message. The buyer’s inbox gets We got your application, and the app emails you New B2B application from Acme Supply Co.
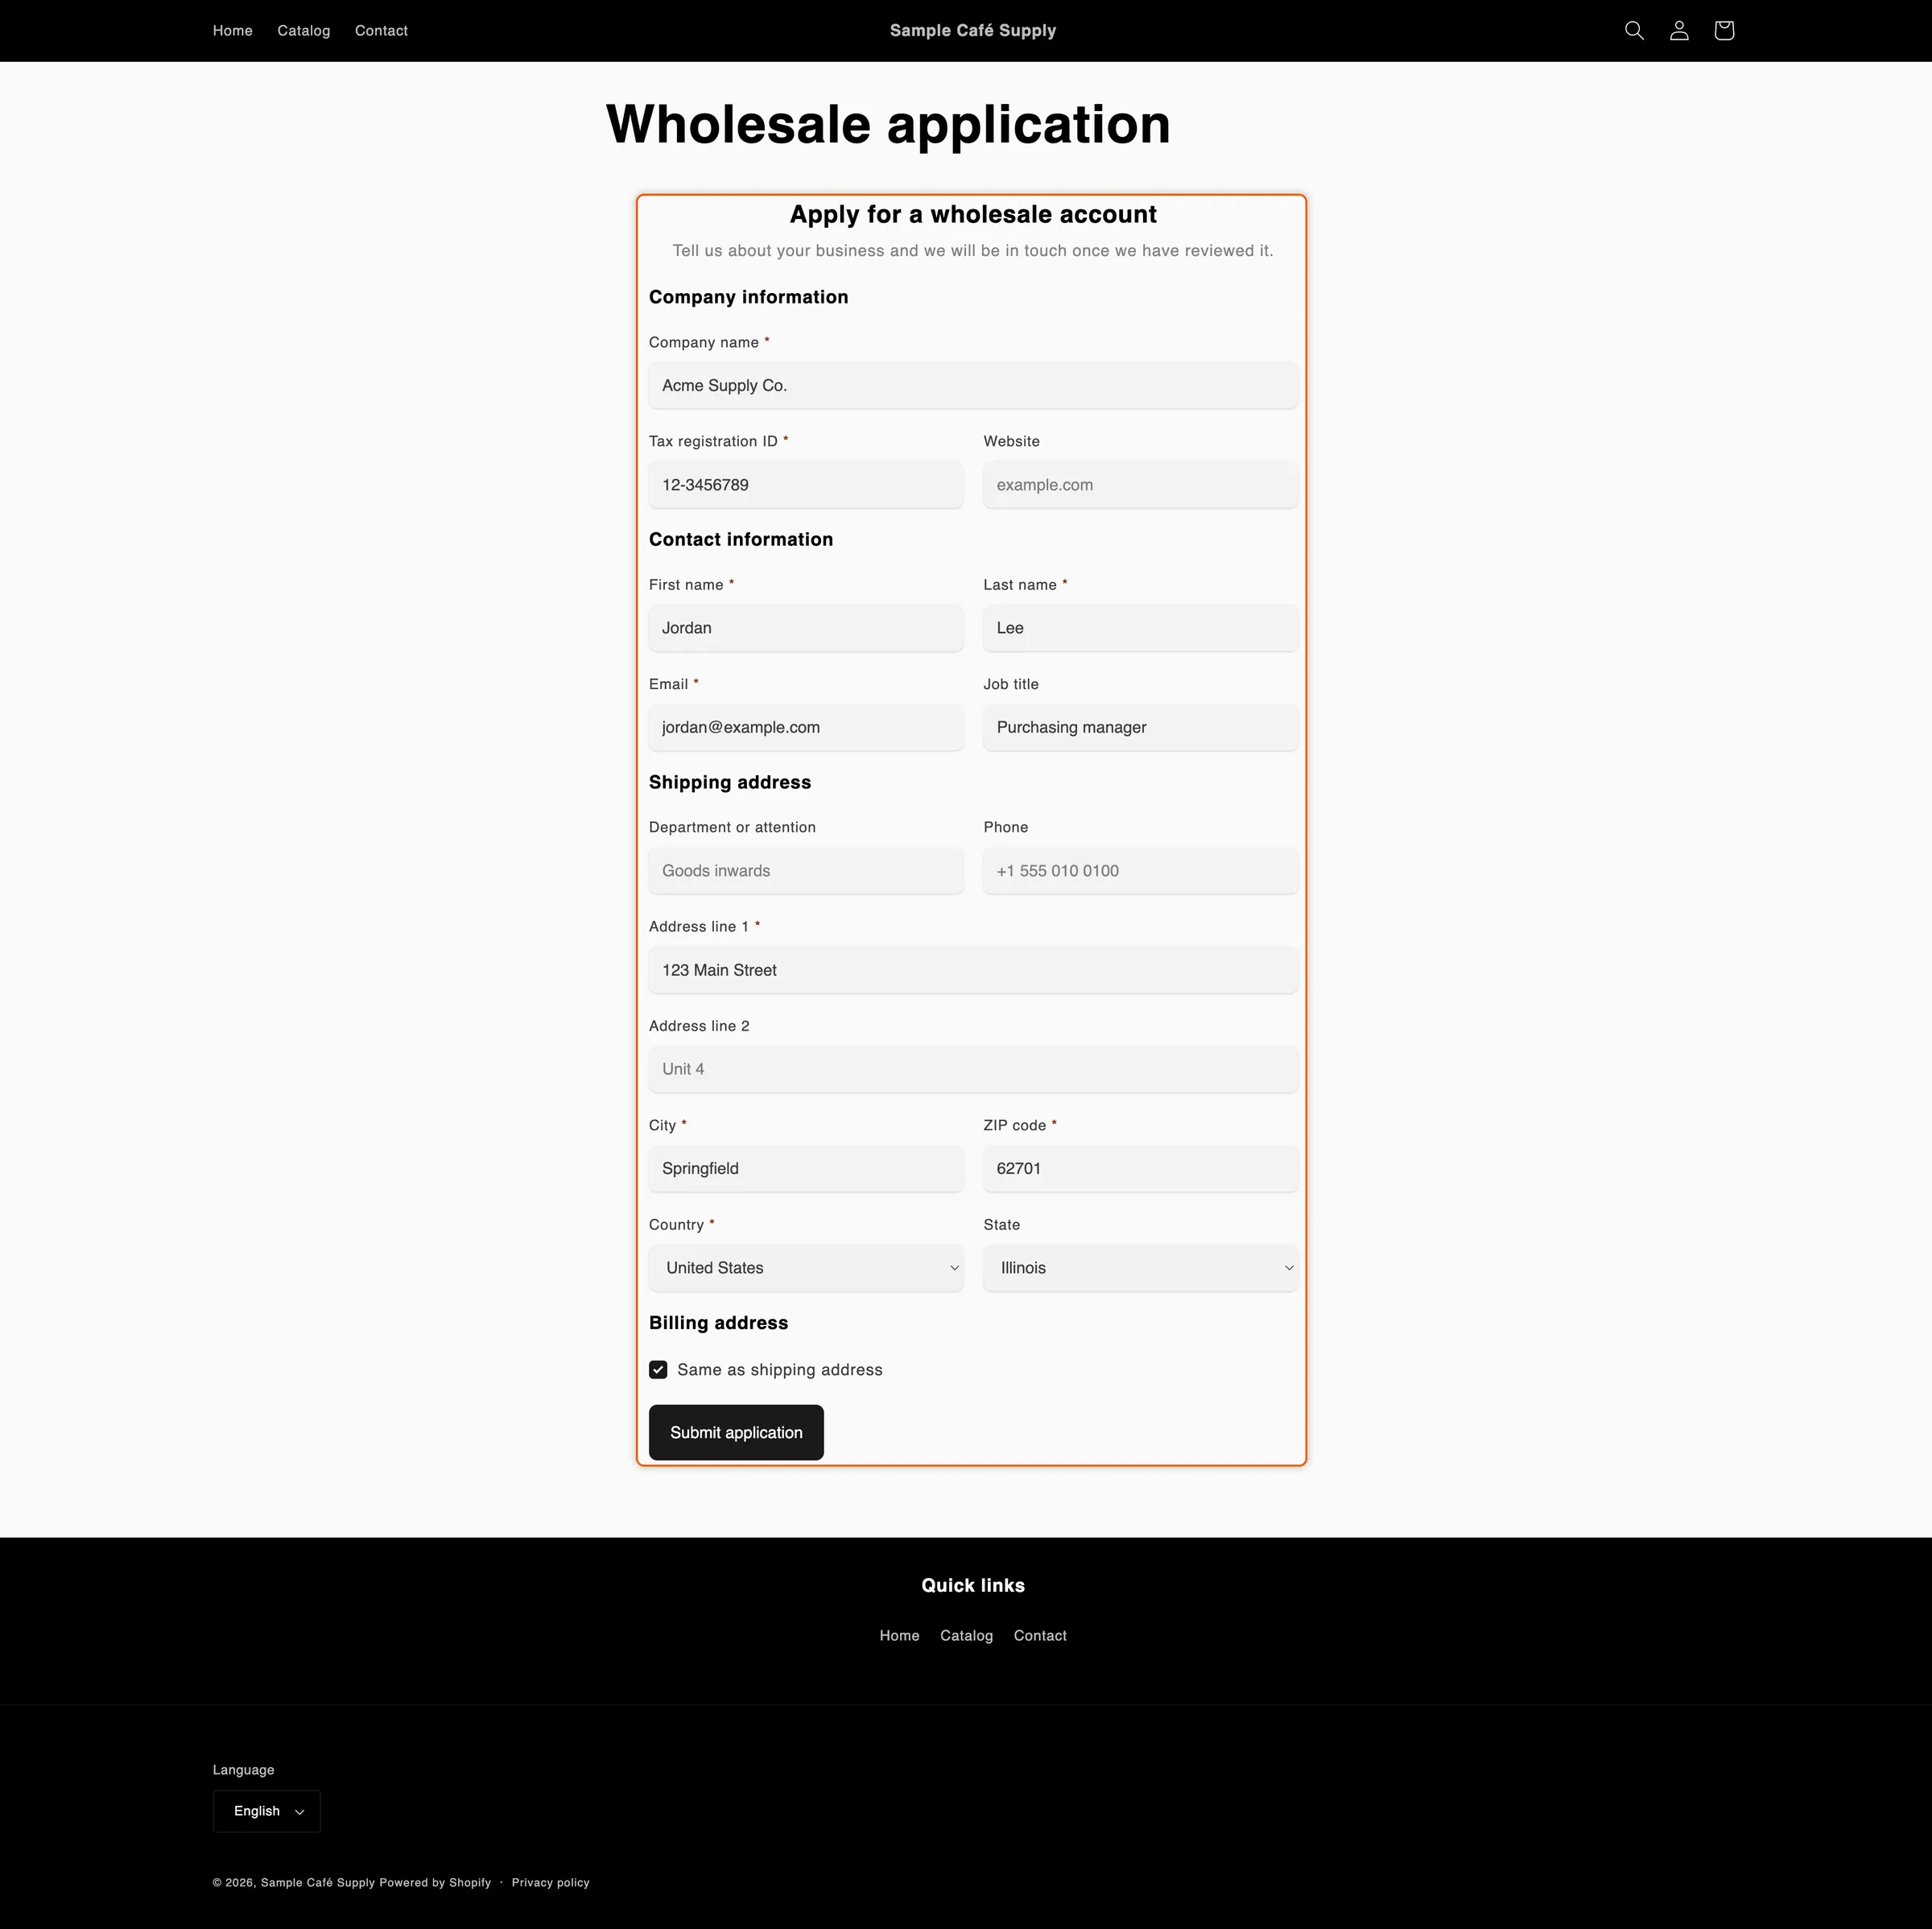
The test application, filled in and ready to submit.
-
Approve the application
- In the app, click Companies. The Applications list shows Acme Supply Co. with the Pending status. To read the answers first, click the company name to open the full application, then come back to the list.
- At the end of its row, click … (More actions), then click Approve.
- The Approve Acme Supply Co. dialog opens. In Apply a preset, pick an approval preset if you have one. A preset holds the terms the company gets, such as its catalog and payment terms. If you don’t have one yet, leave No preset.
- Click Approve application.
The status changes to Approved.
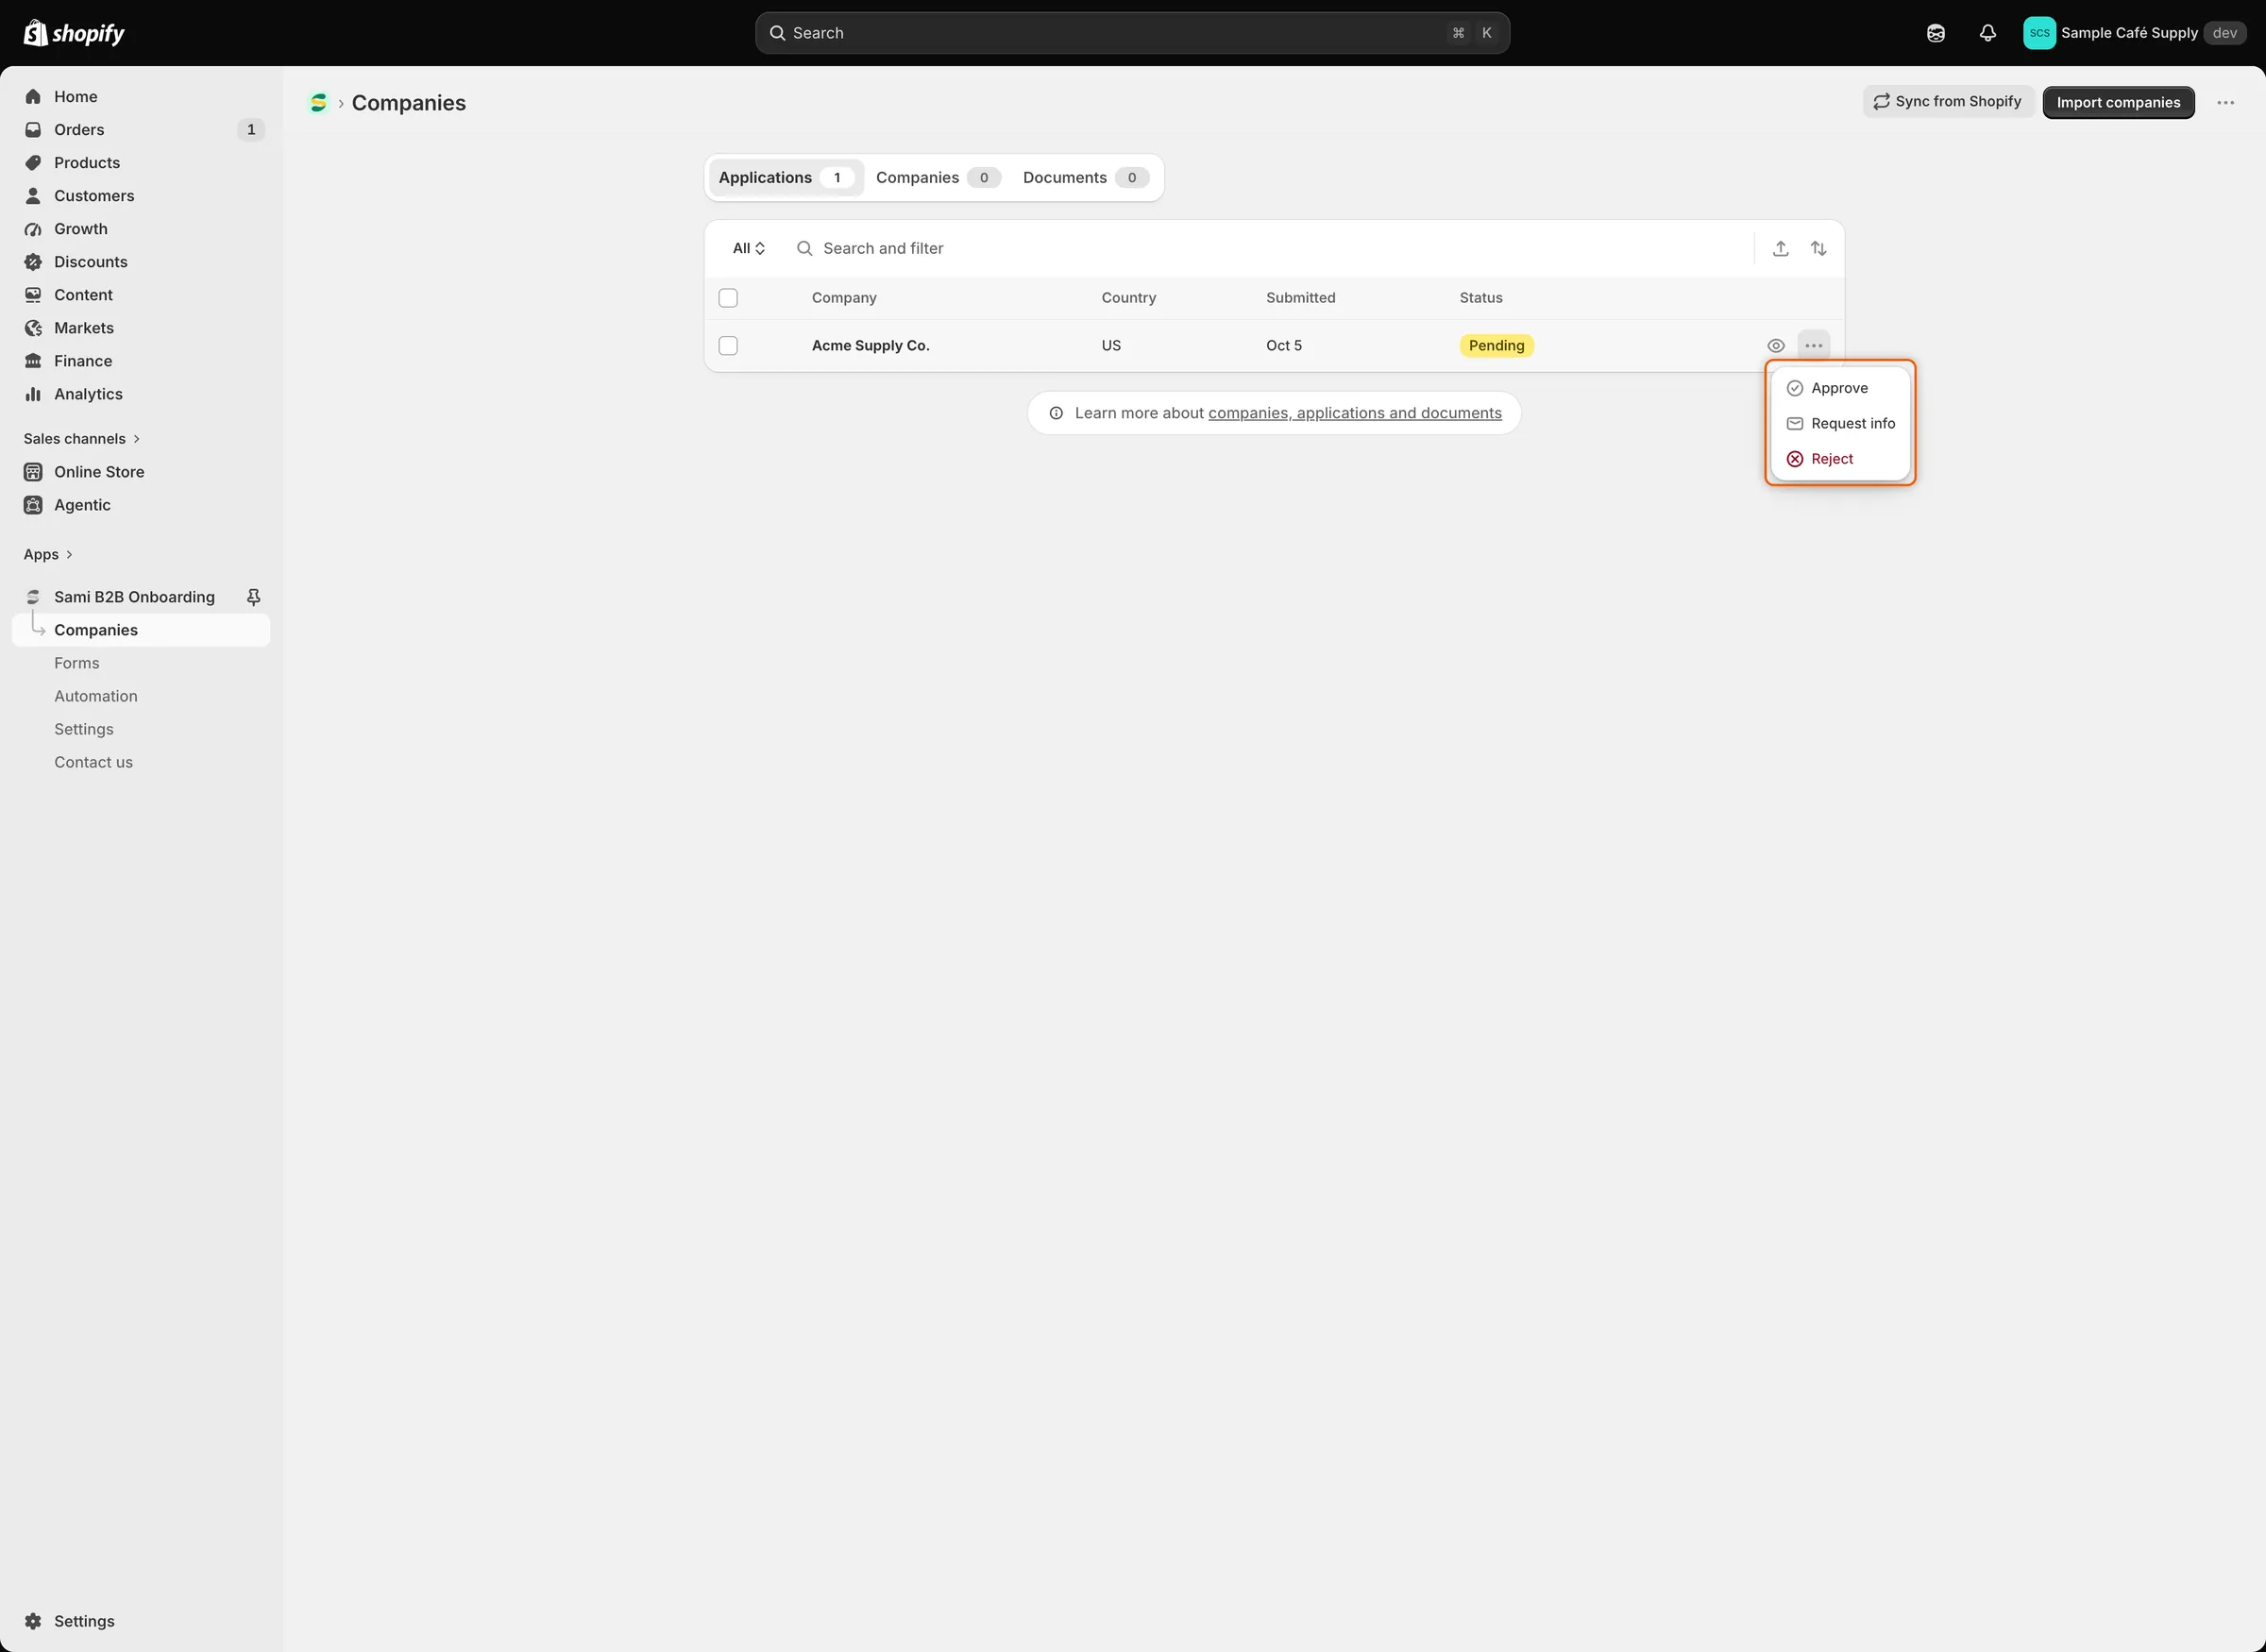
Each row’s … menu holds the three decisions, so you can approve without leaving the list.
-
See the result
Shortly after you approve, you can see the result in three places.
- In Shopify. Go to Customers › Companies in Shopify admin. Acme Supply Co. is listed. Open it: Jordan Lee is under Customers, and the company has a location named Acme Supply Co. at 123 Main Street. On Jordan Lee’s customer page, B2B approved is set.
- In the inbox. The buyer gets Your business account is live, with a Start shopping wholesale button.
- On your storefront. In the private window, sign in to your store’s customer account with the buyer’s email. With Shopify’s customer accounts, the buyer gets a one-time sign-in code by email. Once signed in, the buyer sees prices and can check out. A visitor who isn’t signed in can browse, but sees Log in to see prices instead of prices, and checkout stops them with a message that their account is still being reviewed. If you turned on Test mode, these limits apply only to customers with the test tag.
On Home, Recent activity now lists the latest events for Acme Supply Co., such as the approval and the emails sent. For the full history, open Settings › Activity log.
If your Shopify plan doesn’t include B2B, Shopify doesn’t create the company. The customer is still created and marked B2B approved, and the company stays in the app’s Companies list.
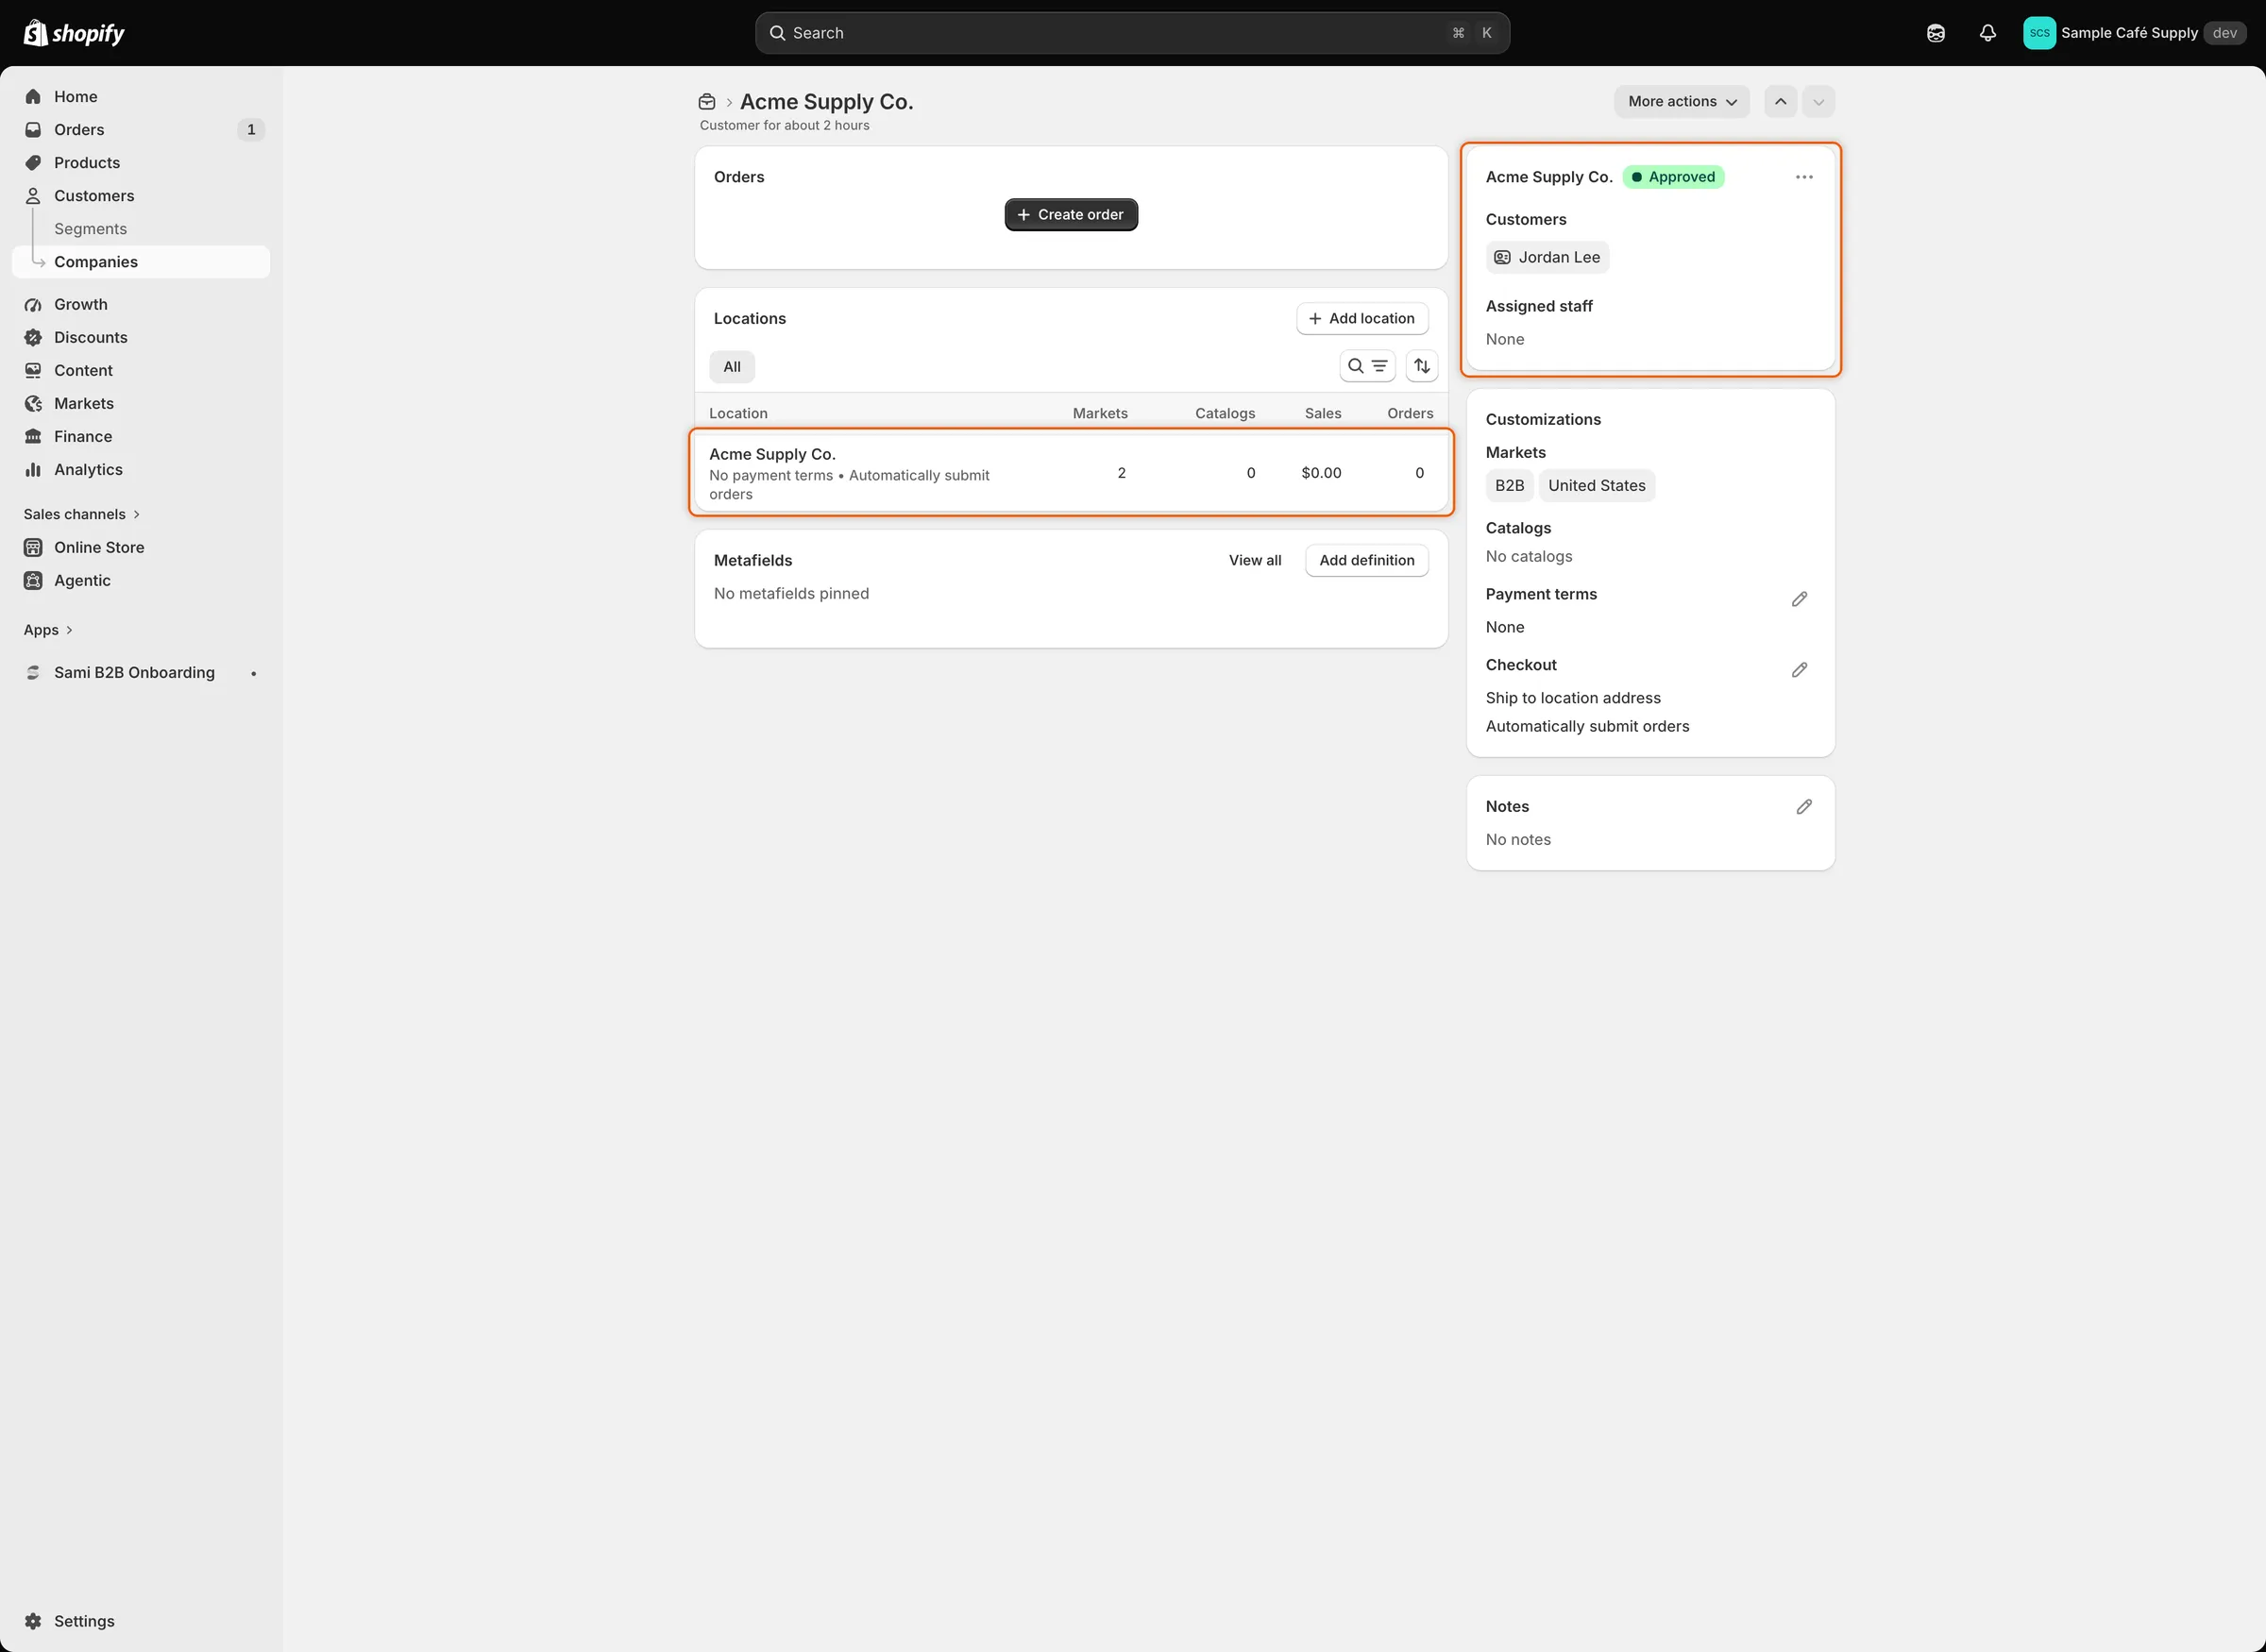
Approval created the company in Shopify, with the buyer listed under Customers and a location for the company.
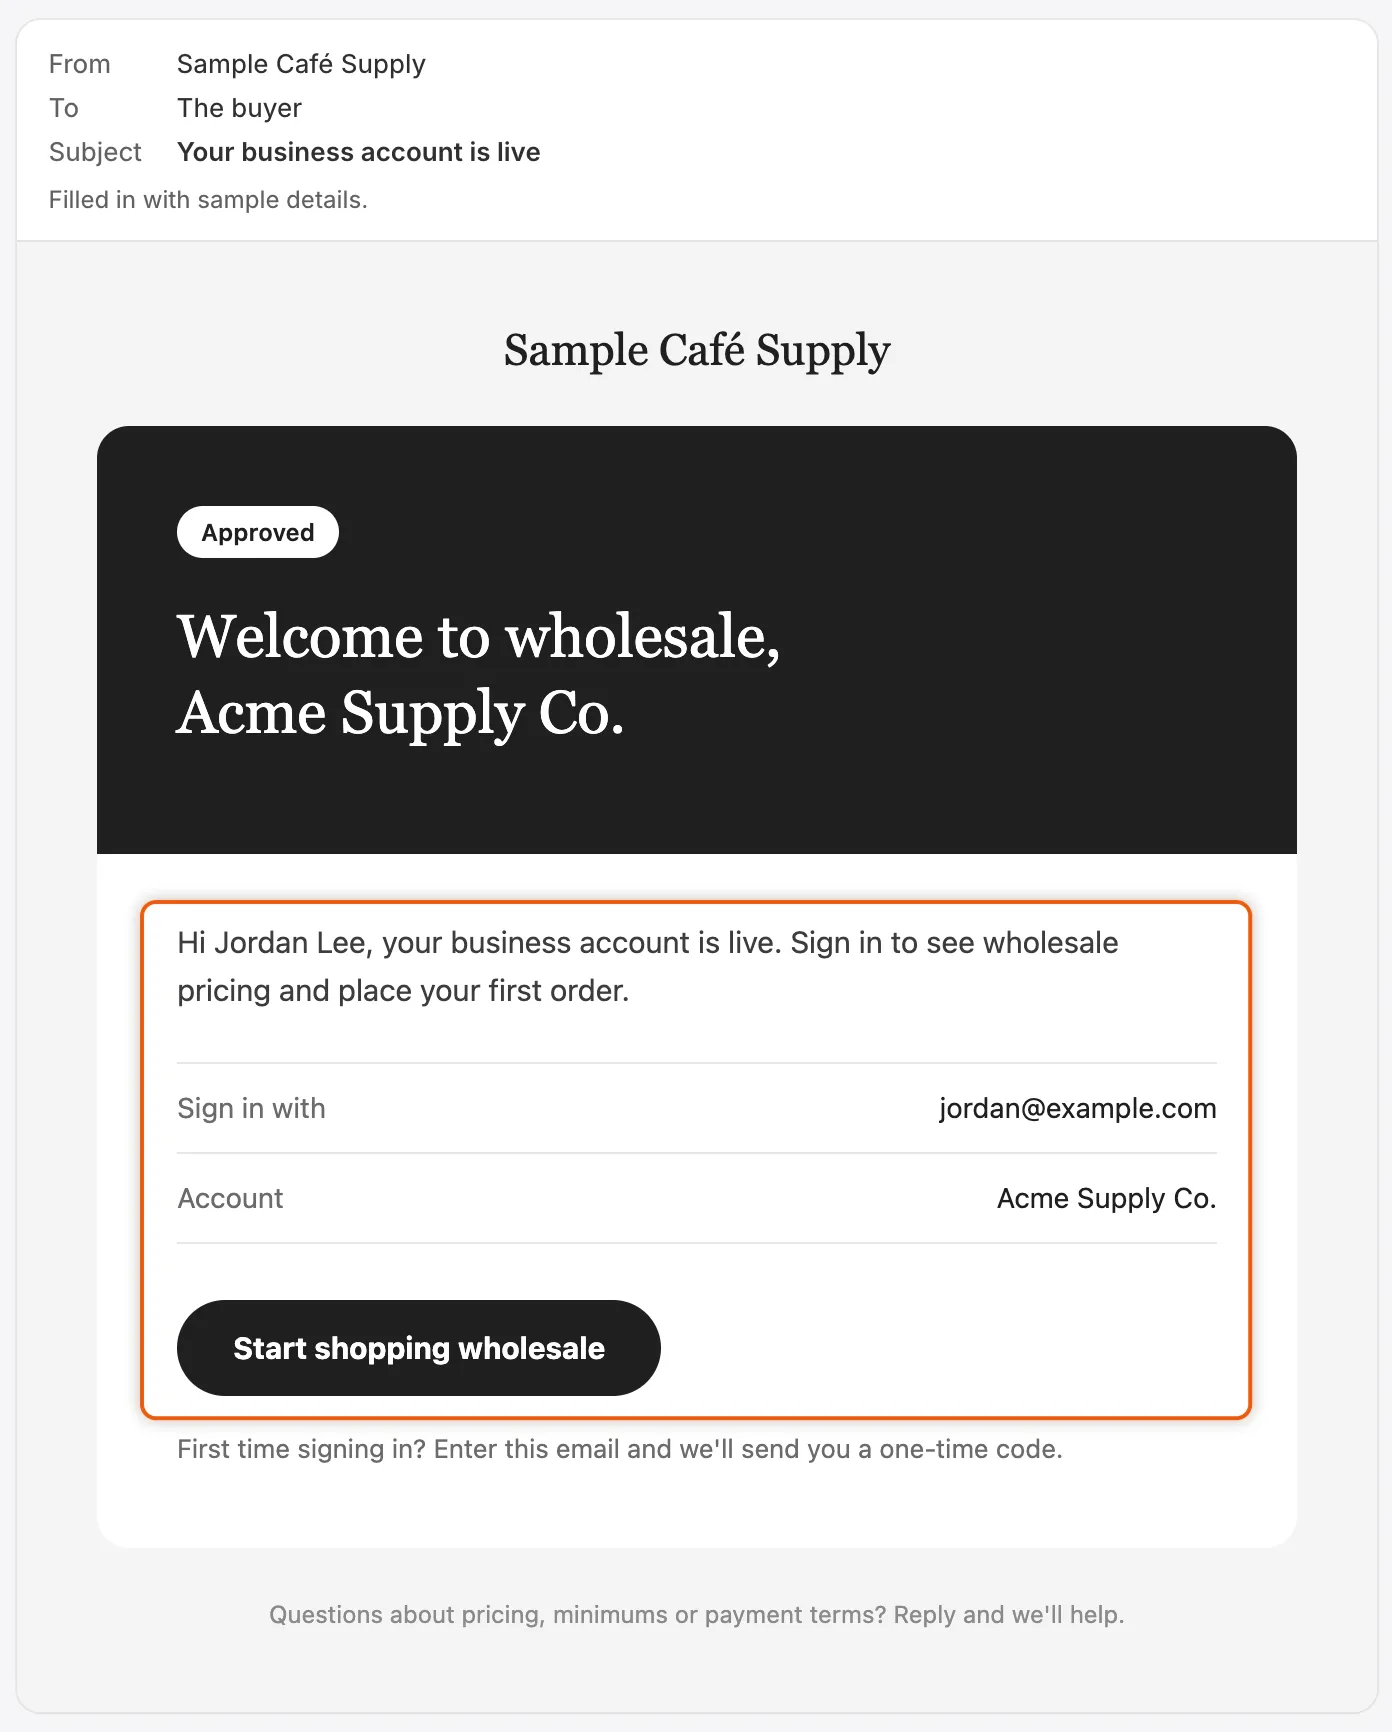
The buyer learns their account is live and how to sign in.
Next steps
Section titled “Next steps”- Build your form — change the questions the form asks.
- Approval presets — save the catalog, payment terms and tax settings that approval applies.
- Store access — hide prices, lock the store or block checkout.
- Your Home page — read the numbers and find the work waiting for you.